Final Cut Pro User Guide for Mac
- Welcome
- What’s new
-
- Intro to effects
-
- Intro to transitions
- How transitions are created
- Add transitions and fades
- Quickly add a transition with a keyboard shortcut
- Set the default duration for transitions
- Delete transitions
- Adjust transitions in the timeline
- Adjust transitions in the inspector and viewer
- Merge jump cuts with the Flow transition
- Adjust transitions with multiple images
- Modify transitions in Motion
-
- Add storylines
- Use the precision editor
- Conform frame sizes and rates
- Use XML to transfer projects
- Glossary
- Copyright

Distress controls in Final Cut Pro for Mac
Use the Distress controls, in the Material section of the 3D Text section of the Text inspector, to create the effect of wear or degradation on the surface of the 3D title.

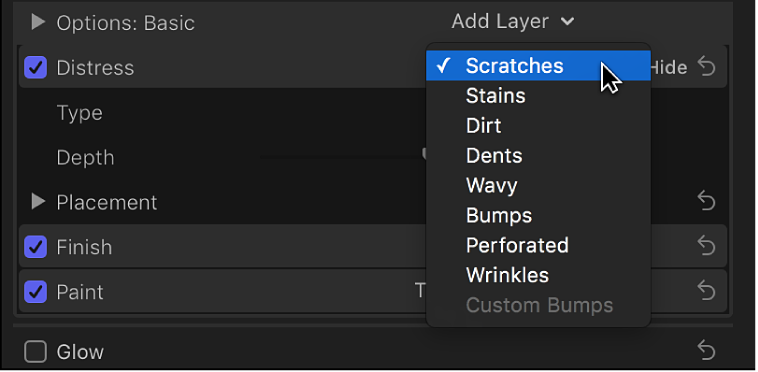
Depending on the option you choose in the Distress pop-up menu, different parameter controls become available.
Distress: A pop-up to choose a distress type: Scratches, Stains, Dirt, Dents, Wavy, Bumps, Perforated, Wrinkles, or Custom Bumps.

When Distress is set to Scratches
Type: A pop-up menu to choose a scratch pattern.
Depth: A slider to adjust the apparent depth of the scratches.
Placement: A group of controls (available when you click the disclosure triangle) to set how the scratch pattern is applied to the text object. See Placement controls in Final Cut Pro for Mac.
When Distress is set to Stains
Type: A pop-up menu to choose a stain pattern.
Opacity: A slider to adjust the transparency of the stain pattern.
Placement: A group of controls (available when you click the disclosure triangle) to set how the stain pattern is applied to the text object. See Placement controls in Final Cut Pro for Mac.
When Distress is set to Dirt
Type: A pop-up menu to choose a dirt pattern.
Opacity: A slider to adjust the transparency of the dirt pattern.
Placement: A group of controls (available when you click the disclosure triangle) to set how the dirt pattern is applied to the text object. See Placement controls in Final Cut Pro for Mac.
When Distress is set to Dents
Type: A pop-up menu to choose a dent pattern.
Depth: A slider to adjust the apparent depth of the dents in the 3D title.
Placement: A group of controls (available when you click the disclosure triangle) to set how the dent pattern is applied to the text object. See Placement controls in Final Cut Pro for Mac.
When Distress is set to Wavy
Depth: A slider to adjust the apparent depth of the wave pattern.
Placement: A group of controls (available when you click the disclosure triangle) to set how the wave pattern is applied to the text object. See Placement controls in Final Cut Pro for Mac.
When Distress is set to Bumps
Type: A pop-up menu to choose a bump pattern.
Depth: A slider to adjust the apparent depth of the bump pattern.
Placement: A group of controls (available when you click the disclosure triangle) to set how the bump pattern is applied to the text object. See Placement controls in Final Cut Pro for Mac.
When Distress is set to Perforated
Type: A pop-up menu to choose a perforation pattern.
Depth: A slider to adjust the apparent depth of the perforation pattern.
Placement: A group of controls (available when you click the disclosure triangle) to set how the perforation pattern is applied to the text object. See Placement controls in Final Cut Pro for Mac.
When Distress is set to Wrinkles
Type: A pop-up menu to choose a wrinkle pattern.
Depth: A slider to adjust the apparent depth of the wrinkles.
Placement: A group of controls (available when you click the disclosure triangle) to set how the wrinkle pattern is applied to the text object. See Placement controls in Final Cut Pro for Mac.
When Distress is set to Custom Bumps
Note: The Custom Bumps distress type is available in a limited set of preset materials that use a built-in image as a bump map. For example, the Scales preset in the Miscellaneous category uses the Custom Bumps distress type. For details about custom bump maps, see the Motion User Guide.
Bump Map Gain: A slider to increase or decrease the contrast of the bump map image, giving the effect of larger or smaller bumps.
Blend Mode: A pop-up menu to choose how multiple bump layers interact with each other. Choose one of two options:
Add: Uses a mathematical add operation, allowing the lighter areas of each layer to shine through.
Replace: Overrides the bump attributes of underlying layers.
Download this guide: PDF