
Use Arpeggiator MIDI plug-in Grid mode in MainStage
The grid consists of 16 steps. Each step controls the step velocity as well as its length, rest, tie, and chord status. In addition, a cycle length can be set. The current grid pattern is automatically saved with the project or concert. You can also save and load your own or supplied grid patterns. The Arpeggiator plug-in assigns incremental position identification numbers to each note in the order they were received, regardless of the initially selected note order preset. These position identification numbers are used to “lock” an event, such as a note, a rest, or a tie to a particular step.
Grid mode parameters
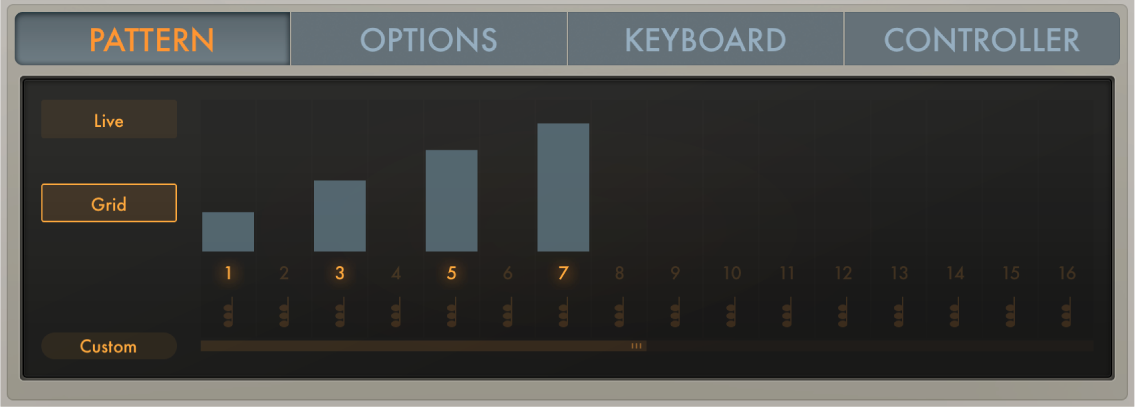
Step on/off buttons: Turn each of the 16 available steps on or off.
If a step is turned on: An arpeggiator note is played at the respective grid position.
If a step is turned off: The grid position is silent and is perceived as a rest.
Note: To ensure the integrity of the arpeggio, the note that would have been played—if the step had been active—is moved to the next active grid position.
Velocity/length bars: Drag vertically to set the velocity for each active step. Drag left to reduce step length. Drag right to increase step length or to create a tie to the next step.
Where multiple velocity/length bars exist, click above them to draw in the velocity of several steps.
Drag a velocity/length bar toward the left to reduce the step length. Dragging to the right increases the step length. This enables you to create different arpeggiator grooves. Dragging snaps to fixed positions at 25%, 50%, 75%, or 100% of the step length. Hold down Shift, then drag to set the step length freely. Changes are reflected immediately in the Grid display by a shaded bar that indicates the step length.
Drag a velocity/length bar toward the right until it overlaps the next step to create a tie to that step. If the step to the right is a rest (an inactive step), this step is automatically turned on to create the tie. A step can be tied to multiple steps in a row. The original velocity values of tied steps are replaced by the velocity of the first step they are tied to, indicated graphically by the velocity bar extending over all tied steps. Changes are reflected immediately in the Grid display by a shaded bar that indicates the tie length.
Note: Within an arpeggio, ties are perceived as a rhythmic element rather than a melodic variation. As a consequence, the tied note may change if notes are added after the tie has been entered, or if you choose a different note order preset.
Chord on/off buttons: Turn on Chord mode for the respective step. When the Arpeggiator encounters a chord step, it simultaneously plays all notes currently in (latched or held) memory on that step. If a chord step is tied to a non-chord step, Chord mode is automatically activated for that step. If a non-chord step is tied to a chord step, Chord mode is automatically turned off for that step. Moving the velocity bar on a chord step changes the overall level of the chord, while retaining relative velocity differences between notes in the chord.
Cycle length bar: Drag the handle at the end of the bar to change the grid length. The currently playing step is indicated by a light running inside the Cycle length bar.
Note: The grid length set with the Cycle length bar is independent of the Arpeggio cycle length parameter (which sets the length of the arpeggiated note pattern) described in options parameters. The grid length cycles independently of the effective note pattern. This prevents disruptions to the perceived rhythmic pattern created by the grid that can be caused by a change to the arpeggio length.
Scroll bar: Drag to move to steps that aren’t visible in the Grid display.
Pattern pop-up menu: Choose a menu item to save or load user grid patterns or to load a supplied grid pattern.
Save Pattern as: Opens a name field. Enter a name, then click the Save button to save your pattern. Click Cancel to exit the “Save Pattern as” name field.
User patterns are shown in the Pattern pop-up menu.
Note: Supplied grid patterns cannot be overwritten. If you attempt to do so, a “Save Pattern as” name field appears.
Recall Default: Deletes all current data and reverts to a “from scratch” state.
Delete User Pattern: Deletes the current user pattern.
Custom: This menu item is shown automatically when any pattern changes have been made. It can be considered the “current state” pattern preset.
Previous/Next Pattern button: Choose the previous or next pattern preset.