Final Cut Pro X User Guide
- Welcome
-
- What’s new in Final Cut Pro 10.4.9
- What’s new in Final Cut Pro 10.4.7
- What’s new in Final Cut Pro 10.4.6
- What’s new in Final Cut Pro 10.4.4
- What’s new in Final Cut Pro 10.4.1
- What’s new in Final Cut Pro 10.4
- What’s new in Final Cut Pro 10.3
- What’s new in Final Cut Pro 10.2
- What’s new in Final Cut Pro 10.1.2
- What’s new in Final Cut Pro 10.1
- What’s new in Final Cut Pro 10.0.6
- What’s new in Final Cut Pro 10.0.3
- What’s new in Final Cut Pro 10.0.1
-
- Intro to effects
-
- Intro to transitions
- How transitions are created
- Add transitions
- Set the default transition
- Delete transitions
- Adjust transitions in the timeline
- Adjust transitions in the inspector and viewer
- Merge jump cuts with the Flow transition
- Adjust transitions with multiple images
- Modify transitions in Motion
-
- Add storylines
- Use the precision editor
- Conform frame sizes and rates
- Use XML to transfer projects
-
-
- Intro to media management
-
- View a clip’s information
- Override a clip’s metadata
- Locate source media files
- Relink clips to media files
- Consolidate projects and libraries
- Back up projects and libraries
- Create optimized and proxy files
- Create a proxy-only project
- Manage render files
- View background tasks
- Convert incompatible media
- Create camera archives
- Glossary
- Copyright

Create variable speed effects in Final Cut Pro
In addition to constant speed changes, you can create variable speed effects in which the playback speed of a clip changes dynamically. For example, a clip might start in slow motion, speed up to fast motion, and then slow back down to regular speed. You create variable speed changes by identifying ranges of a clip as speed segments—sections in a clip that have different playback speeds. Each speed segment has its own constant speed setting. You can set speed segments to any speed value, forward or backward, and you can create abrupt shifts between speed segments, or gradual transitions (also called ramps).
Note: You can’t create smooth transitions between a speed segment set to a forward speed and a speed segment set to reverse speed (and vice versa).
Apply a preset variable speed change
You can apply preset variable speed effects that break your clip into multiple speed segments automatically.
In the Final Cut Pro timeline, select either a range within a clip or a whole clip to which you want to apply a speed ramp effect.
Do one of the following:
Ramp the speed down: Click the Retime pop-up menu below the viewer and choose Speed Ramp > to 0%.

Ramp the speed up: Click the Retime pop-up menu and choose Speed Ramp > from 0%.
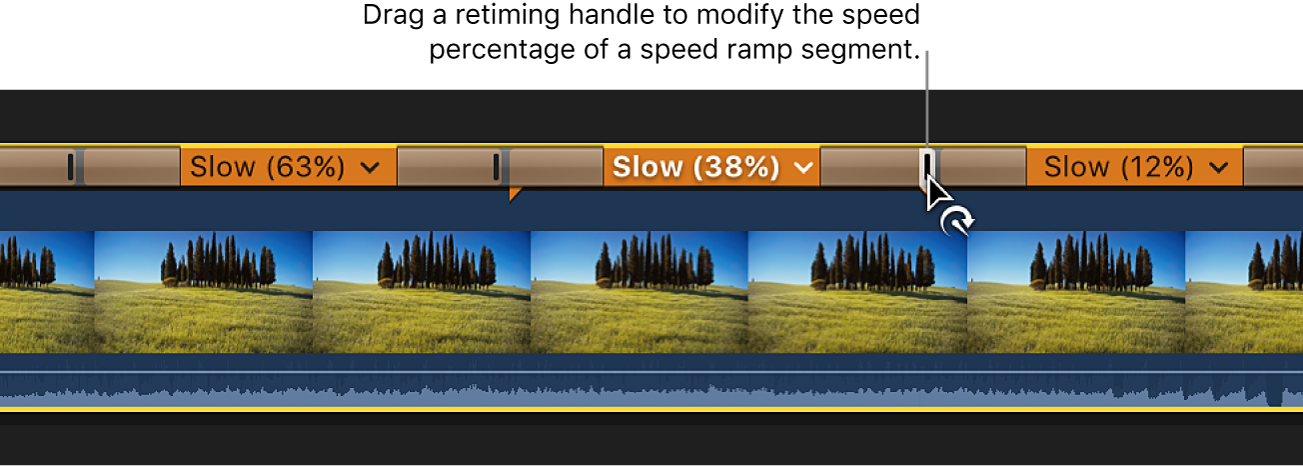
The selection is segmented into four parts with different speed percentages, creating the ramp effect. To adjust the speed of any segment, drag its retiming handle.

You can modify the transitions between segments to control how fast each segment transitions to the next. See Add speed transitions in Final Cut Pro.
Change the end frame of a speed segment
You can change the end frame of a speed segment in the timeline.
When you drag the retiming handle of a speed segment, you’re adjusting the speed of the segment, not trimming it. The Source Frame Edit button allows you to trim the end point (end frame) of a segment.
In the Final Cut Pro timeline, select a clip that has speed segments.
Click the Retime pop-up menu below the viewer and choose Show Retime Editor (or press Command-R).

In the retime editor in the timeline, double-click the transition between two speed segments.
In the Speed Transition window, click the Source Frame Edit button.
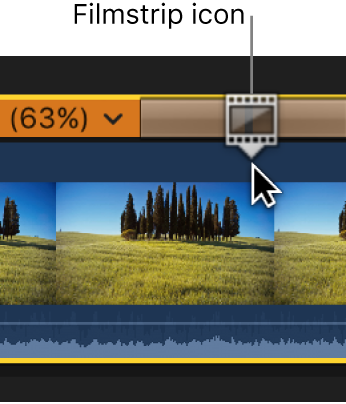
A filmstrip icon appears over the end frame of the speed segment.
To change the end frame, drag the filmstrip icon left or right.

As you drag, the viewer displays the current end frame.
Create custom variable speed changes
You can manually divide a clip into segments and assign each segment its own speed setting.
In the Final Cut Pro timeline, position the playhead or the skimmer at the frame where you want to begin a new speed segment.
Click the Retime pop-up menu below the viewer and choose Blade Speed (or press Shift-B).

The retime editor appears above the clip (If it wasn’t already shown), and the clip is divided into two speed segments.

To set the speed for the newly created segments, do one of the following:
Double-click the retime editor above one of the speed segments. Then, in the Custom Speed window, set a new speed by selecting either Rate or Duration and entering a speed percentage or a duration. Click anywhere outside the Custom Speed window to close it.
Drag the right edge of a speed segment in the retime editor.
To create and modify additional speed segments, repeat steps 1 to 3.
You can modify the transitions between segments to create smooth adjustments from one speed to another. See Add speed transitions in Final Cut Pro.