Final Cut Pro User Guide
- Welcome
-
- What’s new in Final Cut Pro 10.6
- What’s new in Final Cut Pro 10.5.3
- What’s new in Final Cut Pro 10.5
- What’s new in Final Cut Pro 10.4.9
- What’s new in Final Cut Pro 10.4.7
- What’s new in Final Cut Pro 10.4.6
- What’s new in Final Cut Pro 10.4.4
- What’s new in Final Cut Pro 10.4.1
- What’s new in Final Cut Pro 10.4
- What’s new in Final Cut Pro 10.3
- What’s new in Final Cut Pro 10.2
- What’s new in Final Cut Pro 10.1.2
- What’s new in Final Cut Pro 10.1
- What’s new in Final Cut Pro 10.0.6
- What’s new in Final Cut Pro 10.0.3
- What’s new in Final Cut Pro 10.0.1
-
- Intro to effects
-
- Intro to transitions
- How transitions are created
- Add transitions
- Set the default transition
- Delete transitions
- Adjust transitions in the timeline
- Adjust transitions in the inspector and viewer
- Merge jump cuts with the Flow transition
- Adjust transitions with multiple images
- Modify transitions in Motion
-
- Add storylines
- Use the precision editor
- Conform frame sizes and rates
- Use XML to transfer projects
-
- Glossary
- Copyright

Placement controls in Final Cut Pro
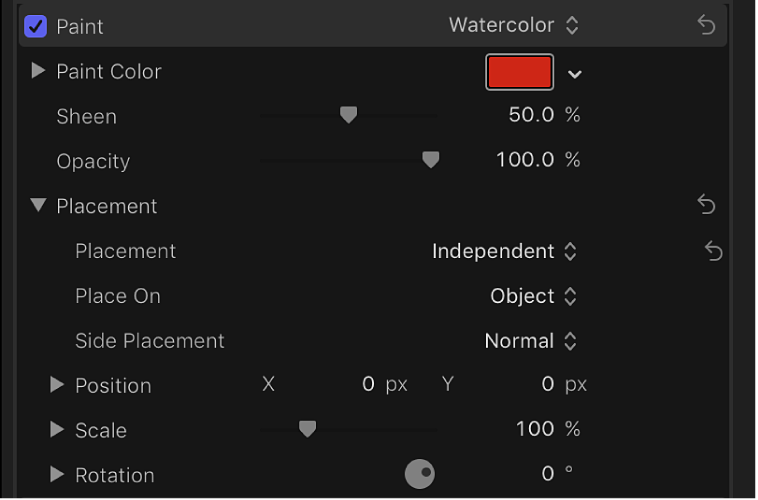
Many material layers include graphic images (with fixed dimensions) that are applied to the 3D title—for example, the pattern of a fabric or the wrinkles of a distress layer. In the Material section of the Text inspector, the controls for each of these layers include a set of Placement controls you can use to define the way the image is mapped onto the text object.
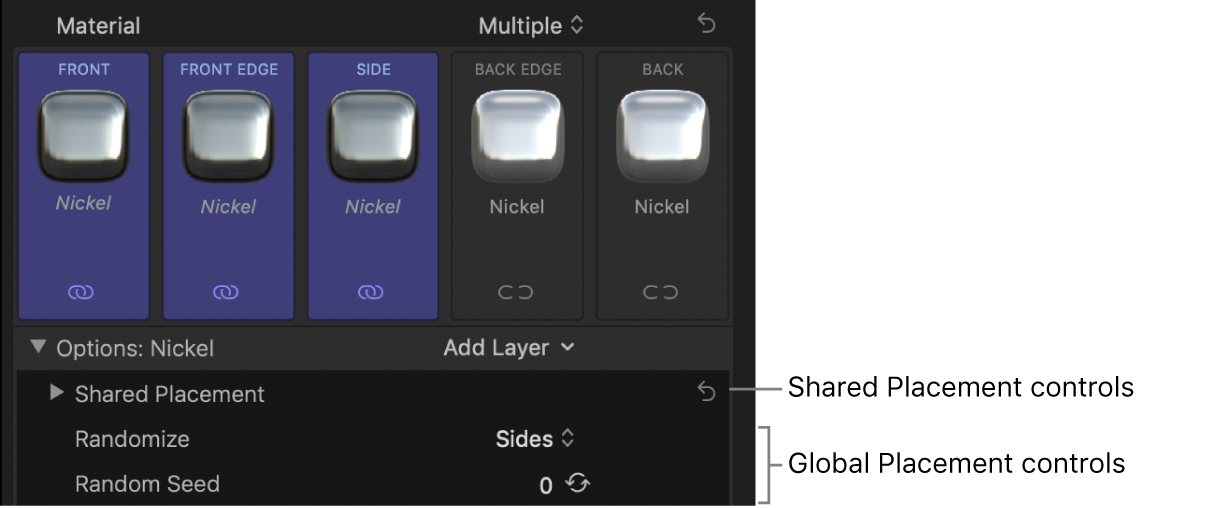
If you want to apply placement settings to more than one layer at once, you can designate the placement for those layers as Shared. In that case, Shared Placement controls appear in the Material section of the Text inspector and replace the Placement controls for the individual layers. Layers that have Placement set to Independent are not affected by the Shared Placement settings. As you add additional layers that include Placement controls, you can choose whether they use the shared settings or are controlled individually.
The Material section of the Text inspector also has a set of Global Placement controls you can use to randomize the placement of any textures applied in any material layer. These settings apply to all textures regardless of whether they are designated as Independent or Shared.
Independent Placement controls
These controls appear in each material layer that includes a texture that is applied to the 3D title.

Placement: A pop-up menu to choose whether the mapping of the image is independent, meaning that the controls below affect the placement of the image, or shared with the other images being placed on the selected 3D title.
When Placement is set to Shared, the rest of the placement parameters in the material layer are hidden, because the layer is now controlled by the Shared Placement settings in the Options section.
Place On: A pop-up menu to choose whether to apply the image or texture once to the entire text object, or individually to each glyph (letter).
Side Placement: A pop-up menu to choose how the mapped image or texture is applied to the sides of the text object. Choose one of the following options:
Normal: The image or texture is mapped onto the front and the sides of the text object in the same direction.
Turn 90°: The image or texture is mapped onto the front of the text object; the same image is mapped onto the sides of the text object, but is rotated by 90 degrees.
Stretch From Edge: The image or texture is mapped onto the front of the text object; on the sides, the pixels on the edge are repeated, so that the pattern appears to be stretched over the sides of the text object.
Position: Value sliders to set the location where the image or texture is mapped onto the object.
Scale: A slider to adjust the magnification (zoom) level of the image or texture being mapped. Click the disclosure triangle to reveal separate X and Y scale sliders and the Scale With Font Size checkbox (described below).
Scale With Font Size: A checkbox (available when you click the Scale disclosure triangle) that, when selected, causes the size of the applied image or texture to change proportionally when you modify the font size of the text object.
Rotation: A dial to rotate the mapped image or texture around the Z axis. Click the disclosure triangle to reveal separate dials for rotating around the X, Y, and Z axes.
Shared Placement controls
These controls appear in the Options section of the Text inspector when the Placement pop-up menu for a material layer is set to Shared. These controls are identical to the Independent Placement controls described above.
Global Placement controls
These settings apply to all images being affected by Placement controls, independent or shared. These controls appear in the Options section of the Text inspector.

You can create variations of the patterns Final Cut Pro uses to place textures, effects, and images onto text objects in your 3D titles. In some cases you may want the placement of the applied pattern to vary among the characters in your titles. The Random Seed feature is effectively a random-pattern generator for this purpose.
Randomize: A pop-up menu to choose whether to apply the randomness to just the sides, just the front and back, or all facets.
Random Seed: A control to choose a different random number to change the random-pattern placement. Click the Generate button to have Final Cut Pro select a random number, or enter your own number in the text field.
Download this guide: Apple Books | PDF