Adjust the focus in Cinematic mode clips in Final Cut Pro for Mac
When you record video in Cinematic mode on iPhone, the Camera app automatically targets the most likely subject of focus in the scene. In the background, it also tracks focus for other potential subjects of your video clip. If another item comes into the frame, the camera may automatically switch the focus to that item. For example, if you’re focusing on one subject and that subject moves away from the center (or the camera pans) and another item comes into view, the camera may automatically focus on the second item.
After you enable Cinematic adjustments, you can switch the focus between subjects in a Cinematic mode video clip, lock the focus on a subject, or fix the focus on a point at a specific distance from the camera.

Switch the focus in a Cinematic mode clip
In the Final Cut Pro timeline, position the playhead on a frame in a Cinematic mode clip that contains the item you want to focus on (or select an existing focus point).
In the viewer, yellow brackets appear around the current subject of focus. White frames indicate potential subjects of focus tracked by the camera.
In the viewer, click once on the suggested focus indicator (white frame) around the item you want to focus on.
Tip: To reveal additional suggested focus points, press and hold the Option key while moving the pointer around in the viewer.
The current focus indicator switches to the item you clicked, and the item comes into focus. A manual focus point appears at the playhead position in the clip’s Cinematic Editor in the timeline.

Note: When you set manual focus points, Final Cut Pro may remove or reposition automatic focus points.
Lock the focus on a subject in a Cinematic mode clip
When you’re editing a Cinematic mode clip in Final Cut Pro, you can lock the focus on an item to prevent the focus from switching to another item.
In the Final Cut Pro timeline, position the playhead on a frame in a Cinematic mode clip that contains the item you want to focus on (or select an existing focus point).
In the viewer, yellow brackets appear around the current subject of focus. White frames indicate potential subjects of focus tracked by the camera.
In the viewer, click the current focus indicator (the yellow brackets) or double-click a suggested focus indicator (a white frame).
Tip: To reveal additional suggested focus points, press and hold the Option key while moving the pointer around in the viewer.
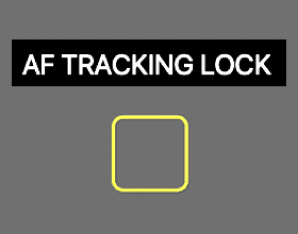
The control you clicked changes to the AF Tracking Lock, and a manual focus point is added to the clip’s Cinematic Editor in the timeline. The focus remains locked on the subject you selected (if possible) until the end of the clip or until the next focus point (a white or yellow dot in the timeline).

To turn off AF Tracking Lock, click the center of the closed yellow frame. The control reverts to the current focus indicator.
Note: When you set manual focus points, Final Cut Pro may remove or reposition automatic focus points.
Lock the focus on a point at a specific distance from the camera
You can lock the focus in a Cinematic mode clip at a specific distance from the camera using AF Lock. AF Lock allows you to maintain the focus on a specific spot in the scene—regardless of the subject’s movement. For example, if you lock the focus on a point in the scene’s middle ground, a blurred subject in the background can move into focus in the middle ground, then become blurry again as it moves toward the foreground.
In the Final Cut Pro timeline, select a Cinematic mode clip and position the playhead so that the clip appears in the viewer.
In the viewer, do one of the following:
Set a fixed-focus point from the current playhead position to the next manual focus point (or the end of the clip): Move the pointer to a spot in the scene at the distance where you want to lock the focus, press and hold the mouse button, then release it.
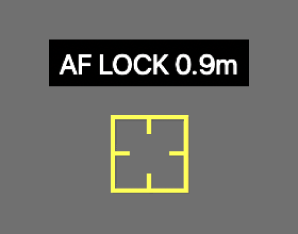
The AF Lock control, a small yellow square with tick marks, appears in the viewer, indicating the distance from the camera. A manual focus point is added to the clip’s Cinematic Editor in the timeline, and subsequent automatic focus points are overwritten.

The focus is maintained at the specified distance from the camera until the next manual focus point (or the end of the clip).
Set a fixed-focus point from the current playhead position to the next manual or automatic focus point (or the end of the clip): Move the pointer to a spot in the scene at the distance where you want to lock the focus, then click once.
A small yellow square with short tick marks appears in the viewer, and a manual focus point is added to the clip’s Cinematic Editor in the timeline.

The focus is maintained until the next manual or automatic focus point (or the end of the clip).
Note: If you lock the focus on a point in the scene that falls outside of the clip’s depth-of-field range, AF Lock doesn’t bring the point into focus.
Delete manual focus points
You can delete any manual (yellow) focus points in a Cinematic mode clip, whether they were created during recording or added in Final Cut Pro.
In Final Cut Pro, open the Cinematic Editor, if it’s not already shown.
Click a manual (yellow) focus point in the timeline, then click Delete Focus Point.

Note: When you delete manual focus points, Final Cut Pro may restore or reposition automatic focus points.
Navigate between focus points
In the Final Cut Pro timeline, select a Cinematic mode clip and position the playhead so that the clip appears in the viewer.
Open the Cinematic Editor, if it’s not already shown.
Do any of the following:
Move to the next focus point: Press Option-Shift-Command-Right Arrow.
Move to the previous focus point: Press Option-Shift-Command-Left Arrow.
Select a focus point: Click an automatic or manual focus point in the Cinematic Editor in the timeline.
Download this guide: Apple Books | PDF