Logic Pro User Guide for iPad
-
- What is Logic Pro?
- Working areas
- Work with function buttons
- Work with numeric values
-
- Intro to tracks
- Create tracks
- Create tracks using drag and drop
- Choose the default region type for a software instrument track
- Select tracks
- Duplicate tracks
- Reorder tracks
- Rename tracks
- Change track icons
- Change track colors
- Use the tuner on an audio track
- Show the output track in the Tracks area
- Delete tracks
- Edit track parameters
- Start a Logic Pro subscription
- How to get help
-
- Intro to recording
-
- Before recording software instruments
- Record software instruments
- Record additional software instrument takes
- Record to multiple software instrument tracks
- Record multiple MIDI devices to multiple tracks
- Record software instruments and audio simultaneously
- Merge software instrument recordings
- Spot erase software instrument recordings
- Replace software instrument recordings
- Capture your most recent MIDI performance
- Use the metronome
- Use the count-in
-
- Intro to arranging
-
- Intro to regions
- Select regions
- Cut, copy, and paste regions
- Move regions
- Remove gaps between regions
- Delay region playback
- Trim regions
- Loop regions
- Repeat regions
- Mute regions
- Split and join regions
- Stretch regions
- Separate a MIDI region by note pitch
- Bounce regions in place
- Change the gain of audio regions
- Create regions in the Tracks area
- Convert a MIDI region to a Drummer region or a pattern region
- Rename regions
- Change the color of regions
- Delete regions
- Create fades on audio regions
- Access mixing functions using the Fader
-
- Intro to Step Sequencer
- Use Step Sequencer with Drum Machine Designer
- Record Step Sequencer patterns live
- Step record Step Sequencer patterns
- Load and save patterns
- Modify pattern playback
- Edit steps
- Edit rows
- Edit Step Sequencer pattern, row, and step settings in the inspector
- Customize Step Sequencer
-
- Effect plug-ins overview
-
- Instrument plug-ins overview
-
- ES2 overview
- Interface overview
-
- Modulation overview
-
- Vector Envelope overview
- Use Vector Envelope points
- Use Vector Envelope solo and sustain points
- Set Vector Envelope segment times
- Vector Envelope XY pad controls
- Vector Envelope Actions menu
- Vector Envelope loop controls
- Vector Envelope release phase behavior
- Vector Envelope point transition shapes
- Use Vector Envelope time scaling
- Use the Mod Pad
- Modulation source reference
- Via modulation source reference
-
- Sample Alchemy overview
- Interface overview
- Add source material
- Save a preset
- Edit mode
- Play modes
- Source overview
- Synthesis modes
- Granular controls
- Additive effects
- Additive effect controls
- Spectral effect
- Spectral effect controls
- Filter module
- Low and Highpass filter
- Comb PM filter
- Downsampler filter
- FM filter
- Envelope generators
- Mod Matrix
- Modulation routing
- Motion mode
- Trim mode
- More menu
- Sampler
- Copyright
Build a custom Amp Designer combo in Logic Pro for iPad
You can use one of the default models or you can create your own hybrid of different amplifiers, cabinets, and so on. You create your own by using the Amp, Speaker, and Microphone Type pop-up menus, as well as the EQ Model pop-up menu.
Note: If you create your own hybrid amp combo, you can save it as a setting file, which also includes any parameter changes you’ve made.
Choose an Amp Designer amplifier
In Logic Pro, choose an amplifier from the Amp pop-up menu. See Amp Designer models for details on the characteristics of each amplifier type.

Choose an Amp Designer cabinet
Cabinets have a huge impact on the character of a guitar sound (see Amp Designer cabinets).
Whereas certain amplifier and cabinet pairings have been popular for decades, departing from them can be an effective way to create fresh-sounding tones. For example, most players automatically associate British heads with 4 x 12” cabinets. Amp Designer lets you drive a small speaker with a powerful head, or pair a tiny amp with a 4 x 12” cabinet. You can experiment with random amplifier and cabinet combinations, but you can also make an educated guess about nontraditional combinations by considering the variables that determine the “sound” of the cabinet.

In Logic Pro, choose a cabinet from the Speaker pop-up menu. Use the following considerations to guide your decision:
Combos or Stacks: Combo amps include both an amplifier and speakers in a single enclosure. These usually have an open back, so the sound resonates in multiple directions. The resulting sound is open—with bright, airy highs and a spacious sound. Amplifier stacks consist of an amplifier head, with the speakers in a separate cabinet. These cabinets generally have a closed back and project the sound forward in a tight, focused beam. They tend to sound more powerful than open-back cabinets, and typically have a tighter low-end response at the expense of some high-end transparency.
Old or New Speakers: Amp Designer models based on vintage cabinets capture the character of aged speakers. These may be a bit looser and duller sounding than new speakers, but many players prefer them for their smoothness and musicality. Sounds based on new cabinets tend to have more snap and bite.
Large Speakers or Small Speakers: A larger speaker doesn’t guarantee a larger sound. In fact, the most popular bass guitar cabinet in history uses 8” speakers. You can often get a deeper, richer tone from a 10” speaker than from a large 4 x 12” cabinet. Try several sizes and choose the one that works best for your music.
Single Speakers or Multiple Speakers: Guitarists typically choose cabinets with multiple speakers for their big sound. The number of speakers is less important than it may appear. Phase cancelations occur between the speakers, adding texture and interest to the tone. Much of the “classic rock” sound, for example, is due to tonal peaks and dips caused by interactions between the speakers in a 4 x 12” cabinet.
Choose a microphone type and placement

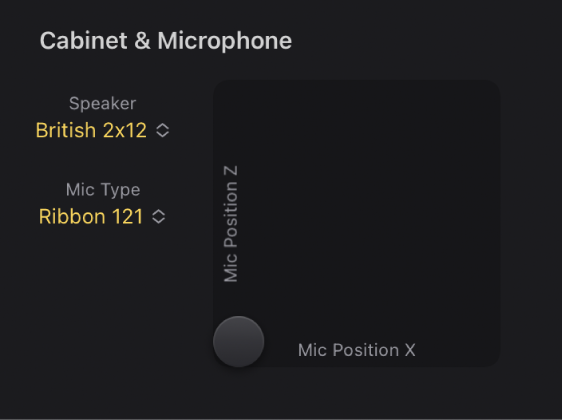
In Logic Pro, choose a microphone model from the Mic Type pop-up menu.
Condenser models: Emulate the sound of high-end studio condenser microphones. The sound of condenser microphones is fine, transparent, and well-balanced. Choose Condenser 87 or Condenser 414.
Dynamic models: Emulate the sound of popular dynamic cardioid microphones. Dynamic microphones sound brighter and more cutting than Condenser models. The mid-range is boosted, with softer lower-mid frequencies, making dynamic microphones a good choice for rock guitar tones, especially if you want guitars to cut through other tracks in a mix. Choose Dynamic 20, Dynamic 57, Dynamic 421, or Dynamic 609.
Ribbon 121: Emulates the sound of a ribbon microphone. A ribbon microphone is a type of dynamic microphone that captures a sound often described as bright or brittle, yet still warm. It is useful for rock, crunch, and clean tones.
Drag the gray dot in the X/Y pad beside the Mic Type pop-up menu to set the microphone position and distance relative to the cabinet.
Choose and adjust an EQ type
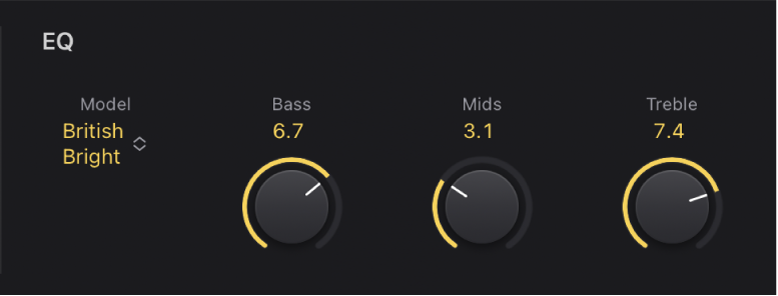
In Logic Pro, tap the Model pop-up menu to choose an EQ model. See Amp Designer EQ.
Rotate the Bass, Mids, and Treble knobs to adjust the EQ model you chose.

Download this guide: PDF