iPhone User Guide
- Welcome
- What’s new in iOS 12
-
- Wake and unlock
- Learn basic gestures
- Learn gestures for iPhone X and later
- Use 3D Touch for previews and shortcuts
- Explore the Home screen and apps
- Change the settings
- Take a screenshot
- Adjust the volume
- Change the sounds and vibrations
- Search for content
- Use and customize Control Center
- View and organize Today View
- Access features from the Lock screen
- Travel with iPhone
- Set screen time, allowances, and limits
- Sync iPhone using iTunes
- Charge and monitor the battery
- Learn the meaning of the status icons
-
- Accessories included with iPhone
- Connect Bluetooth devices
- Stream audio and video to other devices
- Control audio on multiple devices
- AirPrint
- Use Apple EarPods
- Apple Watch
- Use Magic Keyboard
- Wireless charging
- Handoff
- Use Universal Clipboard
- Make and receive Wi-Fi calls
- Use iPhone as a Wi-Fi hotspot
- Share your iPhone Internet connection
- Transfer files with iTunes
-
-
- Get started with accessibility features
- Accessibility shortcuts
-
-
- Turn on and practice VoiceOver
- Change your VoiceOver settings
- Learn VoiceOver gestures
- Operate iPhone using VoiceOver gestures
- Control VoiceOver using the rotor
- Use the onscreen keyboard
- Write with your finger
- Control VoiceOver with Magic Keyboard
- Type onscreen braille using VoiceOver
- Use a braille display
- Use VoiceOver in apps
- Speak selection, speak screen, typing feedback
- Zoom in on the screen
- Magnifier
- Display settings
- Face ID and attention
-
- Guided Access
-
- Important safety information
- Important handling information
- Get information about your iPhone
- View or change cellular settings
- Learn more about iPhone software and service
- FCC compliance statement
- ISED Canada compliance statement
- Class 1 Laser information
- Apple and the environment
- Disposal and recycling information
- Copyright
Download health records in Health on iPhone (U.S. only)
The Health app ![]() offers access to information from supported medical institutions about your allergies, conditions, medications, and more.
offers access to information from supported medical institutions about your allergies, conditions, medications, and more.
When iPhone is locked with a passcode, Touch ID, or Face ID, all of the health data in the Health app—other than what you add to your Medical ID—is encrypted.
Set up automatic downloads
Tap Health Data, then tap Health Records.
Tap Get Started, then, in the search field, enter the name of an organization, such as a clinic or hospital, where you obtain your health records. Or, to find a list of nearby organizations, enter the name of the city or state where you live.
To open a result, tap it.
Tap the button for your patient portal (under Available to Connect).
Enter the user name and password you use for the patient web portal of that organization, then follow the onscreen instructions.
Note: Your institution might not appear in this feature. Institutions are added frequently. See the Institutions that support health records on iPhone website.
Download health records from another institution
Tap Health Data, then tap Health Records.
Tap Add Account (near the bottom of the screen), then, in the search field, enter the name of an organization, such as a clinic or hospital, where you obtain your health records. Or, to find a list of nearby organizations, enter the name of the city or state where you live.
To open a result, tap it.
Tap the button for your patient portal (under Available to Connect).
Enter the user name and password you use for the patient web portal of that healthcare institution, then follow the onscreen instructions.
View your health records
Tap Health Data, tap Health Records, then do any of the following:
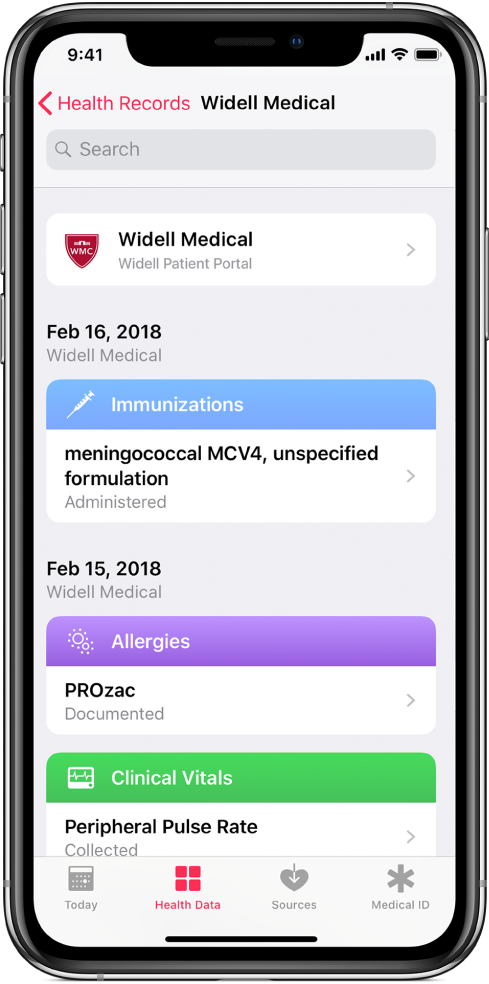
See all records for a category, such as Allergies or Conditions: Tap the category.
See the records from a single institution: Scroll down, then tap the name of the institution.
See more details: Tap any section where you see
 .
.

Customize notification settings for health records
Go to Settings ![]() > Notifications > Health, then choose options. See View and respond to notifications on iPhone.
> Notifications > Health, then choose options. See View and respond to notifications on iPhone.
Delete an institution and its records from iPhone
Tap Health Data, then tap Health Records.
Tap the account, tap the account again at the top of the next screen, then tap Remove Account.
Share your records with other apps
Third-party apps can request access to your health records. Before you grant access, be sure that you trust the app with your records.
To grant access, choose which categories to share—such as allergies, medications, or immunizations—when asked.
Choose whether to grant access to your current and future health records or to only your current records.
If you choose to share only your current records, you’re asked to grant access whenever new records are downloaded to your iPhone.
To stop sharing health records with the app, tap Sources (near the bottom of the screen in the Health app), tap the name of the app, then turn off the categories you no longer wish to share.