iPod touch User Guide
- Welcome
- Your iPod touch
- What’s new in iOS 15
-
- Calculator
-
- Set up FaceTime
- Make and receive calls
- Create a FaceTime link
- Take a Live Photo
- Use other apps during a call
- Make a Group FaceTime call
- View participants in a grid
- Use SharePlay to watch and listen together
- Share your screen
- Change the video settings
- Change the audio settings
- Add camera effects
- Leave a call or switch to Messages
- Block unwanted callers
-
- View maps
-
- Search for places
- Find nearby attractions, restaurants, and services
- Get information about places
- Mark places
- Share places
- Rate places
- Save favorite places
- Explore new places with Guides
- Organize places in My Guides
- Get traffic and weather info
- Delete significant locations
- Quickly find your Maps settings
-
- Use Siri, Maps, and the Maps widget to get directions
- Select other route options
- Things you can do while following a route
- Get driving directions
- Report traffic incidents in Maps on iPod touch
- Get cycling directions
- Get walking directions
- Get transit directions
- Delete recent directions
- Use Maps on your Mac to get directions
- Get rides
-
- View photos
- Play videos and slideshows
- Delete and hide photos and videos
- Edit photos and videos
- Trim video length and adjust slow motion
- Edit Live Photos
- Make photo albums
- Edit and organize albums
- Filter and sort photos in an album
- Search in Photos
- Share photos and videos
- View photos and videos shared with you
- Watch memories
- Personalize memories
- Find people in Photos
- Show a person or place less often
- Browse photos by location
- Use iCloud Photos
- Share photos with iCloud Shared Albums
- Import photos and videos
- Print photos
-
- Browse the web
- Customize your Safari settings
- Change the layout
- Search for websites
- Use tabs in Safari
- Bookmark favorite webpages
- Save pages to a Reading List
- View links shared with you
- Automatically fill in forms
- Get extensions
- Hide ads and distractions
- Browse the web privately
- Clear your cache
- Use Hide My Email
- Shortcuts
- Stocks
- Tips
-
- Make and receive phone calls
- Hand off tasks between devices
- Wirelessly stream video, photos, and audio to Mac
- Cut, copy, and paste between iPod touch and other devices
- Connect iPod touch and your computer with a cable
- Sync iPod touch with your computer
- Transfer files between iPod touch and your computer
-
- Get started with accessibility features
-
-
- Turn on and practice VoiceOver
- Change your VoiceOver settings
- Learn VoiceOver gestures
- Operate iPod touch using VoiceOver gestures
- Control VoiceOver using the rotor
- Use the onscreen keyboard
- Write with your finger
- Use VoiceOver with an Apple external keyboard
- Use a braille display
- Type onscreen braille
- Customize gestures and keyboard shortcuts
- Use VoiceOver with a pointer device
- Use VoiceOver for images and videos
- Use VoiceOver in apps
- Zoom
- Display & Text Size
- Motion
- Spoken Content
- Audio Descriptions
-
-
- Use built-in security and privacy protections
-
- Keep your Apple ID secure
- Sign in with Apple
- Automatically fill in strong passwords
- Change weak or compromised passwords
- View your passwords and related information
- Share passwords securely with AirDrop
- Make your passwords available on all your devices
- Automatically fill in verification codes
- Manage two-factor authentication for your Apple ID
-
- Control access to information in apps
- Control access to hardware features
- Control app tracking permissions on iPod touch
- Control the location information you share
- Turn on iCloud Private Relay
- Create and manage Hide My Email addresses
- Use a private network address
- Control how Apple delivers advertising to you
- Copyright
iPod touch camera basics
Learn how to take photos with Camera ![]() on your iPod touch. Choose from camera modes such as Photo, Pano, and Square, and zoom in or out to frame your shot.
on your iPod touch. Choose from camera modes such as Photo, Pano, and Square, and zoom in or out to frame your shot.
Siri: Say something like: “Open Camera.” Learn how to ask Siri.
Open Camera
To open Camera, swipe left on the iPod touch Lock Screen or tap Camera ![]() on the iPod touch Home Screen.
on the iPod touch Home Screen.
Note: For your security, a green dot appears in the top-right corner of the screen when Camera is in use. See Control access to hardware features.
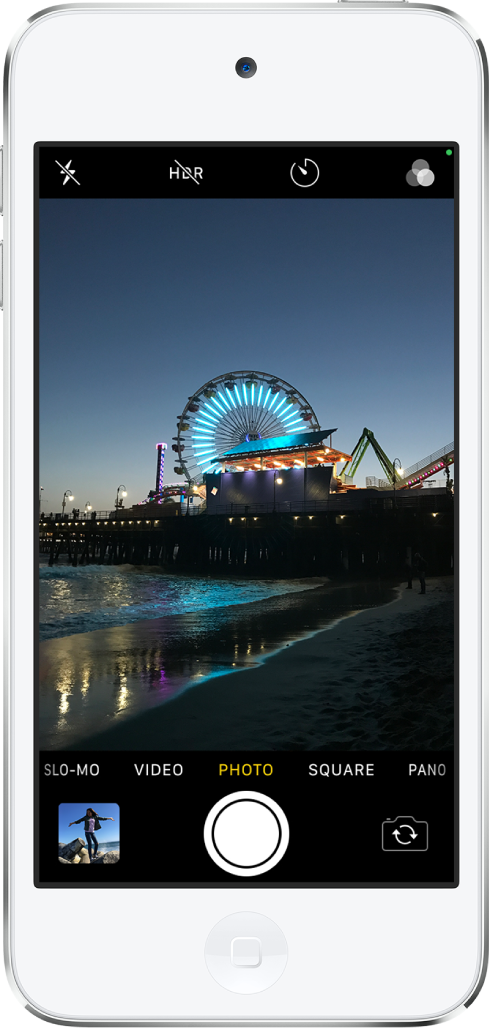
Switch between camera modes
Photo is the standard mode that you see when you open Camera. Use Photo mode to take still photos. Swipe left or right to choose one of the following camera modes:
Video: Record a video.
Time-lapse: Create a time‑lapse video of motion over a period of time.
Slo-mo: Record a video with a slow-motion effect.
Pano: Capture a panoramic landscape or other scene.
Square: Take photos with a square ratio.
To save a mode other than Photo as the default mode when you open Camera, see Save camera settings on iPod touch.
Zoom in or out
Open Camera and pinch the screen to zoom in or out.
Take a photo
Tap the Shutter button, or press either volume button to take a photo.