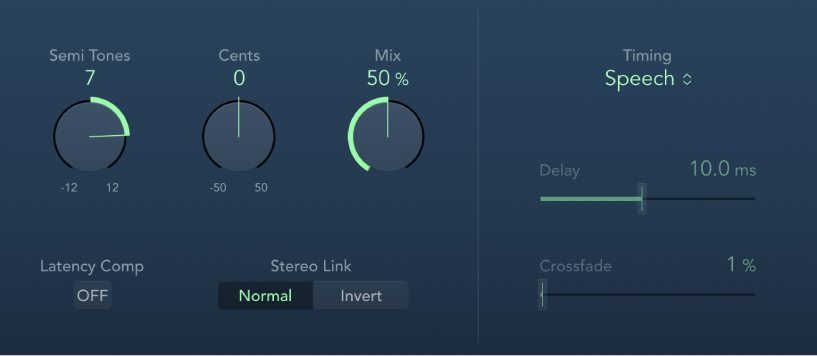
Pitch Shifter controls in Final Cut Pro for Mac
Pitch Shifter provides a simple way to combine a pitch-shifted version of the signal with the original signal. Use pitch shifting to achieve the best results.
To add the Pitch Shifter effect to a clip and show the effect’s controls, see Add Logic effects to clips in Final Cut Pro for Mac.

Semi Tones knob and field: Set the pitch shift value in semitones.
Cents knob and field: Control detuning of the pitch shift value in cents (1/100th of a semitone).
Mix knob and field: Set the balance between the effect and original signals.
Latency Comp (Compensation) button: Turn on to compensate for delays that may be introduced by some algorithms with particular types of source material.
Stereo Link buttons: Click Normal to retain the source stereo signals. Invert swaps (inverts) stereo channel signals, with right channel processing occurring on the left, and vice versa.
Timing pop-up menu: Choose an algorithm to determine how timing is derived.
Drums: Maintains the groove (rhythmic feel) of the source signal.
Speech: Provides a balance between both the rhythmic and harmonic aspects of the signal. This is suitable for complex signals such as spoken-word recordings, rap, and hybrid signals such as rhythm guitar.
Vocals: Retains the intonation of the source, making it well-suited for signals that are inherently harmonic or melodious, such as string pads.
Manual: Uses the settings of the Delay, Crossfade, and Stereo Link parameters.
Pitch Tracking: Follows the pitch of incoming audio material.
Note: The following controls are active only when Manual is chosen from the Timing pop-up menu.
Delay slider and field: Set the amount of delay applied to the input signal. The lower the frequencies of the input signal, the higher (longer) a delay time is required—to effectively pitch shift the signal.
Crossfade slider and field: Set the range (shown as a percentage of the original signal) used to analyze the input signal.
Download this guide: PDF