Final Cut Pro User Guide for Mac
- Welcome
- What’s new
-
- Intro to importing media
- If it’s your first import
- Organize files during import
-
- Import from Image Playground
- Import from iMovie for macOS
- Import from iMovie for iOS or iPadOS
- Import from Final Cut Pro for iPad
- Import from Final Cut Camera
- Import from Photos
- Import from Music
- Import from Apple TV
- Import from Motion
- Import from GarageBand and Logic Pro
- Import using workflow extensions
- Record into Final Cut Pro
- Memory cards and cables
- Supported media formats
-
- Intro to effects
-
- Intro to transitions
- How transitions are created
- Add transitions and fades
- Quickly add a transition with a keyboard shortcut
- Set the default duration for transitions
- Delete transitions
- Adjust transitions in the timeline
- Adjust transitions in the inspector and viewer
- Merge jump cuts with the Flow transition
- Adjust transitions with multiple images
- Modify transitions in Motion
- Add adjustment clips
-
- Add storylines
- Use the precision editor
- Conform frame sizes and rates
- Use XML to transfer projects
-
- Intro to sharing projects
- Share to Apple devices
- Share on the web
- Send a video frame to Pixelmator Pro
- Share in email
- Share stereo or spatial video
- Batch sharing
- Share using Compressor
- Create share destinations
- Change metadata for shared items
- View the status of shared items
- Speed up exports with simultaneous processing
- Glossary
- Copyright and trademarks
Change gradient colors in Final Cut Pro for Mac
You can use the gradient controls to create gradients in titles and generators.
Change the colors in a gradient
In Final Cut Pro, select a title or generator, then open the inspector.
Click the Gradient disclosure triangle to show the gradient editor.
To change the color of a color tag in the gradient editor, do one of the following:
Double-click a color tag.
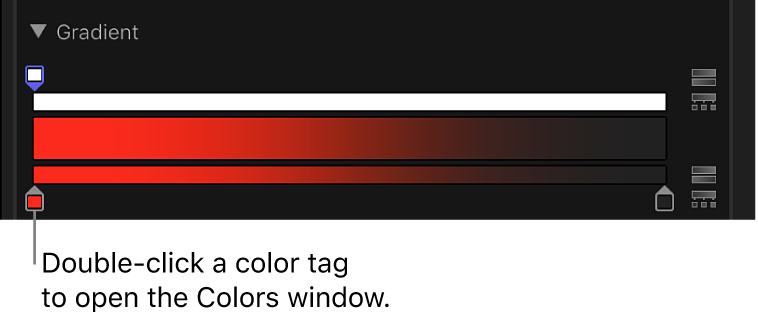
The Colors window appears. Use the Colors window to set a color for the tag.
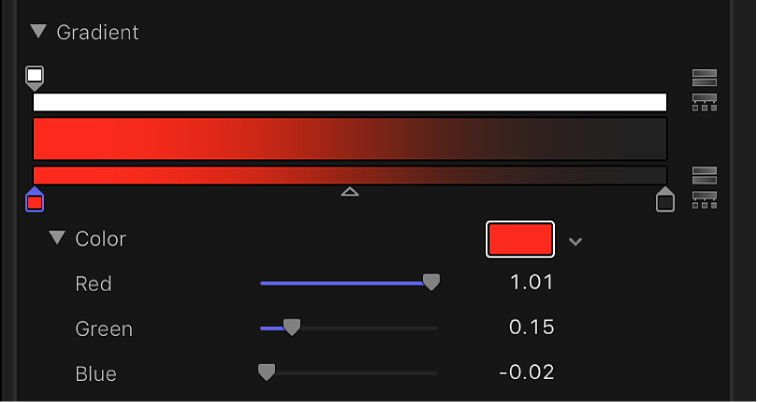
Click a color tag, then adjust the Red, Green, and Blue color channel sliders.
Click the down arrow next to the color well to display the pop-up color palette. When you move the pointer over the color palette, the pointer becomes an eyedropper. Click in the top area to select a color, or click in the bottom gradient to set the tag to a grayscale value.


Change the opacity in a gradient
In Final Cut Pro, select a title or generator, then open the inspector.
Click the Gradient disclosure triangle to show the gradient editor.
In the gradient editor, click an opacity tag.
The Opacity slider becomes available.

Use the Opacity slider or adjacent value slider to change the level of transparency.
The gradient reflects the new opacity values.
The lower the percentage of opacity, the greater the transparency.

Add or remove a color tag
In Final Cut Pro, select a title or generator, then open the inspector.
Click the Gradient disclosure triangle to show the gradient editor.
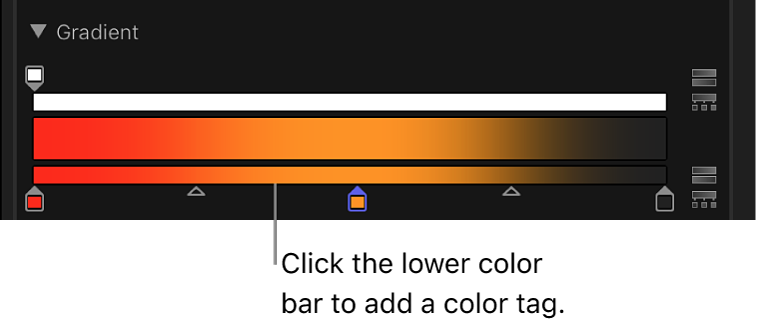
In the gradient editor, position the pointer in the lower gradient bar where you want to add the new color, then click.
A new color tag is added to the gradient.

Add an opacity tag to a gradient
In Final Cut Pro, select a title or generator, then open the inspector.
Click the Gradient disclosure triangle to show the gradient editor.
In the gradient editor, position the pointer in the opacity bar (the top bar) where you want to add the tag, then click.
A new opacity tag is added to the gradient.
Until the value is adjusted, the gradient opacity is 100%.
Remove a color or opacity tag from the gradient
In Final Cut Pro, select a title or generator, then open the inspector.
Click the Gradient disclosure triangle to show the gradient editor.
In the gradient editor, drag the tag away from the gradient bar.
Download this guide: PDF