MainStage User Guide
- Welcome
-
- Overview of Edit mode
-
- Select patches and sets in the Patch List
- Copy, paste, and delete patches
- Reorder and move patches in the Patch List
- Add and rename patches
- Create a patch from several patches
-
- Overview of the Patch Settings Inspector
- Select patch settings in the Patch Library
- Set the time signature for patches
- Change the tempo when you select a patch
- Set program change and bank numbers
- Defer patch changes
- Instantly silence the previous patch
- Change patch icons
- Transpose the pitch of incoming notes for a patch
- Change the tuning for a patch
- Add text notes to a patch
-
- Overview of channel strips
- Add a channel strip
- Change a channel strip setting
- Configure channel strip components
- Show signal flow channel strips
- Hide the metronome channel strip
- Create an alias of a channel strip
- Add a patch bus
- Set channel strip pan or balance positions
- Set channel strip volume levels
- Mute and solo channel strips
- Use multiple instrument outputs
- Use external MIDI instruments
- Reorganize channel strips
- Delete channel strips
-
- Overview of the Channel Strip Inspector
- Choose channel strip settings
- Rename channel strips
- Change channel strip colors
- Change channel strip icons
- Use feedback protection with channel strips
- Set keyboard input for a software instrument channel strip
- Transpose individual software instruments
- Filter MIDI messages
- Scale channel strip velocity
- Set channel strips to ignore Hermode tuning
- Override concert- and set-level key ranges
- Add text notes to a channel strip in the Channel Strip Inspector
- Route audio via send effects
-
- Screen Control Inspector overview
- Replace parameter labels
- Choose custom colors for screen controls
- Change background or grouped screen control appearance
- Set screen controls to show the hardware value
- Set parameter change behavior for screen controls
- Set hardware matching behavior for screen controls
- Reset and compare changes to a patch
- Override concert- and set-level mappings
-
- Overview of mapping screen controls
- Map to channel strip and plug-in parameters
- Map screen controls to actions
- Map a screen control to multiple parameters
- Use screen controls to display PDF document pages
- Edit the saved value for a mapped parameter
- Set drum pads or buttons to use note velocity
- Map screen controls to all channel strips in a patch
- Undo screen control parameter mappings
- Remove screen control mappings
- Work with graphs
- Create controller transforms
- Share patches and sets between concerts
- Record the audio output of a concert
-
- Overview of concerts
- Create a concert
- Open and close concerts
- Save concerts
- How saving affects parameter values
- Clean up concerts
- Consolidate assets in a concert
- Rename the current concert
-
- Overview of the Concert Settings Inspector
- Set MIDI Routing to channel strips
- Transpose incoming note pitch for a concert
- Define the program change message source
- Send unused program changes to channel strips
- Set the time signature for a concert
- Change the tuning for a concert
- Set the pan law for a concert
- Add text notes to a concert
- Control the metronome
- Silence MIDI notes
- Mute audio output
-
- Layout mode overview
-
- Screen control parameter editing overview
- Lift and stamp screen control parameters
- Reset screen control parameters
- Common screen control parameters
- Keyboard screen control parameters
- MIDI activity screen control parameters
- Drum pad screen control parameters
- Waveform screen control parameters
- Selector screen control parameters
- Text screen control parameters
- Background screen control parameters
- How MainStage passes through MIDI messages
- Export and import layouts
- Change the aspect ratio of a layout
-
- Before performing live
- Use Perform mode
- Screen controls in performance
- Tempo changes during performance
- Tips for performing with keyboard controllers
- Tips for performing with guitars and other instruments
- Tune guitars and other instruments with the Tuner
- The Playback plug-in in performance
- Record your performances
- After the performance
- Tips for complex hardware setups
-
- Overview of keyboard shortcuts and command sets
-
- Concerts and layouts keyboard shortcuts
- Patches and sets (Edit mode) keyboard shortcuts
- Editing keyboard shortcuts
- Actions keyboard shortcuts
- Parameter mapping (Edit mode) keyboard shortcuts
- Channel strips (Edit mode) keyboard shortcuts
- Screen controls (Layout mode) keyboard shortcuts
- Perform in Full Screen keyboard shortcuts
- Window and view keyboard shortcuts
- Help and support keyboard shortcuts
-
-
- Use MIDI plug-ins
-
- Arpeggiator overview
- Arpeggiator control parameters
- Note order parameters overview
- Note order variations
- Note order inversions
- Arpeggiator pattern parameters overview
- Use Live mode
- Use Grid mode
- Arpeggiator options parameters
- Arpeggiator keyboard parameters
- Use keyboard parameters
- Assign controllers
- Modifier controls
- Note Repeater controls
- Randomizer controls
-
- Use Scripter
- Use the Script Editor
- Scripter API overview
- MIDI processing functions overview
- HandleMIDI function
- ProcessMIDI function
- GetParameter function
- SetParameter function
- ParameterChanged function
- Reset function
- JavaScript objects overview
- Use the JavaScript Event object
- Use the JavaScript TimingInfo object
- Use the Trace object
- Use the MIDI event beatPos property
- Use the JavaScript MIDI object
- Create Scripter controls
- Transposer controls
-
-
- Alchemy overview
- Alchemy interface overview
- Alchemy Name bar
- Alchemy file locations
-
- Alchemy source overview
- Source master controls
- Import browser
- Source subpage controls
- Source filter controls
- Source filter use tips
- Source elements overview
- Additive element controls
- Additive element effects
- Spectral element controls
- Spectral element effects
- Pitch correction controls
- Formant filter controls
- Granular element controls
- Sampler element controls
- VA element controls
- Wide unison mode
- Source modulations
- Morph controls
- Alchemy master voice section
- Alchemy Extended parameters
-
- Playback plug-in overview
- Add a Playback plug-in
- Playback interface
- Use the Playback waveform display
- Playback transport and function buttons
- Playback information display
- Playback Sync, Snap To, and Play From parameters
- Use the Playback group functions
- Use the Playback Action menu and File field
- Use markers with the Playback plug-in
-
- Sample Alchemy overview
- Interface overview
- Add source material
- Edit mode
- Play modes
- Source overview
- Synthesis modes
- Granular controls
- Additive effects
- Additive effect controls
- Spectral effect
- Spectral effect controls
- Filter module
- Lowpass, bandpass, and highpass filters
- Comb PM filter
- Downsampler filter
- FM filter
- Envelope generators
- Mod Matrix
- Modulation routing
- Motion mode
- Trim mode
- More menu
-
- Sculpture overview
- Sculpture interface
- Global parameters
- Amplitude envelope parameters
- Use the Waveshaper
- Filter parameters
- Output parameters
- Define MIDI controllers
- Extended parameters
-
- Studio Piano
- Copyright and trademarks
Match EQ parameters in MainStage
Match EQ offers the parameters described in this section.
Display and view parameters

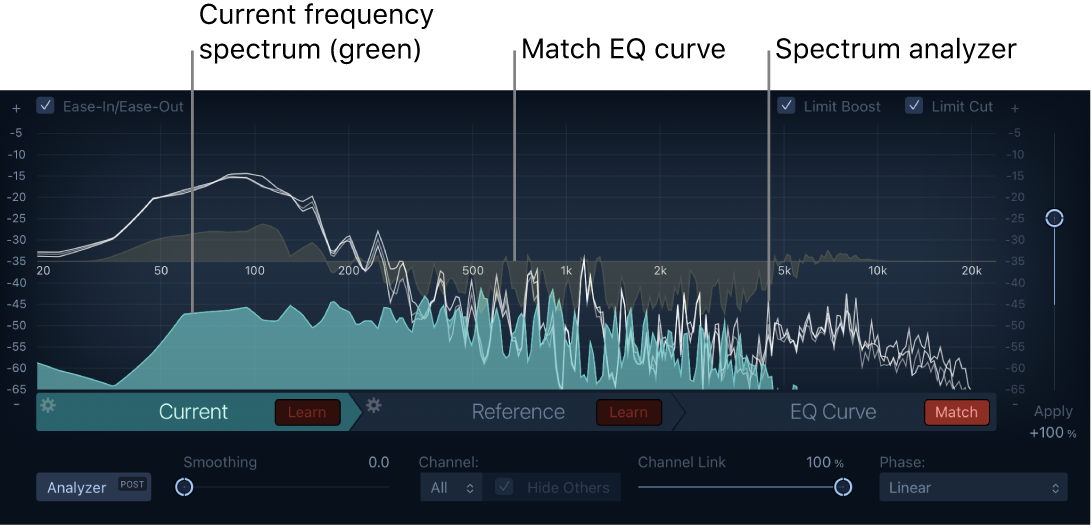
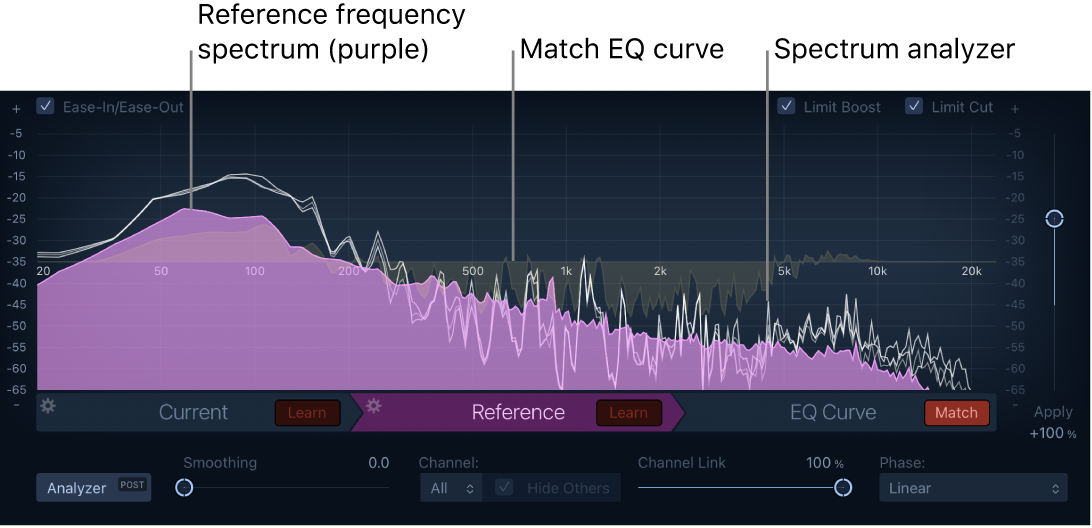
Main display: Shows four different frequency response curves depending on which buttons are activated. Choices are:
Current button: Select to show the loaded frequency spectrum for the Current signal. This is shown in green.
Reference button: Select to show the loaded frequency spectrum for the Reference signal. This is shown in purple.
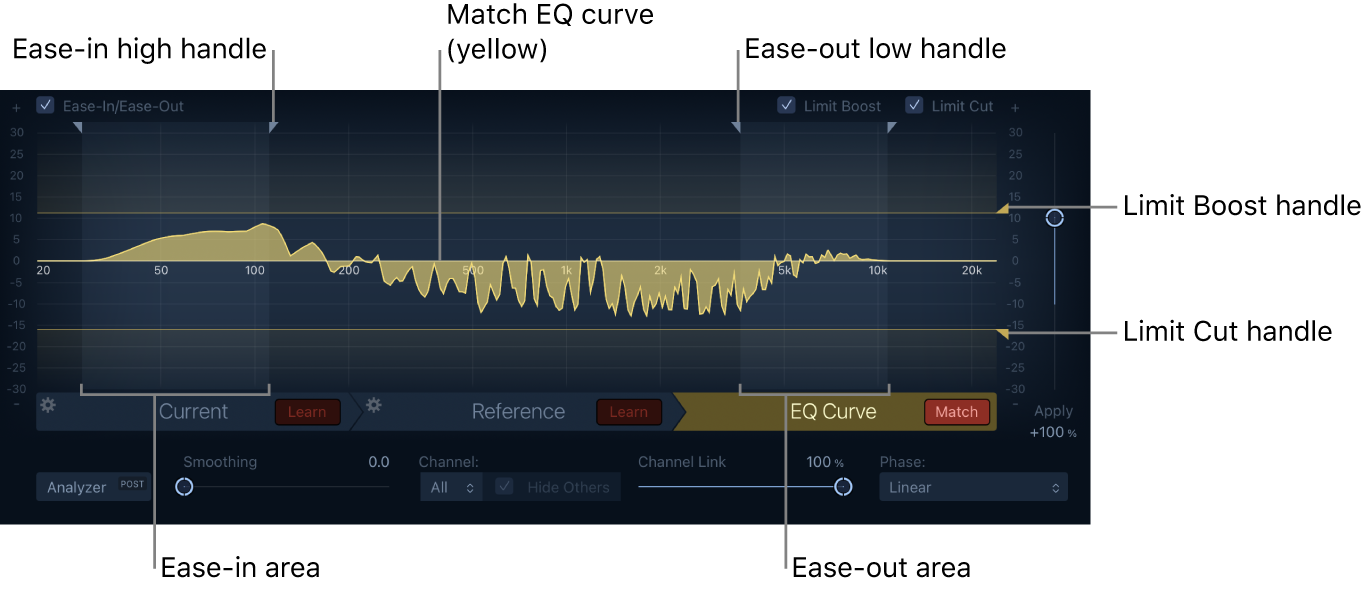
EQ Curve button: Select to show the frequency response curve applied to the signal on this channel strip (the Match button has to be active). This is shown in yellow, or in a dimmed yellow color, if the Current or Reference button is selected.
Analyzer button: Select to show the real-time frequency spectrum of the audio signal on the channel strip during playback. It is displayed in addition to the Current, Reference, or EQ Curve. The curve remains visible when pausing playback.
Analyzer Pre/Post button: Choose whether the Analyzer displays the signal on the channel strip before (Pre) or after (Post) it passes through the EQ curve.
Smoothing slider and field: Set the amount of smoothing for the EQ curve. Increase the value to even out sudden value changes.
Note: Smoothing has no effect on any manual changes you make to the EQ curve.
Channel pop-up menu: Click to choose which channels are displayed by the Analyzer, Current, and Reference spectrum. Choose L&R for stereo, or an individual L or R channel. Changes to the EQ curve affect the chosen channel if a single channel is selected.
Note: The Channel pop-up menu is not available when you use the effect on a mono channel strip.
Hide Others checkbox: Hide or show other channels in the display when an individual channel is chosen in the Channel pop-up menu. The visible impact of this parameter is directly tied to the Channel Link slider value.
Note: The Hide Others checkbox is not available when you use the effect on a mono channel strip.
Channel Link slider and field: Refine settings made with the Channel pop-up menu.
When set to 100%, all channels are represented by a common EQ curve.
When set to 0%, a separate EQ curve is displayed for each channel (chosen with the Channel pop-up menu).
Settings between 0 and 100% blend these values with your EQ curve changes for each channel. This results in a hybrid curve.
Note: The Channel Link slider and field is not available when you use the effect on a mono channel strip.
Scale display: Drag the scale on the left of the display vertically to move the 0 dB reference line up or down to adjust the visible dB range of the display. The Analyzer button has to be activated for that.
Learn and match frequency spectrum parameters

The following buttons and menu commands let you create the source material (for example, the frequency spectrum of your song) and the reference material (for example, the frequency spectrum of your reference song) to have the plug-in create a matching frequency response curve. This represents how your song needs to be equalized to sound similar to the sonic quality of your reference song.
Current Learn button: Start and stop the process of learning the frequency spectrum of the audio signal you play back on the channel strip. It represents the source material that you match against the reference material. The learned frequency spectrum is shown in the main display when the Current button is selected.
Reference Learn button: Start and stop the process of learning the frequency spectrum of the audio signal you receive on the side chain input of the Match EQ plug-in during playback. It represents the reference material the source material is matched against. The learned frequency spectrum is shown in the main display when the Reference button is selected.
EQ Curve Match button: Click to turn the EQ curve on or off. This is the frequency response curve that, during playback, is applied to the audio signal on the channel strip (your song) to match the frequency spectrum of the reference material (your reference song).
Action menus: Choose and execute commands from the Current or Reference Action menus.
Clear Current/Reference Material Spectrum: Clears the Current/Reference frequency spectrum.
Copy Current/Reference Spectrum: Copies the Current/Reference frequency spectrum to the Clipboard.
Paste Current/Reference Spectrum: Pastes the Current/Reference frequency spectrum from the Clipboard.
Load Current/Reference Material Spectrum from settings file: Opens a Finder window showing the Match EQ plug-in settings folder to load a previously saved Match EQ plug-in setting containing the Current/Reference frequency spectrum.
Generate Current/Reference Material Spectrum form audio file: Opens a Finder window to navigate to an audio file. Select the audio file to learn its frequency spectrum to be loaded as the Current/Reference frequency spectrum.
Edit EQ curve parameters

The default EQ curve is calculated by matching the Current frequency response to the Reference frequency response loaded in the plug-in. You can use the following parameters to tweak that curve:
Gain offset: Drag the scale on the right up or down to apply a gain offset to the EQ curve.
Note: You can also drag the left scale if the Analyzer button is deactivated.
Manual adjustments: When the EQ Curve button is selected, you can adjust the frequency response curve using the following gestures:
Drag vertically to adjust the level of that specific frequency.
Drag horizontally to adjust the affected frequency.
Hold the Shift key after starting to drag vertically to change the Q factor, the width of the affected area.
Option-click to reset all manual EQ curve changes.
Note: A help tag appears while dragging, showing the frequency, gain, and Q of the applied changes.
Apply slider and field: Increase or decrease the impact of the EQ curve.
Values greater than 100% magnify the effect.
Values less than 100% reduce effect.
Negative values (−1% to −100%) invert the peaks and troughs in the filter curve.
Note: Control-click the slider to set it to 100%, which represents the default curve without manual changes.
Ease-In/Ease-Out checkbox: Select to have the EQ curve adjusted according to the frequency level. Select Ease-In to adjust in the low frequency range, and Ease-Out to adjust in the high frequency range. When the EQ Curve button is selected, the following handles appear in the main display:
Ease-In Low/High handles: Drag the left and right handles on the left to set a frequency band, representing the ease-in area. The EQ curve is adjusted so frequencies below its low frequency handle result in a flat 0 dB curve (no EQ effect), and frequencies above its high frequency handle are processed by the actual EQ curve. In the ease-in area, the EQ curve is gradually increasing from 0 dB to its actual values.
Ease-Out Low/High handles: Drag the left and right handles on the right to set a frequency band, representing the ease-out area. The EQ curve is adjusted so frequencies below its low frequency handle are processed by the actual EQ curve, and frequencies above its high frequency handle result in a flat 0 dB curve (no EQ effect). In the ease-out area, the EQ curve gradually decreases its actual values down to 0 dB.
Boost Limit checkbox: Select to set and adjust the EQ curve so it doesn’t exceed a specific positive dB value (boost). If selected, a horizontal line with a handle appears in the display on or above the 0 dB line (only visible when the EQ Curve button is selected).
Limit Boost Max line or handle: Drag the line or the handle up to set the maximum positive value (boost) the EQ curve can reach.
Note: Vertically drag between the handles to move both the upper and lower limits simultaneously.
Cut Limit checkbox: Select to set and adjust the EQ curve so it doesn’t exceed a specific negative dB value (cut). If selected, a horizontal line with a handle appears in the display on or below the 0 dB line (only visible when the EQ Curve button is selected).
Limit Cut Max handle: Drag the line or the handle down to set the maximum negative value (cut) the EQ curve can reach.
Note: Vertically drag between the handles to move the upper and lower limits simultaneously.
Phase pop-up menu: Choose the operational principle of the EQ curve, which is always a trade-off between phase shifts (inherent to equalizers), latency, and CPU load.
Linear: Processing doesn’t introduce any phase shifts, which results in higher latencies.
Minimal: Processing allows minimal phase shifts to reduce latency.
Minimal, Zero Latency: Processing allows minimal phase shifts, but achieves zero latency with a higher CPU overhead than the other options.