Logic Pro User Guide for iPad
-
- What is Logic Pro?
- Working areas
- Work with function buttons
- Work with numeric values
-
- Intro to tracks
- Create tracks
- Create tracks using drag and drop
- Choose the default region type for a software instrument track
- Select tracks
- Duplicate tracks
- Reorder tracks
- Rename tracks
- Change track icons
- Change track colors
- Use the tuner on an audio track
- Show the output track in the Tracks area
- Delete tracks
- Edit track parameters
- Start a Logic Pro subscription
- How to get help
-
- Intro to recording
-
- Before recording software instruments
- Record software instruments
- Record additional software instrument takes
- Record to multiple software instrument tracks
- Record multiple MIDI devices to multiple tracks
- Record software instruments and audio simultaneously
- Merge software instrument recordings
- Spot erase software instrument recordings
- Replace software instrument recordings
- Capture your most recent MIDI performance
- Route MIDI internally to software instrument tracks
- Record with Low Latency Monitoring mode
- Use the metronome
- Use the count-in
-
- Intro to arranging
-
- Intro to regions
- Select regions
- Cut, copy, and paste regions
- Move regions
- Remove gaps between regions
- Delay region playback
- Trim regions
- Loop regions
- Repeat regions
- Mute regions
- Split and join regions
- Stretch regions
- Separate a MIDI region by note pitch
- Bounce regions in place
- Change the gain of audio regions
- Create regions in the Tracks area
- Convert a MIDI region to a Session Player region or a pattern region
- Rename regions
- Change the color of regions
- Delete regions
-
- Intro to chords
- Add and delete chords
- Select chords
- Cut, copy, and paste chords
- Move and resize chords
- Loop chords on the Chord track
- Edit chords
- Work with chord groups
- Use chord progressions
- Change the chord rhythm
- Choose which chords a Session Player region follows
- Analyze the key signature of a range of chords
- Create fades on audio regions
- Extract vocal and instrumental stems with Stem Splitter
- Access mixing functions using the Fader
-
- Intro to Step Sequencer
- Use Step Sequencer with Drum Machine Designer
- Record Step Sequencer patterns live
- Step record Step Sequencer patterns
- Load and save patterns
- Modify pattern playback
- Edit steps
- Edit rows
- Edit Step Sequencer pattern, row, and step settings in the inspector
- Customize Step Sequencer
-
- Effect plug-ins overview
-
- Instrument plug-ins overview
-
- ES2 overview
- Interface overview
-
- Modulation overview
- Use the Mod Pad
-
- Vector Envelope overview
- Use Vector Envelope points
- Use Vector Envelope solo and sustain points
- Set Vector Envelope segment times
- Vector Envelope XY pad controls
- Vector Envelope Actions menu
- Vector Envelope loop controls
- Vector Envelope point transition shapes
- Vector Envelope release phase behavior
- Use Vector Envelope time scaling
- Modulation source reference
- Via modulation source reference
-
- Sample Alchemy overview
- Interface overview
- Add source material
- Save a preset
- Edit mode
- Play modes
- Source overview
- Synthesis modes
- Granular controls
- Additive effects
- Additive effect controls
- Spectral effect
- Spectral effect controls
- Filter module
- Low, bandpass, and highpass filters
- Comb PM filter
- Downsampler filter
- FM filter
- Envelope generators
- Mod Matrix
- Modulation routing
- Motion mode
- Trim mode
- More menu
- Sampler
- Studio Piano
- Copyright
Tracks area
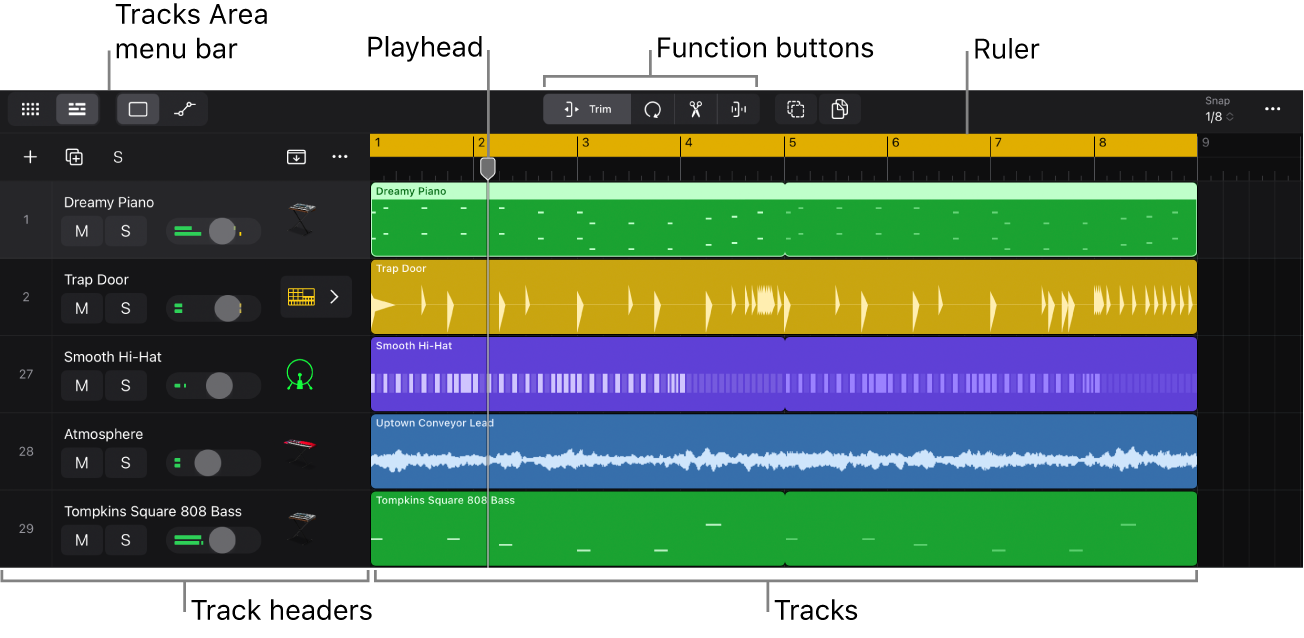
You record and arrange audio and MIDI regions in a timeline-based format in the Tracks area, which occupies the central area of the Logic Pro interface. The main elements of the Tracks area include:

Tracks area menu bar: Contains buttons for showing different views of the Tracks area, function buttons for editing regions, the Snap menu, and a More button.
Ruler: Shows bars, beats, and other divisions of time. The time divisions shown change depending on the zoom level of the Tracks area. You can align items in the Tracks area to specific musical positions using the time divisions in the ruler.
Playhead: The thin vertical line extending from the top to the bottom of the Tracks area, the playhead shows the part of the project currently playing or where playback starts. You can use the playhead to help align regions and other items and for editing tasks, such as splitting regions.
Track headers: Each track has a header that shows the track number and icon and includes controls for muting and soloing the track, enabling the track for recording, and other functions.
Tracks: All regions in the project appear on horizontal lanes called tracks, aligned to time positions in a grid. This is the primary area for recording and arranging regions, loops, and other material.
Open the Tracks area
Tap the Tracks view button
 on the left side of the Tracks area menu bar.
For information about working in the Tracks area, see Intro to the Tracks area.
Download this guide: PDF