Correct shaky video in Final Cut Pro
You can smooth a clip’s shaky footage by correcting the stabilization, rolling shutter, or both.
The stabilization feature in Final Cut Pro reduces the camera motion in your video so that shaky parts can be played back more smoothly. You can turn off stabilization for any clip so that it plays as originally recorded.
Many camcorders and still cameras include CMOS image sensors that expose the picture they’re recording progressively, instead of all at once. As a result, if the camera moves a lot during recording, or if the camera records fast motion, image distortion can occur. This causes the picture to appear wobbly or skewed. Final Cut Pro has a rolling shutter feature that can reduce this motion distortion.
Fix a clip with excessive shake or rolling shutter distortion
If the clip isn’t already in your Final Cut Pro project, add it to the timeline, then select it.
Tip: Stabilization and rolling shutter corrections operate on whole-clip selections, not on range selections. To get the highest-quality and fastest results, isolate the problem section by cutting the clip with the Blade tool in the timeline. Then apply the correction to just the video footage that needs correcting.
If the Video inspector isn’t already shown, do one of the following:
Choose Window > Show in Workspace > Inspector (or press Command-4).
Click the Inspector button on the right side of the toolbar.

Click the Video button at the top of the inspector.

Scroll down to the Stabilization and Rolling Shutter sections.
Tip: Double-click the top bar of the inspector to switch between half-height view and full-height view.
In the Video inspector, do any of the following:
Reduce the shake: Select the Stabilization checkbox.
If you turn on Stabilization, its checkbox turns blue and Final Cut Pro analyzes the clip for the best stabilization method. See Adjust stabilization settings, below.
Reduce rolling shutter distortion: Select the Rolling Shutter checkbox.

To view the fix, play the clip in the timeline.
To turn off stabilization or rolling shutter corrections for a clip, deselect the Stabilization or Rolling Shutter checkbox.
Adjust stabilization settings
You can adjust how much of a correction is applied by the stabilization feature.
Stabilization has two independent phases:
When you apply stabilization to a clip, Final Cut Pro analyzes the pixels in successive frames to determine the direction of camera movement.
During playback and rendering, Final Cut Pro uses the motion analysis data to apply a transform effect to each frame, compensating for camera movement.
Use the available sliders in the Video inspector to control the steadiness of your shot. The higher you set the value of each parameter, the more camera motion is compensated for. A value of 0.0 turns off the parameter.

In Final Cut Pro, select a clip in the timeline, then open the Video inspector.
Select the checkbox for Stabilization or Rolling Shutter.
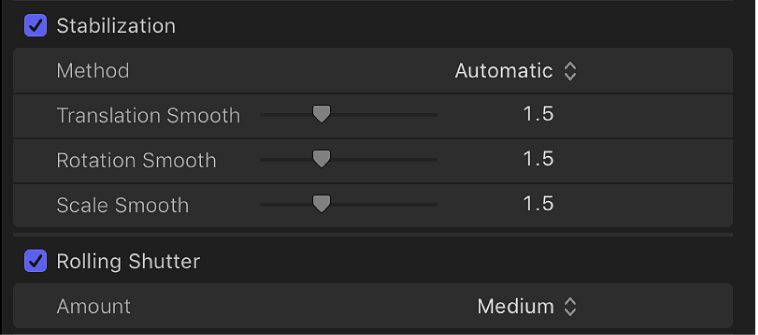
If you turn on Stabilization, its checkbox turns blue and Final Cut Pro analyzes the clip for the best stabilization method. By default, the Method pop-up menu remains set to Automatic and the sliders for the appropriate stabilization method (either InertiaCam or SmoothCam) appear below it.
If you want to change the stabilization method, click the Method pop-up menu and choose an option:
Automatic: Allows Final Cut Pro to choose the most appropriate stabilization method (either InertiaCam or SmoothCam). This is the default setting.
InertiaCam: Applies stabilization optimized for video footage that has camera moves such as pans and zooms. Use the Smoothing slider to adjust the amount of the InertiaCam effect.
Note: When you choose InertiaCam, Final Cut Pro analyzes your video footage and, depending on the results of the analysis, provides a Tripod Mode checkbox that creates the effect of a static camera that is mounted on a tripod.
SmoothCam: Applies the default stabilization method described above, allowing you to adjust the translation, rotation, and scale parameters:
Adjust left, right, up, and down movement of a shot (x and y axes): Drag the Translation Smooth slider.
Adjust rotation around the center point of the image: Drag the Rotation Smooth slider.
Adjust forward or backward camera or lens movement (z axis): Drag the Scale Smooth slider.
For example, if you want to remove horizontal, vertical, and rotational shake, set the Translation Smooth and Rotation Smooth parameters to a value greater than 0. You may need to experiment to see which values steady your shot the best.
Note: When a clip has too much motion (excessive panning, for example), stabilizing the clip may result in black bars on the edges of the video.
To avoid the black bars, you can:
Reduce the values for the Translation Smooth, Rotation Smooth, and Scale Smooth parameters.
Cut or trim the clip in the timeline to remove the sections with the most shake. (You can locate the sections with excessive shake in the Tags pane of the timeline index. Click the individual Excessive Shake tags to select the corresponding ranges in the timeline.)
Crop the edges of the stabilized video to remove the black bars.