Make color adjustments in Final Cut Pro for iPad
In any post-production workflow, color correction (also known as color grading) is generally one of the last steps in finishing an edited video. Final Cut Pro includes powerful and easy-to-use tools for color grading clips in your video.
You can adjust color in your clips in several ways:
Automatically adjust light and color: Use the Enhance Light and Color option in the Color Adjustments effect to automatically enhance a clip’s light and color. Enhance Light and Color uses machine learning to create a more natural appearance in the clip, with better color balance, brightness, and contrast.
Manually adjust light and color: Apply the Color Adjustments effect, then adjust a wide variety of settings to achieve the look you want. You can adjust exposure, contrast, brightness, saturation, and more, and you can independently adjust the image’s highlights, shadows, and midtones.
Adjust color using a color-grading preset: Apply a preset from the browser—such as Green Muted Wash or Cool Shadows with Warm Highs—to quickly give your clips a particular look. Color-grading presets are based on the Color Adjustments effect and have the same controls, so you can start by applying a preset and then adjust its settings to create a custom look.
Add a color effect: Add a color effect from the browser to quickly change an image to black and white, add a tint, create a film-negative effect, and more.
Note: For the most precision and control in color grading your clips, use the Color Adjustments effect or a color-grading preset.
Automatically enhance light and color
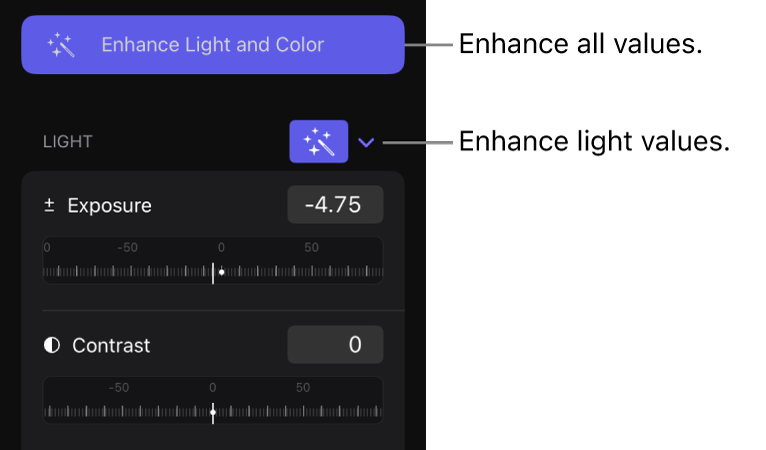
The Enhance Light and Color option in the Color Adjustments effect uses machine learning to analyze video clips and automatically enhance the tonal range of an image, removing any visible color cast.
In Final Cut Pro for iPad, open a project.
Tap a clip in the timeline, then drag the playhead over the clip (to see the effect of your changes in the viewer).
Tap Inspect in the lower-left corner of the screen, then tap
 at the top of the inspector.
Tap
 next to Effects, tap Color Adjustments, then tap
  next to Color Adjustments.
Note: You can also add the Color Adjustments effect from the browser. See Add a color effect, below.
Do one of the following:
Automatically enhance all values: Tap Enhance Light and Color.
Enhance light values only: Tap
 to the right of Light.
Enhance color values only: Tap
 to the right of Color.
To reset the automatic adjustments, tap one or both Enhance buttons ![]() so they’re no longer highlighted, or tap Reset at the top of the inspector.
so they’re no longer highlighted, or tap Reset at the top of the inspector.
To redo the analysis, tap Enhance Light and Color to turn it off, then tap it again to turn it on. The settings change if you move the playhead before analysis or change the project color space.
After you use Enhance Light and Color, you can adjust individual settings manually. See Manually adjust light and color, below.
Manually adjust light and color
In Final Cut Pro for iPad, open a project.
Tap a clip in the timeline, then drag the playhead over the clip (to see the effect of your changes in the viewer).
Tap Inspect in the lower-left corner of the screen, then tap
 at the top of the inspector.
Tap
 next to Effects, tap Color Adjustments, then tap
  next to Color Adjustments.
Note: You can also add the Color Adjustments effect from the browser. See Add a color effect, below.
To change settings for a color adjustment (or color-grading preset) you added previously, tap
 next to the adjustment in the inspector.
To automatically enhance the tonal range of the image and remove any visible color cast, tap Enhance Light and Color.
See Automatically enhance light and color, above.
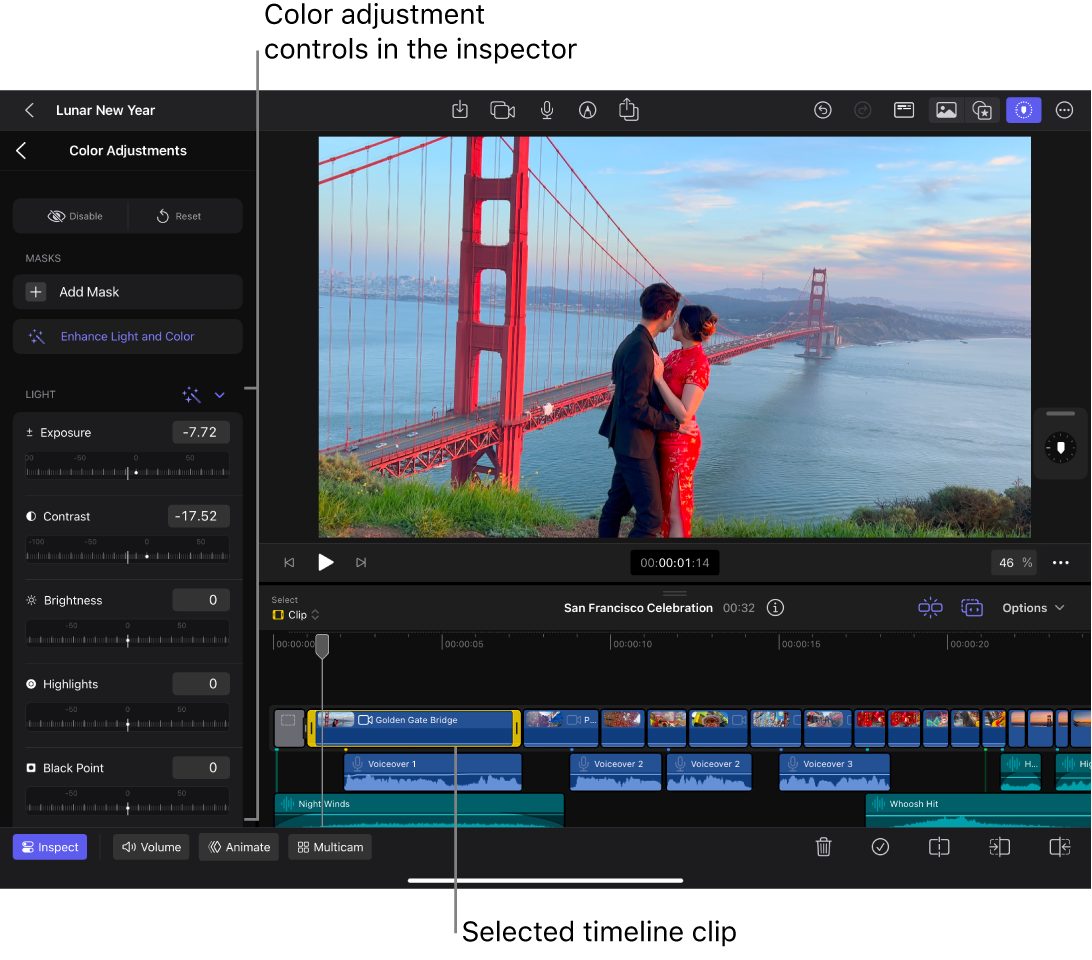
Adjust any of the following:
Light: Use the settings in this section to adjust the tonal range of an image. When the Enhance button
 to the right of Light is selected, light values are set automatically using machine learning.
Exposure: Lightens or darkens the image, with highlights typically affected more than the other tones.
Contrast: Sets the relative amount of contrast between light and dark areas.
Brightness: Adjusts the overall brightness of the image.
Highlights: Adjusts the detail in the lightest areas of the image.
Black Point: Adjusts the point at which black areas become completely black (no detail can be seen). Setting the black point can improve the contrast in a washed-out image.
Shadows: Adjusts the detail that appears in the darkest areas of the image.
Color: Use the settings in this section to adjust the color of an image. When the Enhance button
 to the right of Color is selected, color values are set automatically using machine learning.
Saturation: Adjusts the color (chroma) intensity.
Highlight Warmth: Adjusts the color temperature of the lightest areas of the image. Increase the value to add warm (orange) tones to the image, or decrease the value to add cool (blue) tones.
Highlight Tint: Fine-tunes the white-balance adjustment by neutralizing a remaining green or magenta tint. Increase the value to add a magenta tint to the image, or decrease the value to add a green tint.
Midtone Warmth: Adjusts the color temperature of the midtone areas of the image. Increase the value to add warm (orange) tones to the image, or decrease the value to add cool (blue) tones.
Midtone Tint: Fine-tunes the white-balance adjustment for the midtones only by neutralizing a remaining green or magenta tint. Increase the value to add a magenta tint to the image, or decrease the value to add a green tint.
Shadow Warmth: Adjusts the color temperature of the darkest areas of the image. Increase the value to add warm (orange) tones to the image, or decrease the value to add cool (blue) tones.
Shadow Tint: Fine-tunes the white-balance adjustment in the darkest areas of the image by neutralizing a remaining green or magenta tint. Increase the value to add a magenta tint to the image, or decrease the value to add a green tint.
Note: When Enhance Light and Color (or Color) is selected, any overall color cast is removed.
Mix: Set the amount of the original image to be blended with the adjusted image.

To temporarily turn the adjustment on or off, tap Enable or Disable at the top of the inspector. To reset the controls to their default values, tap Reset.
You can add additional color adjustments to the same clip, and customize their settings using the steps above.
Adjust color using a color-grading preset
In Final Cut Pro for iPad, open a project.
In the timeline, tap the clip you want to adjust, then drag the playhead over the clip (to see the effect of your changes in the viewer).
Tap
 in the toolbar, tap Effects in the browser, then tap Video (if it’s not already selected).
In the Color Grading Presets section, tap presets to preview their effect on the image.
To turn off the preview, tap the preset selected in the browser.
To apply a preset to the timeline clip, do one of the following:
Touch and hold the preset, then drag it to the clip in the timeline.
Tap the preset, then tap Apply under the browser.
To temporarily turn the adjustment on or off, tap the clip, tap Inspect in the lower-left corner of the screen, then tap ![]() at the top of the inspector. Tap the preset name below Effects, then tap Enable or Disable at the top of the inspector.
at the top of the inspector. Tap the preset name below Effects, then tap Enable or Disable at the top of the inspector.
To customize the settings for the preset you added, see Manually adjust light and color, above. To reset the preset’s settings to their default values, tap Reset.
Add a color effect
In Final Cut Pro for iPad, open a project.
In the timeline, tap the clip you want to modify, then drag the playhead over the clip (to see the effect of your changes in the viewer).
Tap
 in the toolbar, tap Effects in the browser, then tap Video (if it’s not already selected).
In the Color section at the top of the browser, do one of the following:
Drag an effect thumbnail over the selected clip in the timeline; when the clip becomes highlighted, release your finger.
Tap an effect thumbnail, then tap Apply below the browser.
To make changes to a color effect, see Adjust a video effect in the inspector. To manually adjust color using the Color Adjustments effect, see Manually adjust light and color, above.
Tip: Because the video effects that come with Final Cut Pro for iPad are based on the effects filters in the Motion app on Mac, you can learn more about them in the Motion User Guide.
Remove color adjustments, presets, or effects
Tip: To work with a larger viewer while you’re adjusting color, you can hide the browser by tapping the highlighted browser button (![]() or
or ![]() ) in the toolbar to deselect it. When both browser buttons are deselected, the browser is hidden.
) in the toolbar to deselect it. When both browser buttons are deselected, the browser is hidden.
You can use a mask to isolate and control which areas of the image are affected by a color adjustment preset or effect. See Mask part of a video effect.