Logic Pro User Guide for iPad
-
- What is Logic Pro?
- Working areas
- Work with function buttons
- Work with numeric values
- Undo and redo edits in Logic Pro for iPad
-
- Intro to tracks
- Create tracks
- Create tracks using drag and drop
- Choose the default region type for a software instrument track
- Select tracks
- Duplicate tracks
- Reorder tracks
- Rename tracks
- Change track icons
- Change track colors
- Use the tuner on an audio track
- Show the output track in the Tracks area
- Delete tracks
- Edit track parameters
- Start a Logic Pro subscription
- How to get help
-
- Intro to recording
-
- Before recording software instruments
- Record software instruments
- Record additional software instrument takes
- Record to multiple software instrument tracks
- Record multiple MIDI devices to multiple tracks
- Record software instruments and audio simultaneously
- Merge software instrument recordings
- Spot erase software instrument recordings
- Replace software instrument recordings
- Capture your most recent MIDI performance
- Route MIDI internally to software instrument tracks
- Record with Low Latency Monitoring mode
- Use the metronome
- Use the count-in
-
- Intro to arranging
-
- Intro to regions
- Select regions
- Cut, copy, and paste regions
- Move regions
- Remove gaps between regions
- Delay region playback
- Trim regions
- Loop regions
- Repeat regions
- Mute regions
- Split and join regions
- Stretch regions
- Separate a MIDI region by note pitch
- Bounce regions in place
- Change the gain of audio regions
- Create regions in the Tracks area
- Convert a MIDI region to a Session Player region or a pattern region
- Replace a MIDI region with a Session Player region in Logic Pro for iPad
- Rename regions
- Change the color of regions
- Delete regions
-
- Intro to chords
- Add and delete chords
- Select chords
- Cut, copy, and paste chords
- Move and resize chords
- Loop chords on the Chord track
- Color chords on the Chord track
- Edit chords
- Work with chord groups
- Use chord progressions
- Change the chord rhythm
- Choose which chords a Session Player region follows
- Analyze the key signature of a range of chords
- Create fades on audio regions
- Extract vocal and instrumental stems with Stem Splitter
- Access mixing functions using the Fader
-
- Intro to Step Sequencer
- Use Step Sequencer with Drum Machine Designer
- Record Step Sequencer patterns live
- Step record Step Sequencer patterns
- Load and save patterns
- Modify pattern playback
- Edit steps
- Edit rows
- Edit Step Sequencer pattern, row, and step settings in the inspector
- Customize Step Sequencer
-
- Intro to mixing
-
- Channel strip types
- Channel strip controls
- Peak level display and clipping
- Set channel strip volume
- Set channel strip input format
- Set the output for a channel strip
- Set channel strip pan position
- Mute and solo channel strips
- Reorder channel strips in the Mixer in Logic Pro for iPad
- Replace a patch on a channel strip using drag and drop
- Work with plug-ins in the Mixer
- Search for plug-ins in the Mixer in Logic Pro for iPad
-
- Effect plug-ins overview
-
- Instrument plug-ins overview
-
- ES2 overview
- Interface overview
-
- Modulation overview
- Use the Mod Pad
-
- Vector Envelope overview
- Use Vector Envelope points
- Use Vector Envelope solo and sustain points
- Set Vector Envelope segment times
- Vector Envelope XY pad controls
- Vector Envelope Actions menu
- Vector Envelope loop controls
- Vector Envelope point transition shapes
- Vector Envelope release phase behavior
- Use Vector Envelope time scaling
- Modulation source reference
- Via modulation source reference
-
- Sample Alchemy overview
- Interface overview
- Add source material
- Save a preset
- Edit mode
- Play modes
- Source overview
- Synthesis modes
- Granular controls
- Additive effects
- Additive effect controls
- Spectral effect
- Spectral effect controls
- Filter module
- Low, bandpass, and highpass filters
- Comb PM filter
- Downsampler filter
- FM filter
- Envelope generators
- Mod Matrix
- Modulation routing
- Motion mode
- Trim mode
- More menu
- Sampler
- Studio Piano
- Copyright
Sculpture string parameter scaling in Logic Pro for iPad
The String Parameter Scaling controls determine the behavior of string parameters across the key range.
Tap the Hide, KeyScale, or Release button to show or hide the corresponding parameters.

Hide, KeyScale, and Release buttons
Hide button: Hide Key Scale or Release parameters.
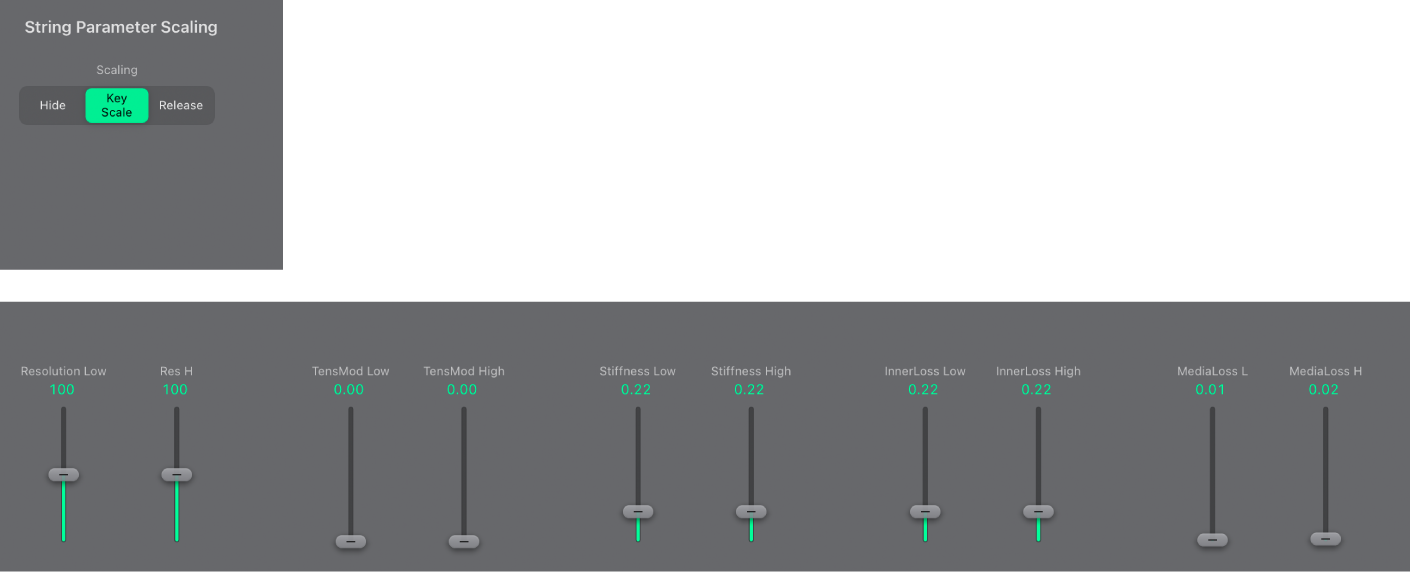
KeyScale button: Show and set parameters for notes that fall below C3 or notes that are positioned above it. In simple terms, the impact of these parameters can be controlled across the keyboard range. For example, a parameter such as string Stiffness could be more intense for high notes and less intense for low notes. In practical terms, this would result in more harmonic (sweeter) sounding bass notes and inharmonic overtones in treble notes (notes above C3).
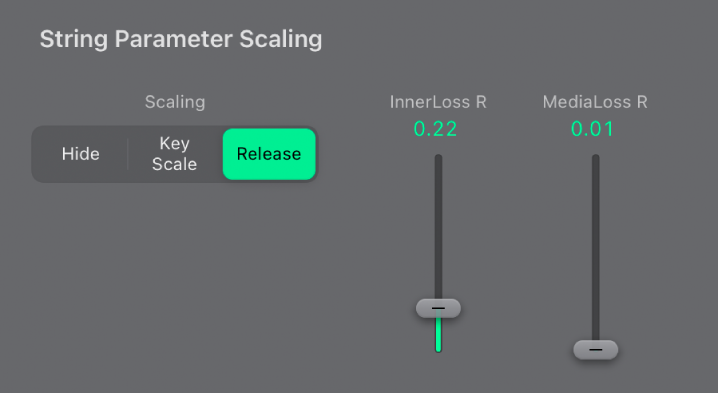
Release button: Show and set string Release parameters, which affect the vibrations of the string after the key is released.
KeyScale parameters
These parameters work in conjunction with controls found in the String Parameters and Material Pad sections.
Resolution Low slider and field: Set the key tracking resolution for notes below middle C (C3). The Resolution Keyscale parameters change the scaling of (harmonic and inharmonic) overtones as you play lower or higher on the keyboard. Use these parameters to smooth out or accentuate these overtones across the key range.
Res(olution) H(igh) slider and field: Set the key tracking resolution for notes above middle C.
TensMod Low slider and field: Set the tension modulation tracking behavior for notes below middle C. The Tension Mod Keyscale parameters change the scaling of the momentary detuning (pitch bend) of the string as you play lower or higher on the keyboard. Use these parameters to smooth out or accentuate this momentary detuning across the key range.
TensMod High slider and field: Set the tension modulation behavior for notes above middle C.
Stiffness Low slider and field: Set the Stiffness key tracking behavior for notes below middle C. The Stiffness Keyscale parameters change the scaling of inharmonic content that is heard as you play lower or higher on the keyboard. Use them to smooth out or accentuate the inharmonic content across the key range.
Stiffness High slider and field: Set the Stiffness key tracking behavior for notes above middle C.
InnerLoss Low slider and field: Set the Inner Loss key tracking behavior for notes below middle C. The Inner Loss Keyscale parameters change the way string damping is scaled as you play lower or higher on the keyboard.
InnerLoss High slider and field: Set the Inner Loss key tracking behavior for notes above middle C.
MediaLoss L(ow) slider and field: Set the Media Loss key tracking behavior for notes below middle C. The Media Loss Keyscale parameters change the way damping of the atmosphere in which the string is vibrating is scaled as you play lower or higher on the keyboard.
MediaLoss H(igh) slider and field: Set the Media Loss key tracking behavior for notes above middle C.
Release parameters
In Release view, you define changes to the damping amount when the key is released. Conservative use of these parameters allows a natural simulation of strings that are dampened when a note-off message is received. See String Parameters and Material Pad.

Note: You can’t adjust the release behavior of the Stiffness parameter.
InnerLoss R(elease) slider and field: Set inner loss behavior (string damping) when the key is released.
MediaLoss R(elease) slider and field: Set media loss behavior (the atmosphere in which the string is vibrating) when the key is released.
Download this guide: PDF