Logic Pro User Guide for iPad
- Welcome
- What’s new in Logic Pro for iPad
-
- What is Logic Pro?
- Working areas
- Work with the menu bar
- Work with function buttons
- Work with numeric values
- Undo and redo edits in Logic Pro for iPad
-
- Intro to tracks
- Create tracks
- Create tracks using drag and drop
- Choose the default region type for a software instrument track
- Select tracks
- Duplicate tracks
- Reorder tracks
- Rename tracks
- Change track icons
- Change track colors
- Use the tuner on an audio track
- Show the output track in the Tracks area
- Delete tracks
- Edit track parameters
- How to get help
-
- Intro to recording
-
- Before recording software instruments
- Record software instruments
- Record additional software instrument takes
- Record to multiple software instrument tracks
- Record multiple MIDI devices to multiple tracks
- Record software instruments and audio simultaneously
- Merge software instrument recordings
- Spot erase software instrument recordings
- Replace software instrument recordings
- Route MIDI internally to software instrument tracks
- Record with Low Latency Monitoring mode
- Use the metronome
- Use the count-in
-
- Intro to arranging
-
- Intro to regions
- Select regions
- Cut, copy, and paste regions
- Move regions
- Remove gaps between regions
- Delay region playback
- Trim regions
- Loop regions
- Repeat regions
- Mute regions
- Split and join regions
- Stretch regions
- Separate a MIDI region by note pitch
- Bounce regions in place
- Change the gain of audio regions
- Normalize audio regions in the Tracks area in Logic Pro for iPad
- Create regions in the Tracks area
- Convert a MIDI region to a Session Player region or a pattern region
- Replace a MIDI region with a Session Player region in Logic Pro for iPad
- Rename regions
- Change the color of regions
- Delete regions
-
- Intro to chords
- Add and delete chords
- Select chords
- Cut, copy, and paste chords
- Move and resize chords
- Loop chords on the Chord track
- Color chords on the Chord track
- Edit chords
- Work with chord groups
- Use chord progressions
- Change the chord rhythm
- Choose which chords a Session Player region follows
- Analyze the key signature of a range of chords
- Analyze the chords in an audio or MIDI region with Chord ID
- Create fades on audio regions
- Extract vocal and instrumental stems with Stem Splitter
- Access mixing functions using the Fader
-
- Intro to editing regions and cells
-
-
- Piano Roll Editor overview
- Select notes
- Add notes
- Delete notes
- Mute notes
- Trim notes
- Move notes
- Copy notes
- Repeat notes
- Shorten overlaps
- Force legato
- Lock note position
- Transpose notes
- Change note velocity
- Change release velocity
- Change MIDI channel
- Set articulation IDs
- Quantize timing
- Quantize pitch
- Edit Live Loops in the Cell Editor
-
- Intro to Step Sequencer
- Use Step Sequencer with Drum Machine Designer
- Chords and pitch in Step Sequencer
- Record Step Sequencer patterns live
- Step record Step Sequencer patterns
- Load and save patterns
- Modify pattern playback
- Edit steps
- Edit rows
- Edit Step Sequencer pattern, row, and step settings in the inspector
- Customize Step Sequencer
-
- Intro to mixing
-
- Channel strip types
- Channel strip controls
- Peak level display and clipping
- Set channel strip volume
- Set channel strip input format
- Set the output for a channel strip
- Set channel strip pan position
- Mute and solo channel strips
- Reorder channel strips
- Replace a patch on a channel strip using drag and drop
- Work with plug-ins in the Mixer
- Search for plug-ins in the Mixer
-
-
- Effect plug-ins overview
-
- Instrument plug-ins overview
-
- ES2 overview
-
- Modulation overview
- Use the Mod Pad
-
- Vector Envelope overview
- Use Vector Envelope points
- Use Vector Envelope solo and sustain points
- Set Vector Envelope segment times
- Vector Envelope XY pad controls
- Vector Envelope Actions menu
- Vector Envelope loop controls
- Vector Envelope point transition shapes
- Vector Envelope release phase behavior
- Use Vector Envelope time scaling
- Modulation source reference
- Via modulation source reference
- Use macro controls
-
- Sample Alchemy overview
- Interface overview
- Add source material
- Save a preset
- Edit mode
- Play modes
- Source overview
- Synthesis modes
- Granular controls
- Additive effects
- Additive effect controls
- Spectral effect
- Spectral effect controls
- Filter module
- Low, bandpass, and highpass filters
- Comb PM filter
- Downsampler filter
- FM filter
- Envelope generators
- Mod Matrix
- Modulation routing
- Motion mode
- Trim mode
- More menu
- Sampler
- Studio Piano
- Copyright and trademarks
Flex project settings in Logic Pro for iPad
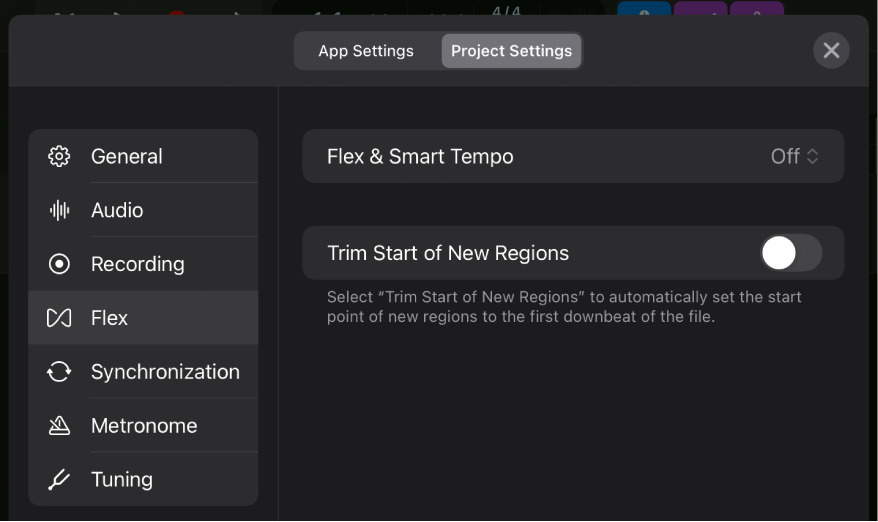
Flex & Smart Tempo pop-up menu: You choose an option to set the Flex switch and Smart Tempo pop-up menu in the Region Defaults inspector. Any newly recorded region adapts those settings displayed in its Region inspector. Changing the Flex and Smart Tempo parameters in the Region Defaults inspector overwrites the selection you made in the Flex & Smart Tempo pop-up menu. The setting also applies to imported audio files.
Flex Off: The Flex switch in the inspector is set to the Off position (flex is turned off) and the Smart Tempo pop-up menu is set to Off. That means the region isn’t flexed and plays back as it was originally recorded.
Flex On, Smart Tempo Off: The Flex switch in the inspector is set to the On position (flex is turned on) and Smart Tempo is set to Off. That means the region is flexed—following the project tempo, quantization settings, and manual flex markers—but the file tempo is ignored. This is useful when the embedded tempo information in the file is incorrect. You still can stretch the audio region and apply quantization.
Flex On, Smart Tempo On: The Flex switch in the inspector is set to the On position (flex is turned on) and Smart Tempo is set to On using the file tempo). That means the region is flexed, using the file tempo as a reference to follow the project tempo.
Flex On, ST On + Align Bars: The Flex switch in the inspector is set to the On position (flex is turned on) and Smart Tempo is set to On + Align Bars. That means the region is flexed, using the file tempo as a reference to follow the project tempo. In addition, beat markers in the region (created by Smart Tempo during the tempo analysis) are used to conform the region to the project tempo at every downbeat (bar).
Flex On, ST On + Align Bars and Beats: The Flex switch in the inspector is set to the On position (flex is turned on) and Smart Tempo is set to On + Align Bars and Beats. That means the region is flexed, using the file tempo as a reference to follow the project tempo. In addition, beat markers in the region are used to conform the region to the project tempo at every beat.
Trim Start of New Regions switch: Automatically sets the start of newly recorded regions to the first downbeat of the file.
Download this guide: PDF