Use the Sampler Mapping pane menu in MainStage
You can use Mapping pane menu commands and functions at any time. The menu bar displays the same menus and elements in the Key Mapping Editor, Group view, and Zone view.
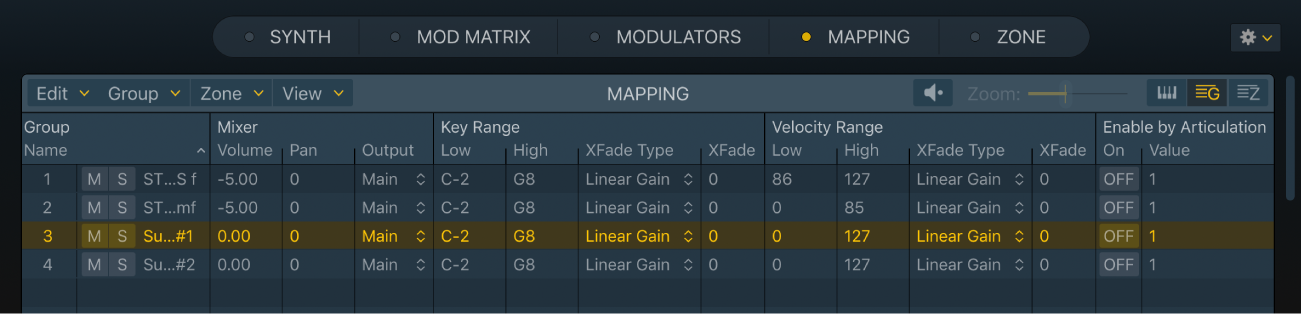
Mapping pane menu parameters
See the tasks in this section to learn more about the commands and functions in each pop-up menu.
Edit pop-up menu: Choose an editing or selection command or function.
Group pop-up menu: Choose a group-related command or function.
Zone pop-up menu: Choose a zone-related command or function. This menu contains Split, Automap, Remap, Loop, and Audio File submenus.
View pop-up menu: Choose an option that affects the appearance and behavior of the display.
Preview button: Play the selected zone.
Zoom slider: In the Key Mapping Editor, drag to zoom the view in or out. You can also use pinch gestures to zoom directly in the graphical editor with your trackpad. If you are using a Magic Mouse, use a single-finger vertical swipe to zoom.
Editor view buttons: Use to switch to the Key Mapping Editor, Group view, or Zone view.
Use Mapping pane Edit menu commands
In MainStage Sampler, choose any of the following commands or functions from the Edit menu:
Cut, Copy, Paste: The standard commands for cutting, copying, and pasting values. You can also cut, copy, and paste selected zones and groups.
When you copy groups between two Sampler instances, associated zones are also copied and group assignments of the zones are retained.
When you copy groups within a single Sampler instance, only the groups themselves are copied, not the associated zones. This behaves like the Group menu Duplicate command.
Delete: Deletes the currently selected zone or group.
WARNING: Take care when deleting a group because all zones associated with the group are also deleted.
Select All: Selects all zones and groups in the loaded sampler instrument.
Deselect All: Selects none of the zones and groups in the loaded sampler instrument.
Select Unused: Selects all unused zones and groups in the loaded sampler instrument. These commands are available only when the Key Mapping Editor or Zone view is active.
Unused Group: A group that doesn’t contain at least one zone, is not part of a round robin, and has no keyswitch is considered unused.
Unused Zone: A zone without a reference to an audio file is considered empty or unused.
Note: A zone without a reference can be created manually by using the New command in the Zone menu. You can manually remove the zone audio reference by using the Detach command in the Zone > Audio files menu.
Invert Selection: Switches the current selection. For example, if you have selected all unused zones and groups, this command will select all used zones and groups.
Select from Last Played Keys: Selects groups, zones and groups, or neither when you play keys on your MIDI keyboard.
None: No zone or group is selected when you play your MIDI keyboard.
Groups: One or more groups is selected when you play your MIDI keyboard.
Groups and Zones: Both zones and groups are selected when you play your MIDI keyboard.
Edit Key Labels: Open a dialog where you can name keys. This is ideal for GM Drum kit mapping, for example.
Edit Output Labels: Open a dialog where you can name audio outputs.
Use Mapping pane Group menu commands
In MainStage Sampler, choose any of the following commands or functions from the Group menu:
New: Create a new, empty group.
Duplicate: Create a copy of the selected group (or groups), inclusive of zones and all group parameter settings.
Create Round Robin: Creates a round robin of multiple selected groups. Repeatedly striking a key will sequentially step through these groups in a continuous cycle. See the task in Make advanced Sampler group selections.
Merge: Merges multiple selected groups.
Use Mapping pane Zone menu commands
In MainStage Sampler, choose any of the following commands or functions from the Zone menu:
New: Create a new empty zone (a zone with no reference to an audio file).
Load Audio Files: Open a browser window where you can choose one or more audio files.
Normalize Loudness: Analyze the selected zone to find the perceived loudness and raise or lower the volume of the zone to achieve a perceived loudness of -12 LUFs. The dynamic relationships of sample levels within the zone remain unaltered. When multiple zones are selected, all will play at the same loudness and the dynamic relationships of sample levels between zones will change.
Tip: If you want to maintain the same relative gain relationship between zones, raise or lower the group volume.
Retune: Analyzes the audio content and sets the root key and tuning value automatically.
Assign to New Group: Create a new empty group and move the selected zone(s) to this group.
Always Move Root Key with Zone: Turn on to automatically move the root key when you drag one or more zones in the Key Mapping Editor.
Tip: This is useful when you want to change a zone’s keyboard position without transposing the zone pitch, when moving it up or down the keyboard.
Prefer Splitting Zones by Velocity: Turn on to change the appearance and behavior of zones in the Key Mapping Editor when you drag the boundary between two zones stacked vertically.
Turn on to cut zones horizontally (by velocity) to resolve a zone overlap within the same group.
Turn off to cut zones vertically (by note) to resolve a zone overlap within the same group.
Slide Zones Over: Turn on to change the appearance and behavior of zones in the Key Mapping Editor when you drag them horizontally to positions that overlap other zones.
Turn on to cut unselected zones to resolve a zone overlap within the same group.
Turn off to cut selected zones to resolve a zone overlap within the same group.
Protect Unselected Zones in Zone List: Turn on to prevent accidental overlaps, and therefore modifications, of unselected zones when you edit notes and velocities in Zone view.
Preview Selected Zone: Automatically plays the selected zone when selected.
In MainStage Sampler, choose any of the following commands or functions from the Zone > Split menu:
Create Zones Split at Transients: Use to analyze the selected zone for transients. A new zone is created for each transient detected in the audio file. This feature is most commonly used to split loops that contain drum, percussion, or other rhythmic patterns.
Create Zones Split at Silence: Use to analyze the selected zone for points with extended periods of silence. New zones are created for the non-silent sections of the zone. This feature is most commonly used to split custom recordings of instruments, where notes of various pitches and loudness levels are played, separated by a second or two of silence.
Create Zones Split at Notes: Use to analyze the selected zone for clear, pitched notes. A new zone is created for each pitched note, of sufficient duration and harmonicity, detected in the audio file. This feature is most commonly used to split loops that contain musical phrases.
Tip: For all of these “Create” functions, once a zone is split, you can use Automap menu commands with the resulting zones to build a playable instrument.
Use Mapping pane Zone menu Automap commands
Automapping is a process that repositions zones across keyboard and velocity ranges, based on the audio content of each zone. As examples: note pitch or loudness, or a filename.
In MainStage Sampler, choose any of the following commands or functions from the Zone > Automap menu:
Automap using Current Root Note: Selected zones are extended horizontally to fill the entire key range without gaps between zones, relative to the current root note position. If multiple selected zones have the same root note, they will be sorted by velocity, based on audio content loudness levels.
Automap using Pitch Detection: Selected zones are repositioned and extended horizontally to fill the entire key range without gaps between zones, in accordance with their pitch. If multiple selected zones have the same pitch, they will be sorted by velocity, based on audio content loudness levels.
Automap using Mapping Data from Audio Files: Selected zones are mapped using any recognized mapping data contained within the audio file header. Should the content of audio files overlap, new groups are created and zones are automatically moved to avoid overlaps.
Automap using Root Note from Audio File Names: Selected zones are repositioned and extended horizontally to fill the entire key range without gaps between zones based on root note data in the audio filename. If multiple selected zones have the same root note in the filename, they will be sorted by velocity, based on audio content loudness levels.
Automap using Root Note from Audio File: Selected zones are repositioned and extended horizontally to fill the entire key range without gaps between zones based on root note metadata in the audio file. If multiple selected zones have the same root note metadata in the file, they will be sorted by velocity, based on audio content loudness levels.
Automap Velocities Only: Selected zones are repositioned and extended vertically to fill the entire velocity range without gaps between zones based on audio content loudness levels.
Use Mapping pane Zone menu Remap commands
Remapping is a process that repositions zones across keyboard and velocity ranges, with no analysis of audio file content.
In MainStage Sampler, choose any of the following commands or functions from the Zone > Remap menu:
Remap Notes: Use to open a dialog where you can specify a start note and width that is applied to all selected zones.
Remap Velocities: Use to open a dialog where you can specify a velocity range that is applied to all selected zones.
Remap White Notes: Use to remap all selected zones to white notes only.
Remap Black Notes: Use to remap all selected zones to black notes only.
Remap All Notes: Use to remap all selected zones to fill all free keys, starting from the position/key of the lowest selected zone.
Remap to Root Notes: Use to remap all selected zones to their respective root key positions.
Remap Evenly: Use to evenly remap all selected zones across the entire keyboard range.
Remap to Round Robin: Use to remap all selected zones to a new round robin group. Different round robin numbers are automatically assigned to each zone.
Pivot on Corner: Use to remap selected zones to the position/key of the lowest selected note. Selected zones are stacked vertically on the key, in order from lowest (at the bottom) to highest numbered. The velocity range of each stacked zone is automatically adjusted.
Note: In cases where selected zones are already stacked vertically, Pivot on Corner will perform the inverse function and will place each zone on a different key, using the full velocity range available.
Mirror Velocities: Use to change the velocity range positions of all selected zones. Selected zone positions are mirrored vertically on the key.
Fill Gaps: Use to expand the velocity and key ranges of all selected zones that have gaps between them. Expansion of these ranges is balanced between selected zones.
Fill Gaps (Notes Only): Expands the key ranges of all selected zones that have gaps between them.
Fill Gaps (Vel Only): Expands the velocity ranges of all selected zones that have gaps between them.
Swap: Use to swap the positions of two selected zones.
Use Mapping pane Zone menu Root Key commands
In MainStage Sampler, choose any of the following commands or functions from the Zone > Root Key menu:
Read Root Key from Audio Analysis: The selected zone is analyzed for the root key.
Read Root Key from Audio File Name: The selected audio file name is scanned for root key data.
Read Root Key from Audio File Chunk: The selected audio file chunk is scanned for root key data. A chunk can be specified in the metadata of a WAV file.
Read Root Key from Audio File SMPL Chunk: The selected audio file SMPL chunk is scanned for root key data. The SMPL chunk can be specified in the metadata of a WAV file.
Use Mapping pane Zone menu Loop commands
In MainStage Sampler, choose any of the following commands or functions from the Zone > Loop menu:
Auto-Loop: Use to analyze the selected zone and to automatically set loop start and loop end marker positions.
Set Start to Loop Start: Use to move the (sample) start marker to the current loop start marker position.
Set End to Loop End: Use to move the (sample) end marker to the current loop end position.
Set Loop from Start to End: Use to move the loop start and end markers to the (sample) start and end marker positions.
Optimize Loop Start: Use to automatically adjust the loop start point to create a smooth loop cycle.
Optimize Loop Crossfade/End: Use to automatically set crossfade values at the point in the loop cycle where the loop end and loop start markers cross over. The loop length is not affected.
These Loop commands are also available in the Edit menu in the Zone pane.
Use Mapping pane Zone menu Audio Files commands
In MainStage Sampler, choose any of the following commands or functions from the Zone > Audio Files menu:
Detach: Use to remove the audio file association from the selected zone. This results in an empty zone.
Write Loop: Use to write loop start and end data to the header of the audio file associated with the selected zone.
Write Mapping: Use to write mapping data such as: the root key, key range, and velocity range to the header of the audio file associated with the selected zone.
Update Info from Audio File: Use to retrieve and refresh mapping data from the header of the audio file associated with the selected zone.
Use Mapping pane Zone menu Rename commands
In MainStage Sampler, choose any of the following commands or functions from the Zone > Rename menu:
Rename using Audio File Name: Use to rename the selected zone, based on the audio filename.
Rename using Audio File Name and Root: Use to rename the selected zone, based on the audio filename and root note.
Rename using Audio File Name, Root and Velocity: Use to rename the selected zone, based on the audio filename, root note, and velocity.
Add Root and Velocity to Existing Name: Use to add audio file root note and velocity data to the selected zone name.
Use Mapping pane View menu commands
In MainStage Sampler, choose any of the following display functions from the View menu to change the layout and appearance of the Key Mapping Editor, Group view, and Zone view:
Show Zone Names: Turn on to display zone names on each zone in the Key Mapping Editor.
Show Zones from all Selected Groups: Turn on to restrict the display of zones to selected groups in the Key Mapping Editor and Zone view.
Show Group Column in Mapping Editor: Turn on to display the group list in the Key Mapping Editor.
Show Group Column in Zone List: Turn on to display the group list in Zone view.
Visible Group List Columns: Choose each item to display the corresponding parameter column in Group view. A checkmark is shown beside active items. Choose an active item to hide the column in Group view.
Show all/used columns: Choose to show all or used columns only in Group or Zone view.
Restore column options: Choose a Restore item to reset the current Group or Zone view column layout to default settings.
Use column layout as default: Choose to set the current Group or Zone view column layout as the default column layout.
Visible Zone List Columns: Choose each item to display the corresponding parameter column in Zone view. A checkmark is shown beside active items. Choose an active item to hide the column in Zone view.
Show all/used columns: Choose to show all or used columns only in Group or Zone view.
Restore column options: Choose a Restore item to reset the current Group or Zone view column layout to default settings.
Use column layout as default: Choose to set the current Group or Zone view column layout as the default column layout.