
Använda Dölj min e-postadress på datorn
Med Dölj min e-postadress kan du generera unika, slumpmässiga e-postadresser som vidarebefordrar mejl till ditt privata e-postkonto. Det betyder att du slipper lämna ut din riktiga e-postadress när du fyller i formulär på webben eller registrerar dig för ett nyhetsbrev. Du kan välja att vidarebefordra mejl till din Mail på iCloud-adress eller valfri e-postadress som är kopplad till ditt Apple‑ID.
Om du vill veta vad du kan göra med Dölj min e-postadress på dina iOS- och iPadOS-enheter och på iCloud.com läser du Ställa in och använda Dölj min e-postadress i iCloud+ på alla dina enheter.
Om du vill använda Dölj min e-postadress måste du prenumerera på iCloud+ eller Apple One som omfattar iCloud+ och andra tjänster. Se Apple Support-artikeln Samla alla dina Apple-prenumerationer i ett paket med Apple One.
Obs! iCloud+ är kanske inte tillgängligt i alla länder eller regioner, och iCloud+-funktionerna kan variera beroende på område. Se webbsidan macOS Tillgängliga funktioner.
Skapa en ny adress automatiskt i Safari eller Mail
I Safari och Mail kan du automatiskt skapa en unik, slumpmässig adress genom att klicka i fältet för e-postadress och välja Dölj min e-postadress. Se Gömma din privata e-postadress i Safari och Använda Dölj min e-postadress i Mail.
Skapa en ny adress manuellt i iCloud-inställningarna
Välj Apple-menyn

Om du inte ser ditt namn klickar du på ”Logga in med ditt Apple-ID”, anger ditt Apple-ID (eller en e-postadress eller ett telefonnummer du kan nås på som du har angett i Apple-ID-inställningarna) och anger sedan lösenordet. Om du inte har ett Apple‑ID kan du skapa ett.
Klicka på iCloud till höger och sedan på Göm min e-postadress. (Du kanske måste rulla nedåt.)
Klicka på lägg till-knappen
 i det nedre vänstra hörnet.
En dialogruta öppnas med en slumpmässigt skapad iCloud-e-postadress.
Tips: Skapa en ny slumpmässig iCloud-mejladress genom att klicka på uppdateringsknappen
 .
.Skriv en etikett för e-postadressen och en anteckning som påminner dig om hur du använder den här e-postadressen. Klicka sedan på Fortsätt.
När adressen har skapats kopierar du e-postadressen till urklipp genom att klicka på Kopiera adress.
Klicka på Fortsätt när du är färdig. Klicka sedan på Klar.

Hantera adresser som är skapade med Dölj min e-postadress
Du kan kopiera en adress, ändra etiketter, skapa nya adresser, avaktivera eller radera adresser och välja till vilken privat e-postadress du vill vidarebefordra mejl.
Välj Apple-menyn
Om du inte ser ditt namn klickar du på ”Logga in med ditt Apple-ID”, anger ditt Apple-ID (eller en e-postadress eller ett telefonnummer du kan nås på som du har angett i Apple-ID-inställningarna) och anger sedan lösenordet. Om du inte har ett Apple‑ID kan du skapa ett.
Klicka på iCloud till höger och sedan på Göm min e-postadress. (Du kanske måste rulla nedåt.)
Om det behövs anger du ditt Apple‑ID-lösenord och klickar på Fortsätt.
Gör något av följande med alternativen som visas:
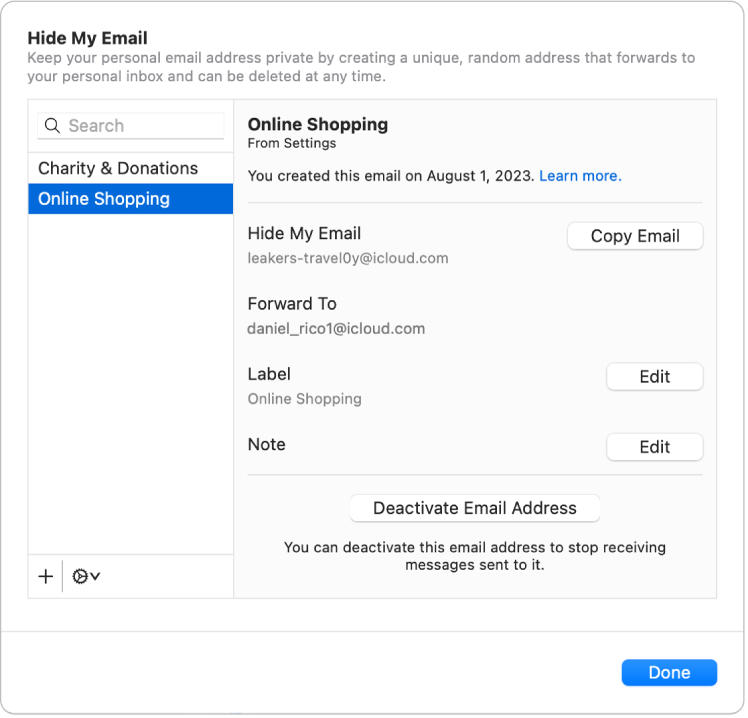
Redigera en etikett: Markera en adress till vänster och klicka på Redigera bredvid Etikett till höger. Gör dina ändringar i etiketten och klicka sedan på Klar.
Redigera en anteckning: Markera en adress till vänster och klicka på Redigera bredvid Anteckning till höger. Gör dina ändringar i anteckningen och klicka sedan på Klar.
Avaktivera en adress: Markera en adress till vänster och klicka på Avaktivera e-postadress till höger. Klicka sedan på Avaktivera.
Återaktivera en inaktiv adress: Klicka på alternativknappen
 i det nedre vänstra hörnet och klicka sedan på Visa inaktiva adresser. Markera en inaktiv adress i listan till vänster och klicka på Återaktivera adress till höger. Klicka på Återaktivera och sedan på Klar.
Radera en inaktiv adress: Klicka på alternativknappen
i det nedre vänstra hörnet och klicka sedan på Visa inaktiva adresser. Markera en inaktiv adress i listan till vänster och klicka på Radera adress. Klicka på Radera och sedan på Klar.Välj en privat e-postadress som du vill vidarebefordra mejl till: Om du har fler än en privat e-postadress klickar du på alternativknappen
i det nedre vänstra hörnet och klickar sedan på Ändra vidarebefordringsadress. Markera adressen som Dölj min e-postadress ska vidarebefordra mejl till och klicka sedan på Klar.
Klicka på Klar.
Information om funktionerna i iCloud+ för Safari finns i Safari Användarhandbok.