Final Cut Pro User Guide
- Welcome
- What’s new
-
- Intro to effects
-
- Intro to transitions
- How transitions are created
- Add transitions and fades
- Quickly add a transition with a keyboard shortcut
- Set the default duration for transitions
- Delete transitions
- Adjust transitions in the timeline
- Adjust transitions in the inspector and viewer
- Merge jump cuts with the Flow transition
- Adjust transitions with multiple images
- Modify transitions in Motion
-
- Add storylines
- Use the precision editor
- Conform frame sizes and rates
- Use XML to transfer projects
- Glossary
- Copyright

View and change audio levels in Final Cut Pro for Mac
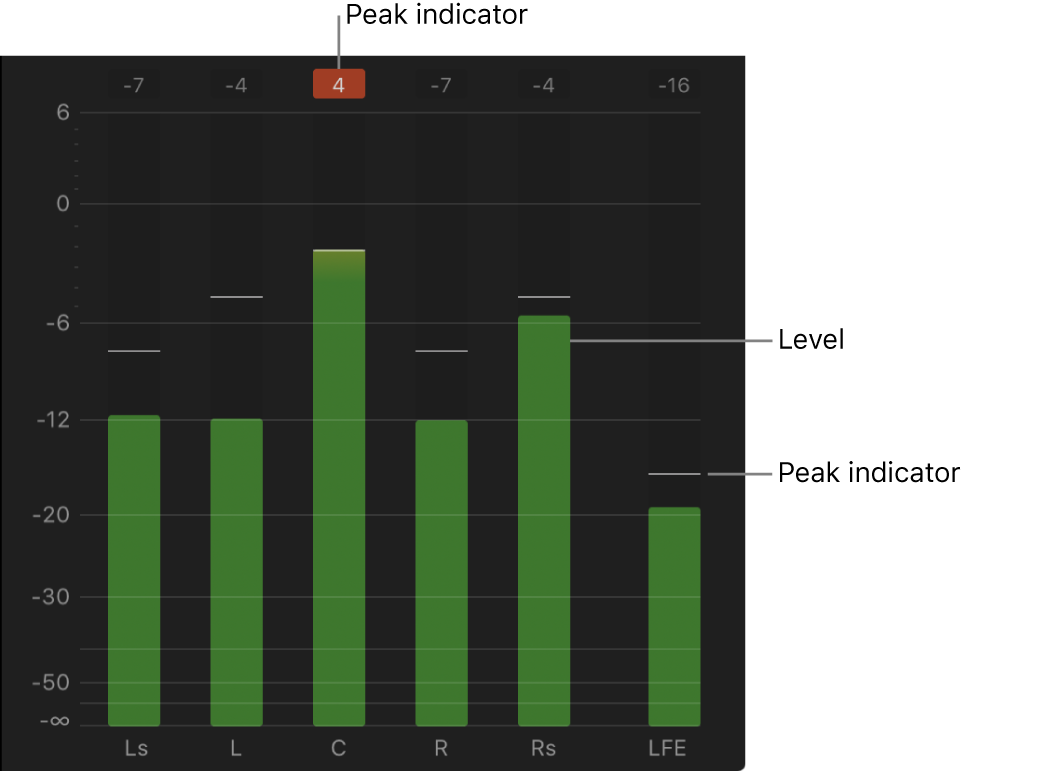
The audio meters show the audio levels of clips in Final Cut Pro and warn you if a particular clip or section of a clip reaches peak levels, which may result in audible distortion.
When an audio clip is approaching peak levels during playback, the level color changes from green to yellow.
When an audio clip exceeds peak levels, the level color changes from yellow to red, and the peak indicator turns red for the respective audio channel or channels. The peak indicators are reset when you stop and start playback.
To avoid having clip volume exceed peak levels, adjust the volume. Although the proper level for a clip depends on the mix, it’s important to make sure that the combined level for all concurrent clips doesn’t exceed 0 dB during the loudest sections.
Show the audio meters
Final Cut Pro includes a small audio meters icon below the viewer and larger audio meters that can be shown to the right of the timeline.
In Final Cut Pro, do one of the following:
Choose Window > Show in Workspace > Audio Meters, so there’s a checkmark next to the menu item.
Click the audio meters icon below the viewer.

You can drag the edges of the meters to see an expanded view with additional information.

To hide the audio meters, choose Window > Show in Workspace > Audio Meters, or click the audio meters icon below the viewer.
Note: The number of audio meters you see depends on how many channels are configured for the clip you’re playing. For example, when you play back a surround clip in the browser, six surround audio meters are displayed, but if you drag that same clip into a stereo project in the timeline, Final Cut Pro automatically mixes down the surround audio into stereo, and only two audio meters are displayed. For information about changing a project from stereo to multichannel surround sound, see Modify a project’s settings in Final Cut Pro for Mac. For information about channel configurations, see Configure audio channels in Final Cut Pro for Mac.
Reset and correct peak levels
Adjust the volume, and play back the clip again to test for peaks.
In the timeline and browser, the waveform section or sections of a clip turn yellow when a level is approaching peak levels, and red when a level exceeds 0 dB.
Note: If you add a clip with mono audio to a stereo project, Final Cut Pro plays the single mono audio in both left and right channels, visible in the stereo audio meters for the project.
Download this guide: Apple Books | PDF