Create a multi-channel MXF file with Final Cut Pro
Learn how to use finished 5.1 surround and stereo sound mixes to create a multi-channel MXF file.
With Final Cut Pro, you can create a multi-channel MXF (Material Exchange File) file that's suitable for broadcast or theatrical release. When completed, the MXF file contains eight audio channels—six 5.1 surround channels and two stereo channels.
To create the MXF file, you need:
A video Master File of the finished Final Cut Pro project.
The finished 5.1 surround audio mix, in either of the following formats:
A single 6-channel interleaved audio file, in which each channel corresponds to one of the 5.1 surround channels (L, R, C, LFE, LS, and RS).
Six individual mono files, in which each file corresponds to a 5.1 surround channel.
The finished stereo mix, in either of the following formats:
A single stereo-interleaved audio file.
Two individual mono files, in which one file corresponds to the left channel and the other file to the right channel.
If you're using mono audio files for the finished surround and stereo mixes, make sure to name each file appropriately for the audio channel each file represents.
Click one of the following links for instructions, depending on the version of Final Cut Pro you're using.
Create a multi-channel MXF file using Final Cut Pro 10.3
To create a multi-channel MXF file in Final Cut Pro 10.3, use Final Cut Pro to import media into a project, assign audio channels to roles, and create the final MXF file.
Import media
First, import media into a new Final Cut Pro project and increase the gain of the audio files. Adding 3 dB of gain now compensates for 3 dB of downmix attenuation that occurs when you eventually share this project as an MXF file.
Create a stereo project in Final Cut Pro.
Import the finished video Master File of the project, the finished 5.1 surround audio mix, and the finished stereo mix.
Select the surround clip (either one interleaved file or six mono files) and the stereo clip (either one interleaved file or two mono files) in the project Browser. Choose Modify > Adjust Volume > Absolute, enter “3” in the display below the viewer, then press the Return key.
Assign roles and subroles
Next, assign audio channels to roles and subroles.
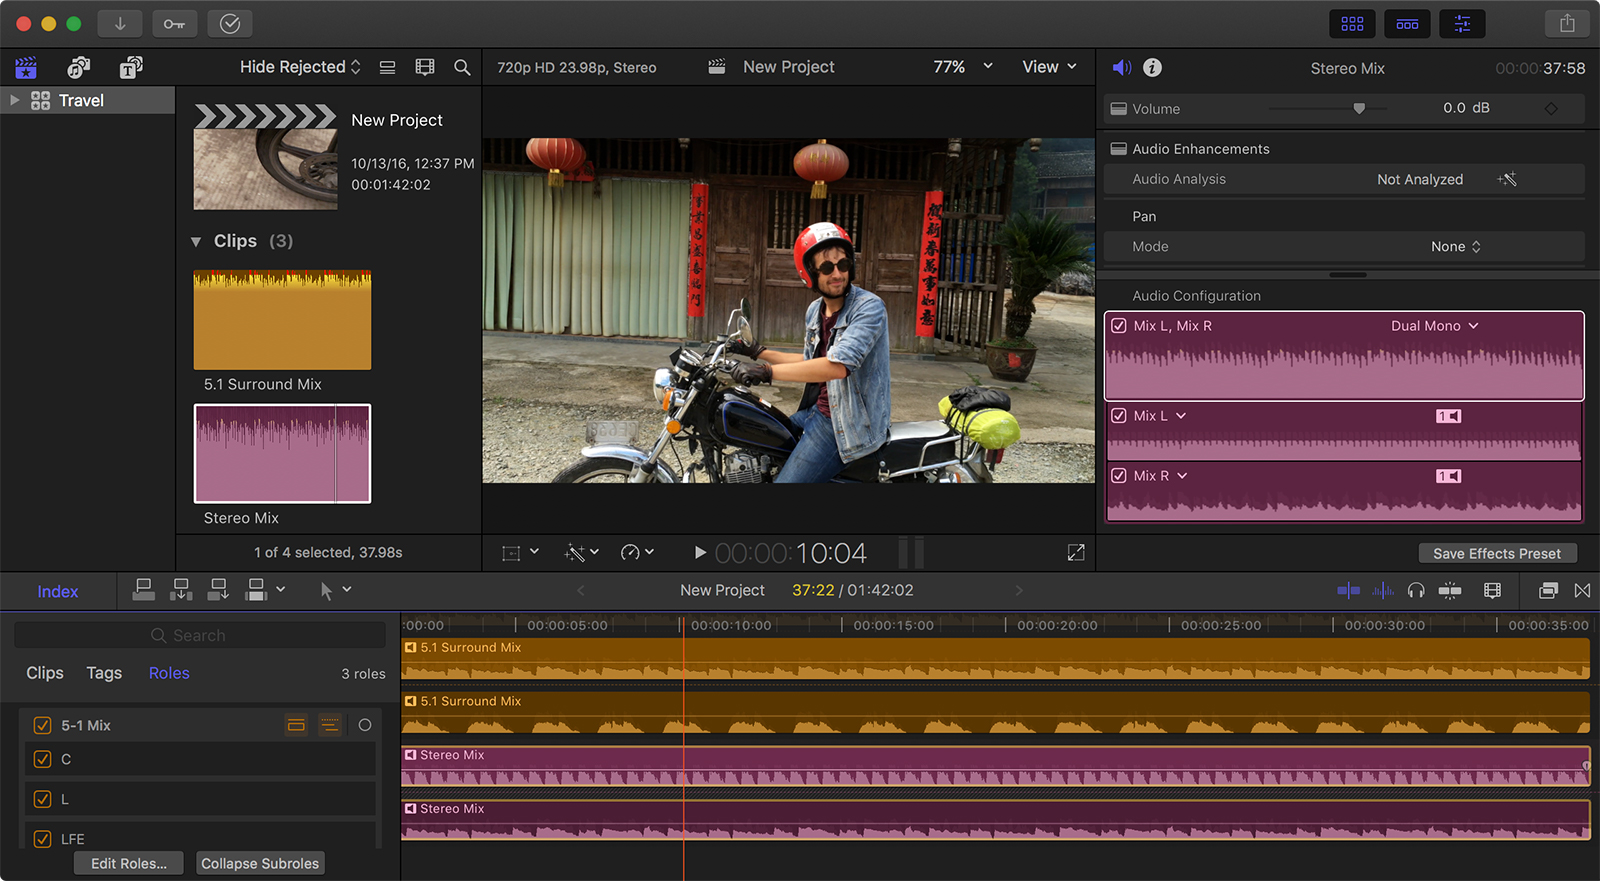
In the Timeline Index, click Roles to view clips by role and subrole.
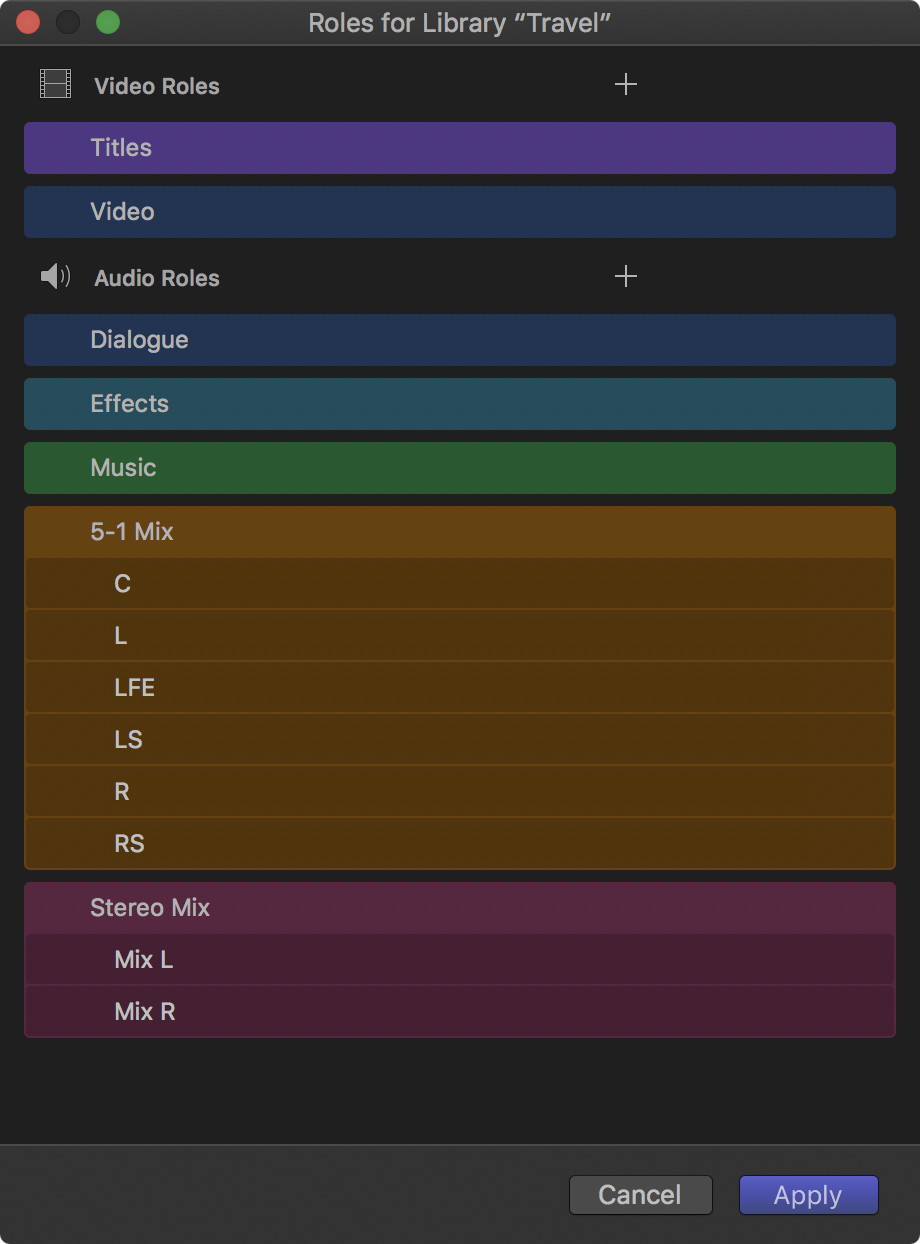
Choose Modify > Edit Roles.
Create a new custom audio role named "5-1 Mix," with six subroles named "L," "R," "C," "LFE," "LS," and "RS."
Create another new audio role called "Stereo Mix," with two subroles called "Mix L" and "Mix R."
If you imported the surround clip as a single interleaved file:
Select the surround clip in the Browser.
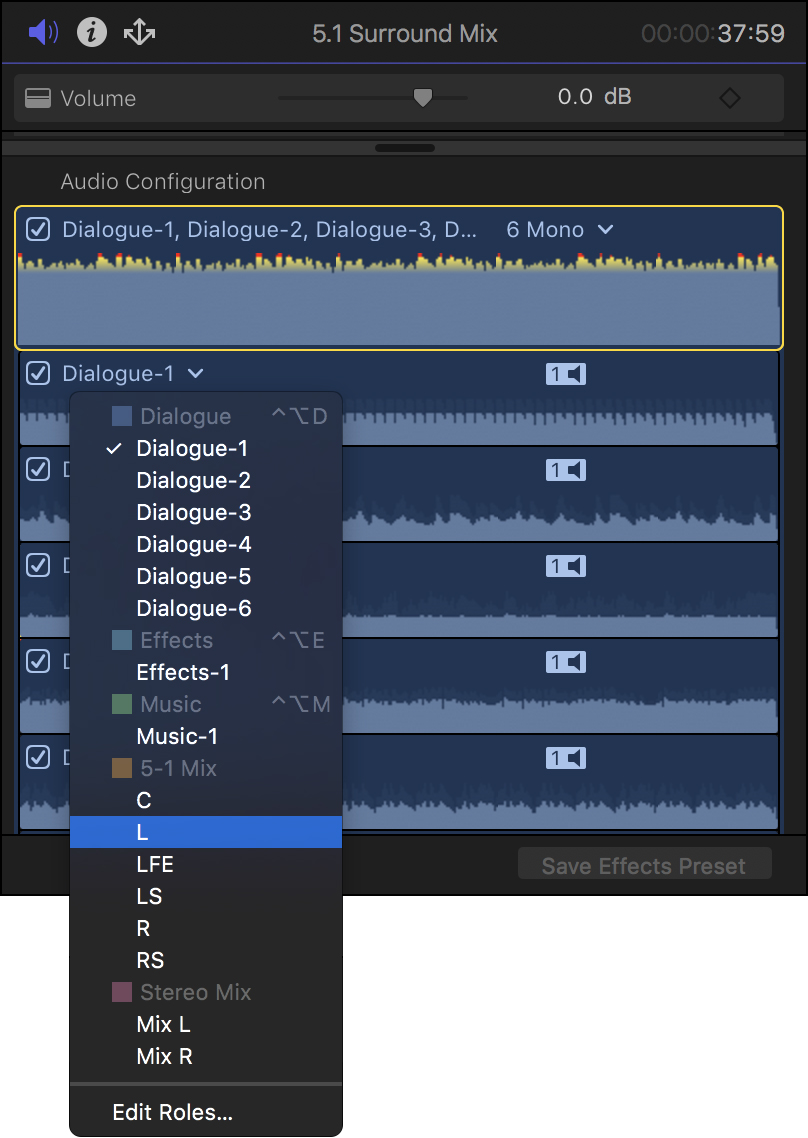
In the Audio Inspector, click the Channels pop-up menu and choose 6 Mono.
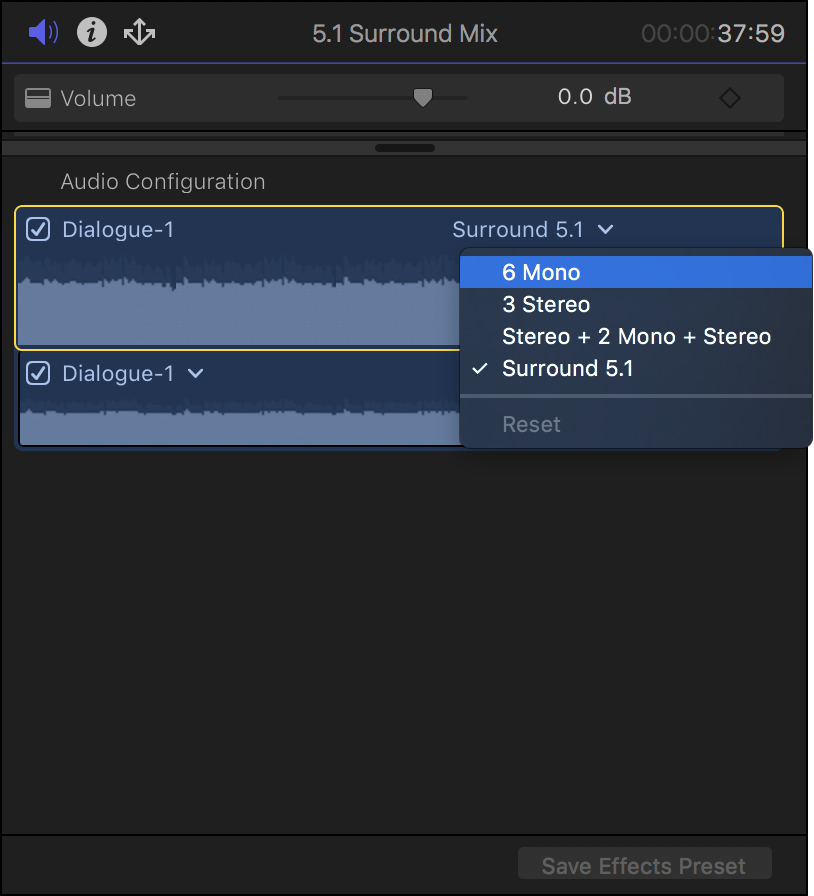
In the Audio Inspector, click "Dialogue-1" in the first component of the 5.1 surround mix (not the main audio clip), then choose subrole "L" of the 5-1 Mix role. Assign all other components of the surround file to subroles according to the "Subrole assignments" table.
If you imported the stereo mix as an interleaved file, do the following:
Select the file in the browser.
In the Audio Inspector, click the Channels pop-up menu and choose Dual Mono.
Assign its two components to subroles according to the "Subrole assignments" table.
If you imported the surround and the stereo mixes as individual mono files, assign each file to the appropriate subrole of the 5-1 Mix and Stereo Mix roles.
Edit the 5.1 surround audio clip(s) and the stereo mix clip(s) into the Timeline. To show the subroles in the Timeline, click the Show Subroles icon
 for each role.
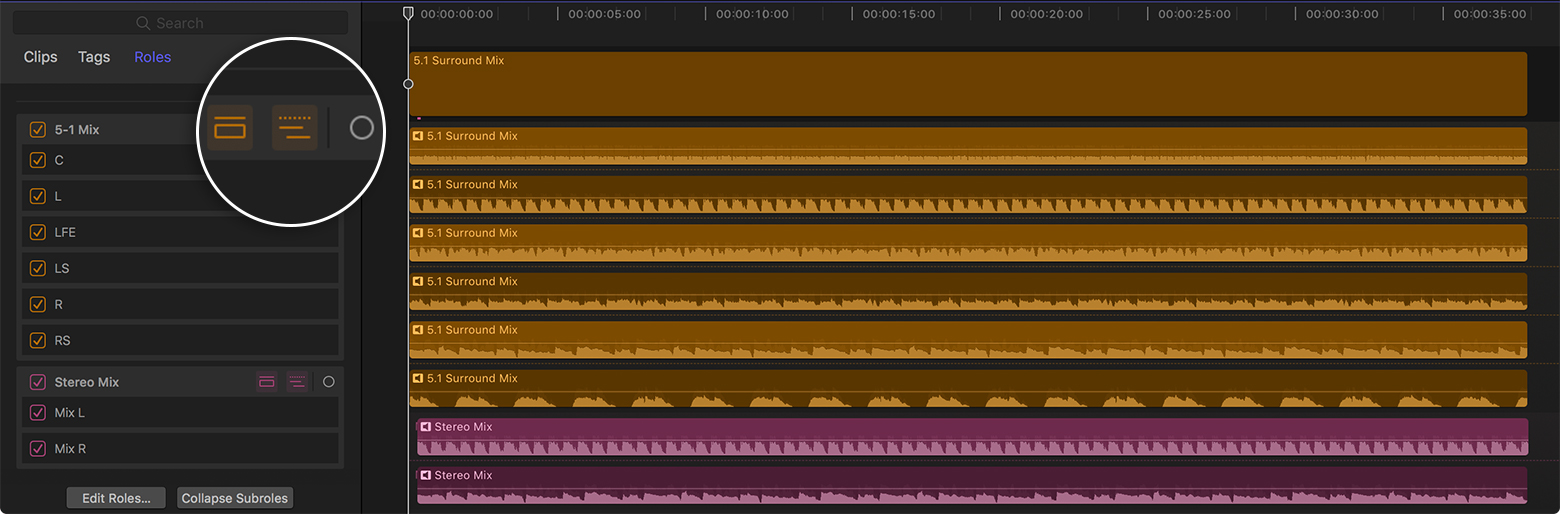
Share the project
Finally, sync the video and audio clips in the Timeline, then share the project as an MXF file.
Edit the video clip into the Timeline, and sync the audio to the video. Make sure to disable any other audio in the project Timeline so that you only hear the new audio files.
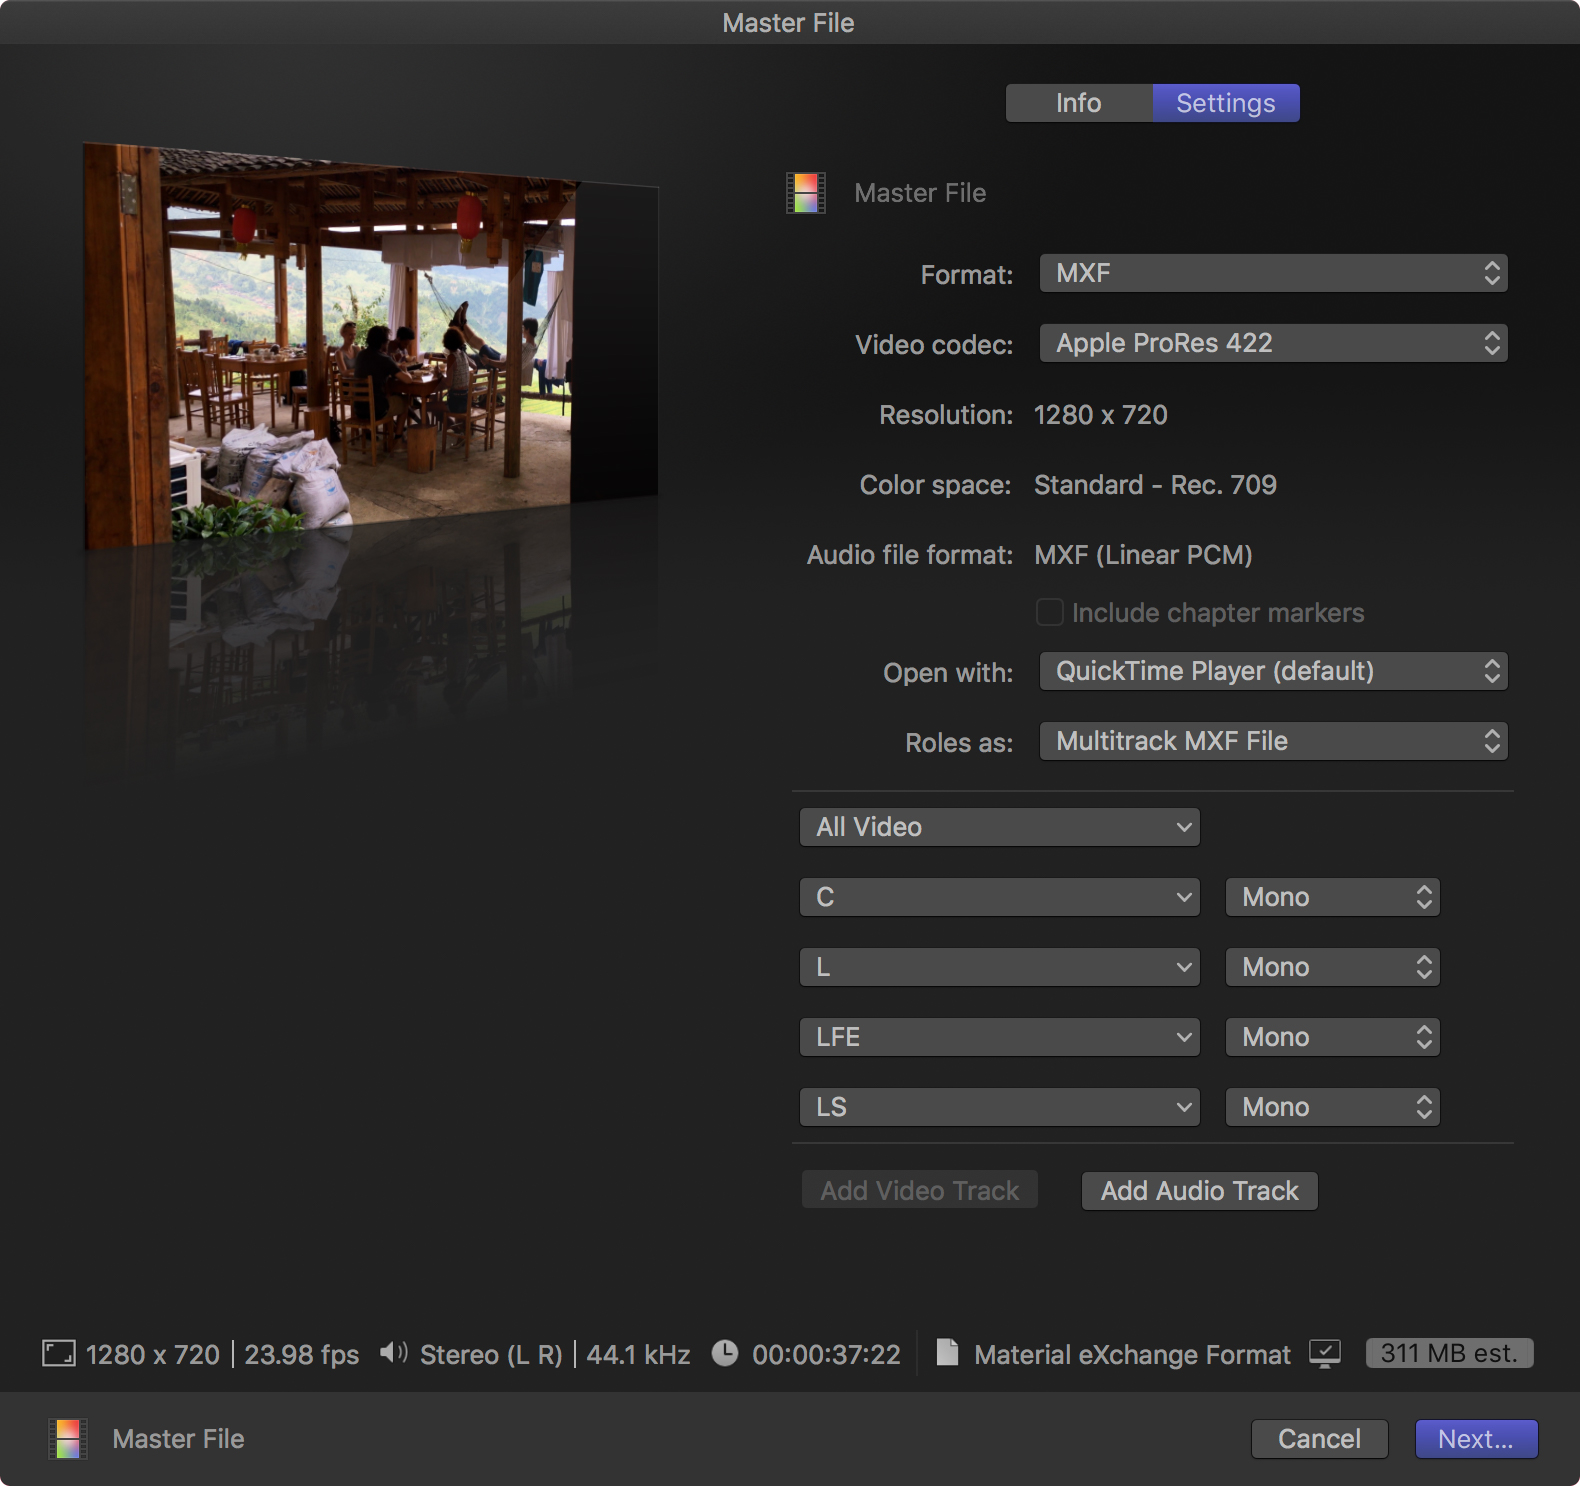
Choose File > Share > Master File.
Click Settings, then choose MXF from the Format pop-up menu.
Choose Multitrack QuickTime Movie from the "Roles as" pop-up menu.
Click Next, choose a location, then click Save. Final Cut Pro creates an MXF file containing a video track and eight mono audio channels. Channels 1–6 correspond to the 5.1 surround mix tracks, and channels 7–8 correspond to the stereo mix channels.
Create a multi-channel MXF file using Final Cut Pro 10.1.4–10.2.3 and Compressor
If you're using Final Cut Pro versions 10.1.4–10.2.3, use Final Cut Pro to import media, assign roles and subroles, and share the project. Then, use Compressor 4.1.3 or later to create the multi-channel MXF file.
Import media
First, import media into a new Final Cut Pro project and increase the gain of the audio files. Adding 3 dB of gain now compensates for 3 dB of downmix attenuation that occurs when you eventually share this project as an MXF file.
Create a stereo project in Final Cut Pro.
Import the finished video Master File of the project, the finished 5.1 surround audio mix, and the finished stereo mix.
Select the surround clips (either one stereo interleaved file or six mono files) and the stereo clip (either one stereo interleaved file or two mono files) in the project Browser. Choose Modify > Adjust Volume > Absolute, enter “3” in the Dashboard, then press the Return key.
Assign roles and subroles
Next, assign audio channels to roles and subroles.
In the Timeline Index, click Roles to view clips by role and subrole.
Choose Modify > Roles.
Create a new custom audio role named "5-1 Mix," with six subroles named "L," "R," "C," "LFE," "LS," and "RS."
Create another new audio role called "Stereo Mix," with two subroles called "Mix L" and "Mix R."
Edit the 5.1 surround audio clip(s) and the stereo audio clip(s) into the Timeline.
If you imported the surround and stereo audio clips as single interleaved files, do the following for each clip:
Select the clip in the Timeline.
In the Audio tab of the inspector, click the Surround pop-up menu and choose 6 Mono for the surround clip, and Dual Mono for the stereo clip.
Right-click the clip in the Timeline and choose Expand Audio Components. Six component clips appear under the surround clip, and two component clips appear under the stereo clip.
Select a component clip in the Timeline (not the main audio clip), select Modify > Assign roles, then choose a subrole from the list. Assign component clips to subroles according to the "Subrole assignments" table.
If you imported the surround and the stereo mixes as individual mono files, assign each file to the appropriate subrole of the 5-1 Mix and Stereo Mix roles.
Share the project as a Master File
After assigning roles and subroles, sync the video and audio clips in the Timeline, then share the project as an MXF file.
Import the finished video clip, edit it into the timeline, and sync the audio to the video. Make sure to disable any other audio in the project Timeline so that you only hear the new audio files.
Choose File > Share > Master File.
Click Settings, choose Video and Audio from the Format pop-up menu, then choose Multitrack QuickTime Movie from the "Roles as" pop-up menu.
Remove the existing audio roles by placing the pointer over the role you want to remove, then clicking the Remove (–) button that appears to the right of the pop-up menu. Don't remove the Video role.
Create eight new mono audio roles by clicking Add Audio Track. Configure the audio roles in the following order:
L
R
C
LFE
LS
RS
Mix L
Mix R
Click Next (or Share), choose a location, then click Save. Final Cut Pro creates a QuickTime file containing a video track and eight mono audio tracks in the order defined in the previous step.
Create the MXF using Compressor
Finally, create the MXF file using Compressor. Before transcoding the file, make sure you know the MXF format appropriate for your delivery requirement.
In Compressor, click Add File, the, choose the Multitrack QuickTime Movie you shared from Final Cut Pro.
Choose a Custom > MXF Compressor Setting (such as "1080i29.97 AVC-Intra 100”).
Click Start Batch to create an MXF file with eight mono audio tracks containing the 5.1 and Stereo mixes as discrete channels.
Subrole assignments
The following tables show the subrole assignments for the audio components of the surround mix and the stereo mix, depending on the version of Final Cut Pro you're using.
Subrole assignments for Final Cut Pro 10.3
Surround component | 5-1 Mix subrole assignment | Stereo mix component | Stereo Mix subrole assignment |
|---|---|---|---|
Dialogue 1 | L | Dialogue 1 | Mix L |
Dialogue 2 | R | Dialogue 2 | Mix R |
Dialogue 3 | C | ||
Dialogue 4 | LFE | ||
Dialogue 5 | LS | ||
Dialogue 6 | RS |
Subrole assignments for Final Cut Pro 10.1 – 10.2.3
Surround component | 5-1 Mix subrole assignment | Stereo mix component | Stereo Mix subrole assignment |
|---|---|---|---|
mono 1 | L | mono 1 | Mix L |
mono 2 | R | mono 2 | Mix R |
mono 3 | C | ||
mono 4 | LFE | ||
mono 5 | LS | ||
mono 6 | RS |
Need more help?
Tell us more about what's happening, and we’ll suggest what you can do next.