Motion User Guide
- Welcome
- What’s new
-
- Intro to basic compositing
-
- Intro to transforming layers
-
- Intro to transforming layers in the canvas
- Transform layer properties in the canvas
- Transform tools
- Change layer position, scale, or rotation
- Move a layer’s anchor point
- Add a drop shadow to a layer
- Distort or shear a layer
- Crop a layer
- Modify shape or mask points
- Transform text glyphs and other object attributes
- Align layers in the canvas
- Transform layers in the HUD
- Transform 2D layers in 3D space
-
- Intro to behaviors
- Behaviors versus keyframes
-
- Intro to behavior types
-
- Intro to Parameter behaviors
- Audio behavior
- Average behavior
- Clamp behavior
- Custom behavior
- Add a Custom behavior
- Exponential behavior
- Link behavior
- Logarithmic behavior
- MIDI behavior
- Add a MIDI behavior
- Negate behavior
- Oscillate behavior
- Create a decaying oscillation
- Overshoot behavior
- Quantize behavior
- Ramp behavior
- Randomize behavior
- Rate behavior
- Reverse behavior
- Stop behavior
- Track behavior
- Wriggle behavior
-
- Intro to Simulation behaviors
- Align to Motion behavior
- Attracted To behavior
- Attractor behavior
- Drag behavior
- Drift Attracted To behavior
- Drift Attractor behavior
- Edge Collision behavior
- Gravity behavior
- Orbit Around behavior
- Random Motion behavior
- Repel behavior
- Repel From behavior
- Rotational Drag behavior
- Spring behavior
- Vortex behavior
- Wind behavior
- Additional behaviors
-
- Intro to using generators
- Add a generator
-
- Intro to image generators
- Caustics generator
- Cellular generator
- Checkerboard generator
- Clouds generator
- Color Solid generator
- Concentric Polka Dots generator
- Concentric Shapes generator
- Gradient generator
- Grid generator
- Japanese Pattern generator
- Lens Flare generator
- Manga Lines generator
- Membrane generator
- Noise generator
- One Color Ray generator
- Op Art 1 generator
- Op Art 2 generator
- Op Art 3 generator
- Overlapping Circles generator
- Radial Bars generator
- Soft Gradient generator
- Spirals generator
- Spiral Drawing generator
- Use Spiral Drawing onscreen controls
- Star generator
- Stripes generator
- Sunburst generator
- Truchet Tiles generator
- Two Color Ray generator
- Save a custom generator
-
- Intro to filters
- Browse and preview filters
- Apply or remove filters
-
- Intro to filter types
-
- Intro to Color filters
- Brightness filter
- Channel Mixer filter
- Color Adjustments filter
- Color Balance filter
- Example: Color-balance two layers
- Color Curves filter
- Use the Color Curves filter
- Color Reduce filter
- Color Wheels filter
- Use the Color Wheels filter
- Colorize filter
- Contrast filter
- Custom LUT filter
- Use the Custom LUT filter
- Gamma filter
- Gradient Colorize filter
- HDR Tools filter
- Hue/Saturation filter
- Hue/Saturation Curves filter
- Use the Hue/Saturation Curves filter
- Levels filter
- Negative filter
- OpenEXR Tone Map filter
- Sepia filter
- Threshold filter
- Tint filter
-
- Intro to Distortion filters
- Black Hole filter
- Bulge filter
- Bump Map filter
- Disc Warp filter
- Droplet filter
- Earthquake filter
- Fisheye filter
- Flop filter
- Fun House filter
- Glass Block filter
- Glass Distortion
- Insect Eye filter
- Mirror filter
- Page Curl filter
- Poke filter
- Polar filter
- Refraction filter
- Ring Lens filter
- Ripple filter
- Scrape filter
- Sliced Scale filter
- Use the Sliced Scale filter
- Sphere filter
- Starburst filter
- Stripes filter
- Target filter
- Tiny Planet filter
- Twirl filter
- Underwater filter
- Wave filter
-
- Intro to Stylize filters
- Add Noise filter
- Bad Film filter
- Bad TV filter
- Circle Screen filter
- Circles filter
- Color Emboss filter
- Comic filter
- Crystallize filter
- Edges filter
- Extrude filter
- Fill filter
- Halftone filter
- Hatched Screen filter
- Highpass filter
- Indent filter
- Line Art filter
- Line Screen filter
- MinMax filter
- Noise Dissolve filter
- Pixellate filter
- Posterize filter
- Relief filter
- Slit Scan filter
- Slit Tunnel filter
- Texture Screen filter
- Vignette filter
- Wavy Screen filter
- About filters and color processing
- Publish filter controls to Final Cut Pro
- Using filters on alpha channels
- Filter performance
- Save custom filters
-
- Intro to 360-degree video
- 360-degree projects
- Create 360-degree projects
- Add 360-degree video to a project
- Create a tiny planet effect
- Reorient 360-degree media
- Creating 360-degree templates for Final Cut Pro
- 360-degree-aware filters and generators
- Export and share 360-degree projects
- Guidelines for better 360-degree projects
-
- Intro to settings and shortcuts
-
- Intro to Keyboard shortcuts
- Use function keys
- General keyboard shortcuts
- Audio list keyboard shortcuts
-
- Tools keyboard shortcuts
- Transform tool keyboard shortcuts
- Select/Transform tool keyboard shortcuts
- Crop tool keyboard shortcuts
- Edit Points tool keyboard shortcuts
- Edit shape tools keyboard shortcuts
- Pan and Zoom tools keyboard shortcuts
- Shape tools keyboard shortcuts
- Bezier tool keyboard shortcuts
- B-Spline tool keyboard shortcuts
- Paint Stroke tool keyboard shortcuts
- Text tool keyboard shortcuts
- Shape mask tools keyboard shortcuts
- Bezier Mask tool keyboard shortcuts
- B-Spline Mask tool keyboard shortcuts
- Transport control keyboard shortcuts
- View option keyboard shortcuts
- HUD keyboard shortcuts
- Inspector keyboard shortcuts
- Keyframe Editor keyboard shortcuts
- Layers keyboard shortcuts
- Library keyboard shortcuts
- Media list keyboard shortcuts
- Timeline keyboard shortcuts
- Keyframing keyboard shortcuts
- Shape and Mask keyboard shortcuts
- 3D keyboard shortcuts
- Miscellaneous keyboard shortcuts
- Touch Bar shortcuts
- Move assets to another computer
- Work with GPUs
- Glossary
- Copyright and trademarks

Create a new project in Motion
You can create a new Motion project using a standard project preset (such as Broadcast HD 1080 or 4K Ultra HD), or create a project using custom properties (such as resolution, color processing, frame rate, and so on).
Create a basic project
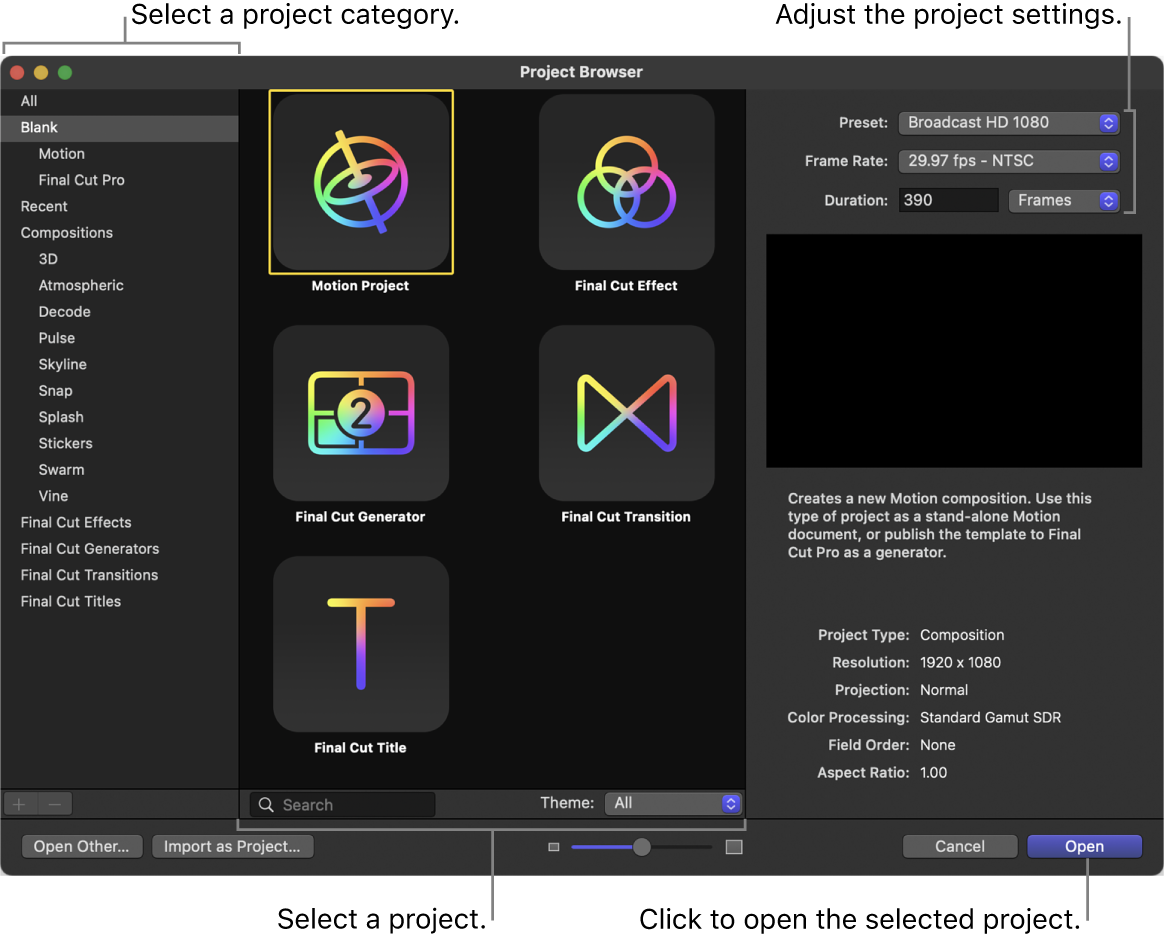
Open Motion, then choose File > New from Project Browser (or press Option-Command-N).
Note: When “For New Documents” is set to “Show Project Browser” (in the Project pane of Motion Settings), you can also choose File > New (or press Command-N) to create new projects.
In the Project Browser, select the Blank category in the left sidebar, then click the Motion Project icon.

In the right column, do the following:
Click the Preset pop-up menu, then choose a project preset (4K Ultra HD or Broadcast HD 1080, for example).
Click the Frame Rate pop-up menu, then choose a frame rate.
Important: Frame rates can’t be changed after you create a project.
Click the pop-up menu next to Duration, choose a timing option (Frames, Timecode, or Seconds), then type a project duration in the field.
Click Open.
A new, untitled Motion project opens using the properties you specified.
The project is not saved until you choose a save command from the File menu. For information about saving project files, see Save, autosave, and revert projects.
Create a project with custom properties
Open Motion, File > New from Project Browser (or press Option-Command-N).
In the Project Browser, select the Blank category in the left sidebar, then click the Motion Project icon.
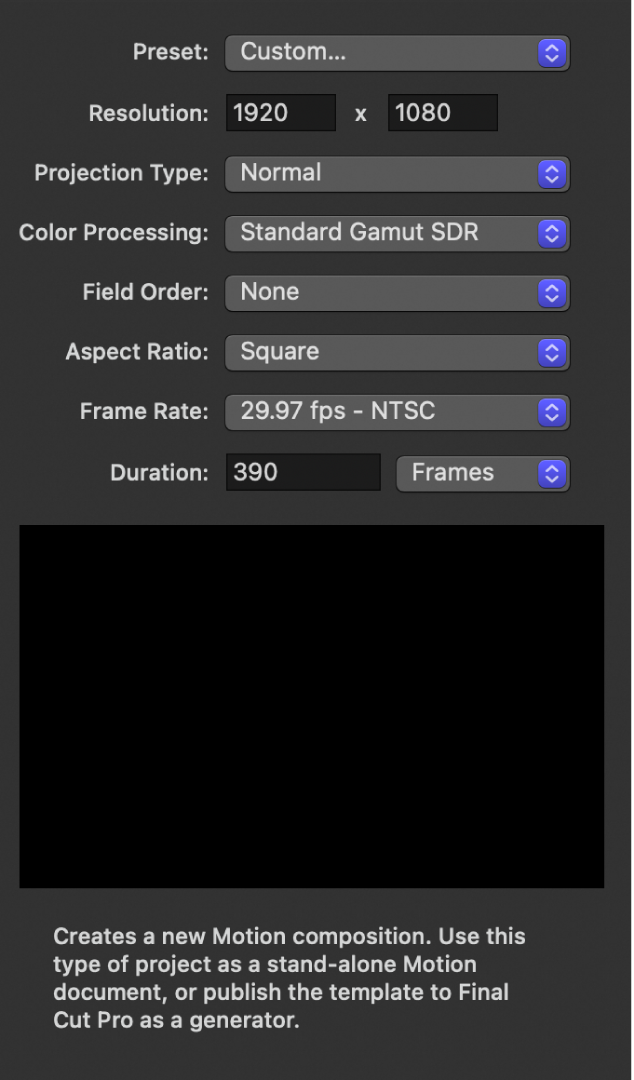
In the right column, click the Preset pop-up menu, then choose Custom.

Set the resolution (width and height), projection type, color processing, field order, aspect ratio, frame rate, and duration for your custom project.
Click Open.
A new, untitled Motion project opens using the properties you specified.
Create a 360° video-ready project
Open Motion, File > New from Project Browser (or press Option-Command-N).
In the Project Browser, then click the Motion Project icon.
In the right column, do the following:
Click the Preset pop-up menu, then choose a 360° Video option.
Click the Frame Rate pop-up menu, then choose a frame rate.
Click the pop-up menu next to the Duration field, choose a timing option (Frames, Timecode, or Seconds), then enter a project duration in the field.
Click Open.
A new, untitled 360° Motion project opens using the properties you specified.
See Intro to 360° video.
Create a project prepopulated with specific media files
Creating a prepopulated project is an easy way to ensure your Motion project is set to the correct resolution, frame rate, and color processing of your source clips.
In Motion, do one of the following:
Choose File > Import As > Project (or press Shift-Command-I).
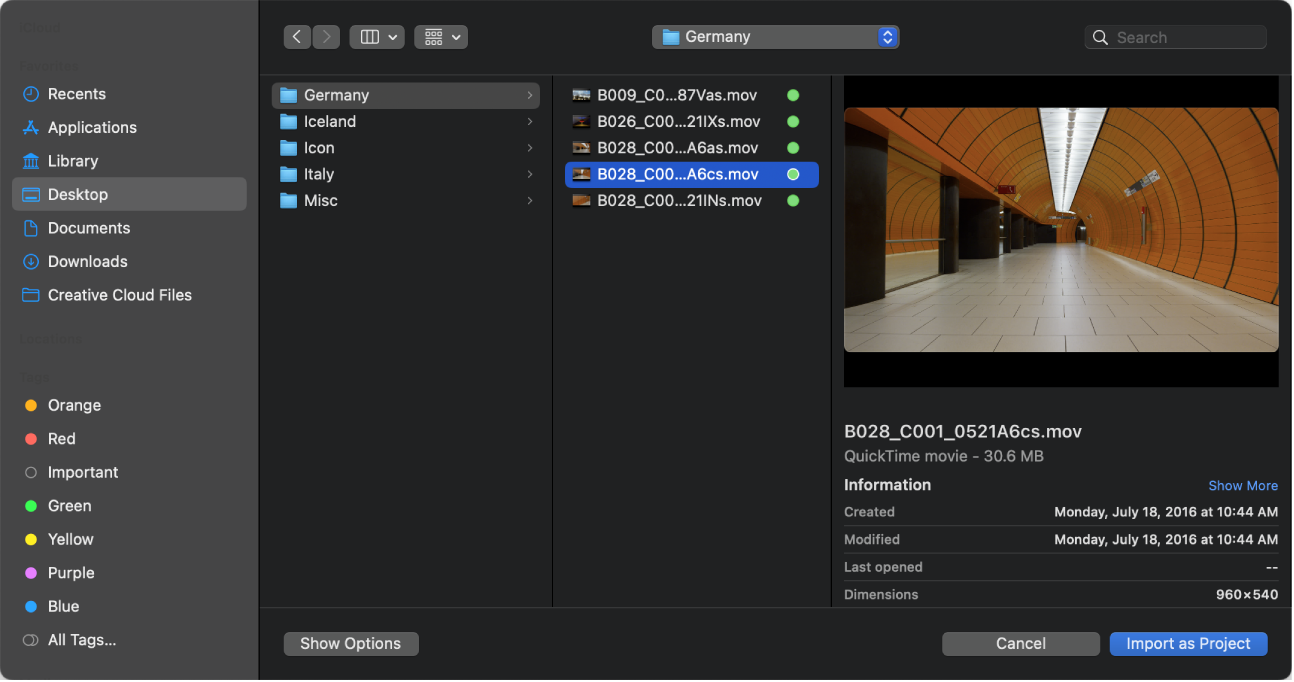
Choose File > New from Project Browser (or press Option-Command-N), then click Import as Project in the Project Browser.
In the dialog that appears, navigate to and select one or more media files, Shift-clicking to select contiguous items or Command-clicking to select noncontiguous items.

Optionally, do any of the following in the dialog:
Adjust additional project settings: Click Show Options.
Fixed settings inherent to the selected files remain dimmed, but will propagate to the new project. For example, because movie files have an inherent frame rate, aspect ratio, and field order, those settings are dimmed in the dialog.
Except for the Frame Rate parameter, these settings can be modified after the project is created, in the Properties Inspector. See Intro to project properties.
Use each frame of a selected image sequence as a frame in a video clip: Select the Image Sequence checkbox. See Image sequences.
Create a 360° Motion project from the selected file: Select the Import as 360° checkbox.
Click Import as Project.
A new, untitled Motion project opens populated with the media you selected in step 2.
With the exception of frame rate, you can modify a project’s properties in the Project Properties Inspector.
Download this guide: PDF