Motion User Guide
- Welcome
- What’s new
-
- Intro to basic compositing
-
- Intro to transforming layers
-
- Intro to transforming layers in the canvas
- Transform layer properties in the canvas
- Transform tools
- Change layer position, scale, or rotation
- Move a layer’s anchor point
- Add a drop shadow to a layer
- Distort or shear a layer
- Crop a layer
- Modify shape or mask points
- Transform text glyphs and other object attributes
- Align layers in the canvas
- Transform layers in the HUD
- Transform 2D layers in 3D space
-
- Intro to the Timeline
- Display or resize the Timing pane
-
- Edit in the Timeline
- Move objects in the Timeline
- Distribute objects in the Timeline
- Trim objects in the Timeline
- Slip video layers in the Timeline
- Split objects in the Timeline
- Delete objects in the Timeline
- Copy and paste objects in the Timeline
- Group tracks in the Timeline
- Edit the group track in the Timeline
- Navigate in the Timeline
- Show and modify keyframes in the Timeline
- Edit in the mini-Timeline
-
- Intro to behaviors
- Behaviors versus keyframes
-
- Intro to behavior types
-
- Intro to Parameter behaviors
- Audio behavior
- Average behavior
- Clamp behavior
- Custom behavior
- Add a Custom behavior
- Exponential behavior
- Link behavior
- Use the Link behavior to control text strings
- Logarithmic behavior
- MIDI behavior
- Add a MIDI behavior
- Negate behavior
- Oscillate behavior
- Create a decaying oscillation
- Overshoot behavior
- Quantize behavior
- Ramp behavior
- Randomize behavior
- Rate behavior
- Reverse behavior
- Stop behavior
- Track behavior
- Wriggle behavior
-
- Intro to Simulation behaviors
- Align to Motion behavior
- Attracted To behavior
- Attractor behavior
- Drag behavior
- Drift Attracted To behavior
- Drift Attractor behavior
- Edge Collision behavior
- Gravity behavior
- Orbit Around behavior
- Random Motion behavior
- Repel behavior
- Repel From behavior
- Rotational Drag behavior
- Spring behavior
- Vortex behavior
- Wind behavior
- Additional behaviors
-
- Intro to shapes, masks, and paint strokes
- Edit fill, outline, and feathering
- Keyframe shape control points
- Convert between shapes and masks
- Using filters and masks with shapes
- Copy shape styles
- Save custom shapes and shape styles
-
- Intro to using generators
- Add a generator
-
- Intro to image generators
- Caustics generator
- Cellular generator
- Checkerboard generator
- Clouds generator
- Color Solid generator
- Concentric Polka Dots generator
- Concentric Shapes generator
- Gradient generator
- Grid generator
- Japanese Pattern generator
- Lens Flare generator
- Manga Lines generator
- Membrane generator
- Noise generator
- One Color Ray generator
- Op Art 1 generator
- Op Art 2 generator
- Op Art 3 generator
- Overlapping Circles generator
- Radial Bars generator
- Soft Gradient generator
- Spirals generator
- Spiral Drawing generator
- Use Spiral Drawing onscreen controls
- Star generator
- Stripes generator
- Sunburst generator
- Truchet Tiles generator
- Two Color Ray generator
- Save a custom generator
-
- Intro to filters
- Browse and preview filters
- Apply or remove filters
-
- Intro to filter types
-
- Intro to Color filters
- Brightness filter
- Channel Mixer filter
- Color Adjustments filter
- Color Balance filter
- Example: Color-balance two layers
- Color Curves filter
- Use the Color Curves filter
- Color Reduce filter
- Color Wheels filter
- Use the Color Wheels filter
- Colorize filter
- Contrast filter
- Custom LUT filter
- Use the Custom LUT filter
- Gamma filter
- Gradient Colorize filter
- HDR Tools filter
- Hue/Saturation filter
- Hue/Saturation Curves filter
- Use the Hue/Saturation Curves filter
- Levels filter
- Negative filter
- OpenEXR Tone Map filter
- Sepia filter
- Threshold filter
- Tint filter
-
- Intro to Distortion filters
- Black Hole filter
- Bulge filter
- Bump Map filter
- Disc Warp filter
- Droplet filter
- Earthquake filter
- Fisheye filter
- Flop filter
- Fun House filter
- Glass Block filter
- Glass Distortion
- Insect Eye filter
- Mirror filter
- Page Curl filter
- Poke filter
- Polar filter
- Refraction filter
- Ring Lens filter
- Ripple filter
- Scrape filter
- Sliced Scale filter
- Use the Sliced Scale filter
- Sphere filter
- Starburst filter
- Stripes filter
- Target filter
- Tiny Planet filter
- Twirl filter
- Underwater filter
- Wave filter
-
- Intro to Stylize filters
- Add Noise filter
- Bad Film filter
- Bad TV filter
- Circle Screen filter
- Circles filter
- Color Emboss filter
- Comic filter
- Crystallize filter
- Edges filter
- Extrude filter
- Fill filter
- Halftone filter
- Hatched Screen filter
- Highpass filter
- Indent filter
- Line Art filter
- Line Screen filter
- MinMax filter
- Noise Dissolve filter
- Pixellate filter
- Posterize filter
- Relief filter
- Slit Scan filter
- Slit Tunnel filter
- Texture Screen filter
- Vignette filter
- Wavy Screen filter
- About filters and color processing
- Publish filter controls to Final Cut Pro
- Using filters on alpha channels
- Filter performance
- Save custom filters
-
- Intro to 360-degree video
- 360-degree projects
- Create 360-degree projects
- Add 360-degree video to a project
- Create a tiny planet effect
- Reorient 360-degree media
- Creating 360-degree templates for Final Cut Pro
- 360-degree-aware filters and generators
- Export and share 360-degree projects
- Guidelines for better 360-degree projects
-
- Intro to exporting projects
- Export a QuickTime movie
- Export audio only
- Export a still image
- Export a still image to Pixelmator Pro
- Export an image sequence
- Export to Apple devices
- Export to email
- Export using Compressor
- Create share destinations
- Render settings
- View the status of shared items
- Share notifications
-
- Intro to settings and shortcuts
-
- Intro to Keyboard shortcuts
- Use function keys
- General keyboard shortcuts
- Audio list keyboard shortcuts
-
- Tools keyboard shortcuts
- Transform tool keyboard shortcuts
- Select/Transform tool keyboard shortcuts
- Crop tool keyboard shortcuts
- Edit Points tool keyboard shortcuts
- Edit shape tools keyboard shortcuts
- Pan and Zoom tools keyboard shortcuts
- Shape tools keyboard shortcuts
- Bezier tool keyboard shortcuts
- B-Spline tool keyboard shortcuts
- Paint Stroke tool keyboard shortcuts
- Text tool keyboard shortcuts
- Shape mask tools keyboard shortcuts
- Bezier Mask tool keyboard shortcuts
- B-Spline Mask tool keyboard shortcuts
- Magnetic Mask tool keyboard shortcuts
- Transport control keyboard shortcuts
- View option keyboard shortcuts
- HUD keyboard shortcuts
- Inspector keyboard shortcuts
- Keyframe Editor keyboard shortcuts
- Layers keyboard shortcuts
- Library keyboard shortcuts
- Media list keyboard shortcuts
- Timeline keyboard shortcuts
- Keyframing keyboard shortcuts
- Shape and Mask keyboard shortcuts
- 3D keyboard shortcuts
- Miscellaneous keyboard shortcuts
- Touch Bar shortcuts
- Move assets to another computer
- Work with GPUs
- Glossary
- Copyright and trademarks
Select characters with the Transform Glyph tool
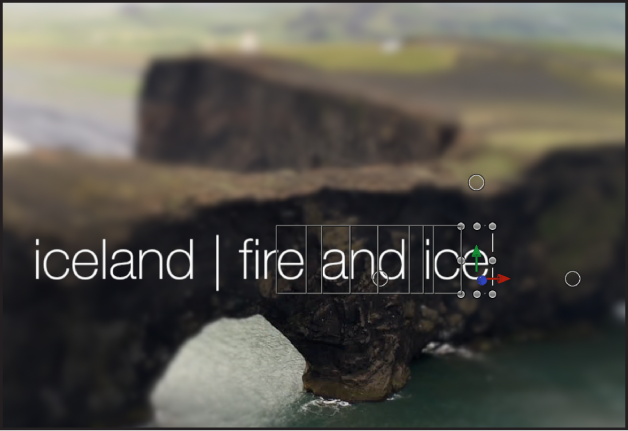
Before you can transform a glyph, you must select it using the Transform Glyph tool in the canvas toolbar. You can select a single glyph or multiple glyphs in a text layer. When more than one glyph is selected, the last Shift-selected glyph is enclosed in a bounding box with transform handles. This is known as the focused glyph. Each of the other glyphs in the selection are enclosed in a bounding box without transform handles. Any selected glyph (focused or not) is affected by transforms applied to the focused glyph.
Note: If you use the Transform Glyph tool to distort an appearance attribute of a glyph (Face, Outline, Glow, Drop Shadow), only one glyph can be selected at a time.
Select a single glyph
In Motion, select a text layer in the Layers list, canvas, or Timeline.
In the canvas toolbar, click and hold the transform tools pop-up menu, then choose Transform Glyph.
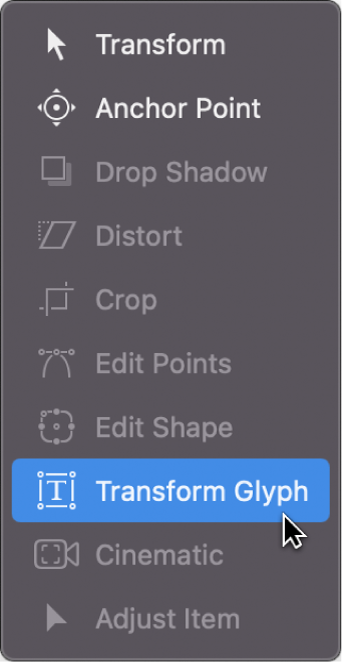
A bounding box with transform handles appears around the first glyph in the text. (Or, if a different glyph was previously selected, the bounding box surrounds that glyph).
If you want to select a different glyph in the text layer, click another glyph in the canvas.
Select all glyphs in a text layer
In Motion, select a text layer in the Layers list, canvas, or Timeline.
In the canvas toolbar, click and hold the transform tools pop-up menu, then choose Transform Glyph.
Ensure that the Attribute pop-up menu in the HUD is set to Transform Glyph (because the other settings in the menu allow only one glyph selection at a time).
A glyph is selected in the canvas.
Choose Edit > Select All (or press Command-A).
All glyphs are selected.
Select multiple glyphs in a text layer
In Motion, select a text layer in the Layers list, canvas, or Timeline.
In the canvas toolbar, click the transform tools pop-up menu, then choose Transform Glyph.
Ensure that the Attribute pop-up menu in the HUD is set to Transform Glyph (because the other settings in the menu allow only one glyph selection at a time).
A glyph is selected in the canvas.
Do one of the following:
Select contiguous glyphs: Pressing and holding the Shift key, click in the canvas to select additional adjacent glyphs; or drag in the canvas to select adjacent glyphs.
Select noncontiguous glyphs: Pressing and holding the Command key, click to select nonadjacent glyphs.
Although the onscreen controls appear only around the focused (last selected) glyph, any glyph surrounded by a box is affected when you adjust the onscreen controls.
Deselect a group of selected glyphs
In Motion, choose Edit > Deselect All (or press Shift-Command-A).
Any previously selected glyphs are deselected.
Select a glyph in another text layer
With an active Transform Glyph tool selection in Motion, click a different text layer in the Layers list or Timeline.
The selection shifts to the second text layer.
Download this guide: PDF