Logic Pro User Guide
- Welcome
-
- What is Logic Pro?
- Workflow overview
- Logic Pro project basics
- Advanced tools and additional options
- Undo and redo edits
- Manage Logic Pro content
- How to get help
-
- Projects overview
- Create projects
- Open projects
- Save projects
- Delete projects
-
- Play a project
- Set the playhead position
- Control playback with the transport buttons
- Use transport shortcut menus
- Use transport keyboard shortcuts
- Customize the control bar
- Change the LCD display mode
- Monitor and reset MIDI events
- Use the cycle area
- Use the Chase Events function
- Control Logic Pro using Apple Remote
- Control Logic Pro projects using Logic Remote
- Preview projects in the Finder
- Close projects
- View project information
-
- Overview
-
- Before recording software instruments
- Play software instruments
- Record software instruments
- Record additional software instrument takes
- Overdub software instrument recordings
- Spot erase software instrument recordings
- Use Note Repeat
- Record to multiple software instrument tracks
- Replace software instrument recordings
- Record multiple MIDI devices to multiple tracks
- Record software instruments and audio simultaneously
- Use step input recording techniques
- Use the metronome
-
- Overview
-
- Regions overview
- Select regions
- Select parts of regions
- Cut, copy, and paste regions
- Move regions
- Add or remove gaps
- Delay region playback
- Loop regions
- Repeat regions
- Resize regions
- Mute and solo regions
- Time stretch regions
- Split regions
- Demix MIDI regions
- Join regions
- Create regions in the Tracks area
- Normalize audio regions in the Tracks area
- Create aliases of MIDI regions
- Clone audio regions
- Convert repeated MIDI regions to loops
- Change the color of regions
- Convert audio regions to Sampler zones
- Rename regions
- Delete regions
-
- Overview
-
- Add notes
- Select notes
- Snap items to the grid
- Move notes
- Copy notes
- Change the pitch of notes
- Resize notes
- Edit note velocity
- Quantize the timing of notes
- Quantize the pitch of notes
- Change note articulations
- Lock the position of events
- Mute notes
- Change note color
- View note labels
- Delete notes
- Time stretch notes
- View multiple MIDI regions
- Split chords
- Automation/MIDI area in the Piano Roll Editor
- Open other editors
-
- Flex Time and Pitch overview
-
- Flex Pitch algorithm and parameters
- Edit the pitch of audio in the Audio Track Editor or a zoomed in track
- Edit the pitch of audio in the Tracks area when the track is not zoomed in
- Correct the timing of audio regions with Flex Pitch
- Quantize the pitch of audio regions
- Create MIDI from audio recordings
- Change the gain of notes in audio regions
- Use Varispeed to alter the speed and pitch of audio
-
- Mixing overview
- Set channel strip input formats
- Set channel strip pan or balance positions
- Mute and solo channel strips
-
- Plug-ins overview
- Add, remove, move, and copy plug-ins
- Insert a plug-in on a track using drag and drop
- Activate plug-ins on inactive channels
- Use the Channel EQ
- Work in the plug-in window
- Work with plug-in settings
- Work with plug-in latencies
- Work with Audio Units plug-ins
- Support for ARA 2 compatible plug-ins
- Use the Plug-in Manager
- Work with channel strip settings
- Surround panning
- Use the I/O Labels window
- Undo and redo Mixer and plug-in adjustments
-
- Smart Controls overview
- Show Smart Controls for master effects
- Choose a Smart Control layout
- Automatic MIDI controller assignment
- Map screen controls automatically
- Map screen controls
- Edit mapping parameters
- Use parameter mapping graphs
- Open the plug-in window for a screen control
- Rename a screen control
- Use articulation IDs to change articulations
- Assign hardware controls to screen controls
- Compare Smart Control edits with saved settings in Logic Pro
- Use the Arpeggiator
- Automate screen control movements
-
- Live Loops overview
- Start and stop cells
- Work with Live Loops cells
- Change loop settings for cells
- How the Live Loops grid and Tracks area interact
- Edit cells
- Edit scenes
- Work in the Cell Editor
- Bounce cells
- Record a Live Loops performance
- Change Live Loops grid settings
- Control Live Loops in Logic Pro with other devices
-
- Overview
- Add notes
-
- Part box overview
- View score symbols
- Select score symbols
- Add notes and rests
- Add notes and symbols to multiple regions
- Add key and time signature changes
- Change the clef sign
- Add dynamic marks, slurs, and crescendi
- Change note heads
- Add symbols to notes
- Add trills, ornaments, and tremolo symbols
- Add sustain pedal markings
- Add chord symbols
- Add chord grids and tablature symbols
- Add bar lines, repeats, and coda signs
- Add page and line break symbols
-
- Select notes
- Move and copy notes
- Change note pitch, duration, and velocity
- Change note articulations
- Quantize the timing of notes
- Restrict note input to the current key
- Control how ties are displayed
- Add and edit tuplets
- Override display quantization using tuplets
- Add grace notes and independent notes
- Delete notes
- Use automation in the Score Editor
-
- Staff styles overview
- Assign staff styles to tracks
- Staff Style window
- Create and duplicate staff styles
- Edit staff styles
- Edit staff, voice, and assign parameters
- Add and delete staffs or voices in the Logic Pro Staff Style window
- Copy staffs or voices in the Logic Pro Staff Style window
- Copy staff styles between projects
- Delete staff styles
- Assign notes to voices and staffs
- Display polyphonic parts on separate staffs
- Change the staff assignment of score symbols
- Beam notes across staffs
- Use mapped staff styles for drum notation
- Predefined staff styles
- Share a score
-
- Environment overview
- Common object parameters
- Customize the Environment
-
-
- Fader objects overview
- Use fader objects
- Play back fader movements
- Work with object groups
- Fader styles
- Fader functions: MIDI events
- Fader functions: range, value as
- Fader functions: filter
- Vector fader
- Special faders overview
- Cable switchers
- Meta event faders
- SysEx faders
- Work with SysEx messages
- Special functions
- Ornament objects
- MMC record buttons
- Keyboard objects
- Monitor objects
- Channel splitter object
- Physical input objects
- Physical input objects
- MIDI click objects
-
-
- Key commands overview
- Browse, import, and save key commands
- Assign key commands
- Copy and print key commands
-
- Global Commands key commands
- Global Control Surfaces Commands
- Various windows
- Windows Showing Audio files
- Main Window Tracks and Various Editors
- Live Loops Grid
- Various Editors
- Views showing Time Ruler
- Main Window Tracks
- Mixer
- MIDI Environment
- Piano Roll
- Score Editor
- Event Editor
- Step Editor
- Step Sequencer
- Project Audio
- Audio File Editor
- Smart Tempo Editor
- Sampler
- Step Input Keyboard
- Tool key commands in Logic Pro
- Touch Bar shortcuts
-
-
- Working with your control surface
- Connect control surfaces
- Add a control surface to Logic Pro
- Automatic assignment for USB MIDI controllers
- Grouping control surfaces
- Control Surfaces preferences overview
- Modal dialog display
- Tips for using your control surface
- Control surfaces supported by Logic Pro
- Software and firmware
-
-
- Learn about Effects
-
- Learn about Amps and Pedals
-
- Bass Amp Designer overview
- Bass amplifier models
- Bass cabinet models
- Build a custom combo
- Amplifier signal flow
- Pre-amp signal flow
- Use the D.I. box
- Amplifier controls
- Bass Amp Designer effects overview
- Bass Amp Designer EQ
- Bass Amp Designer compressor
- Bass Amp Designer Graphic EQ
- Bass Amp Designer Parametric EQ
- Bass Amp Designer microphone controls
-
- Use MIDI plug-ins
-
- Arpeggiator overview
- Arpeggiator control parameters
- Note order parameters overview
- Note order variations
- Note order inversions
- Arpeggiator pattern parameters overview
- Use Live mode
- Use Grid mode
- Arpeggiator options parameters
- Arpeggiator keyboard parameters
- Use keyboard parameters
- Assign controller parameters
- Modifier MIDI plug-in controls
- Note Repeater MIDI plug-in controls
- Randomizer MIDI plug-in controls
-
- Use the Scripter MIDI plug-in
- Use the Script Editor
- Scripter API overview
- MIDI processing functions overview
- HandleMIDI function
- ProcessMIDI function
- GetParameter function
- SetParameter function
- ParameterChanged function
- Reset function
- JavaScript objects overview
- Use the JavaScript Event object
- Use the JavaScript TimingInfo object
- Use the Trace object
- Use the MIDI event beatPos property
- Use the JavaScript MIDI object
- Create Scripter controls
- Transposer MIDI plug-in controls
-
- Learn about included Instruments
-
- Alchemy overview
- Name bar
-
- Alchemy source overview
- Source master controls
- Import browser
- Source subpage controls
- Source filter controls
- Source filter use tips
- Source elements overview
- Additive element controls
- Additive element effects
- Spectral element controls
- Spectral element effects
- Pitch correction controls
- Formant filter controls
- Granular element controls
- Sampler element controls
- VA element controls
- Source modulations
- Morph controls
- Master voice section
- Alchemy extended parameters
-
- Logic Pro Quick Sampler overview
- Add content to Logic Pro Quick Sampler
- Logic Pro Quick Sampler waveform display
- Use Flex in Logic Pro Quick Sampler
- Logic Pro Quick Sampler Pitch controls
- Logic Pro Quick Sampler Filter controls
- Quick Sampler filter types
- Logic Pro Quick Sampler Amp controls
- Logic Pro Quick Sampler extended parameters
-
- Sculpture overview
- Sculpture interface
- Global parameters
- Amplitude envelope parameters
- Use the Waveshaper
- Filter parameters
- Output parameters
- Use surround range and diversity
- Assign MIDI controllers
- Extended parameters
-
-
- Ultrabeat overview
- Ultrabeat interface
- Synthesizer section overview
- Filter section controls
- Distortion circuit controls
- Glossary

Use Lane Sets in the Step Editor in Logic Pro
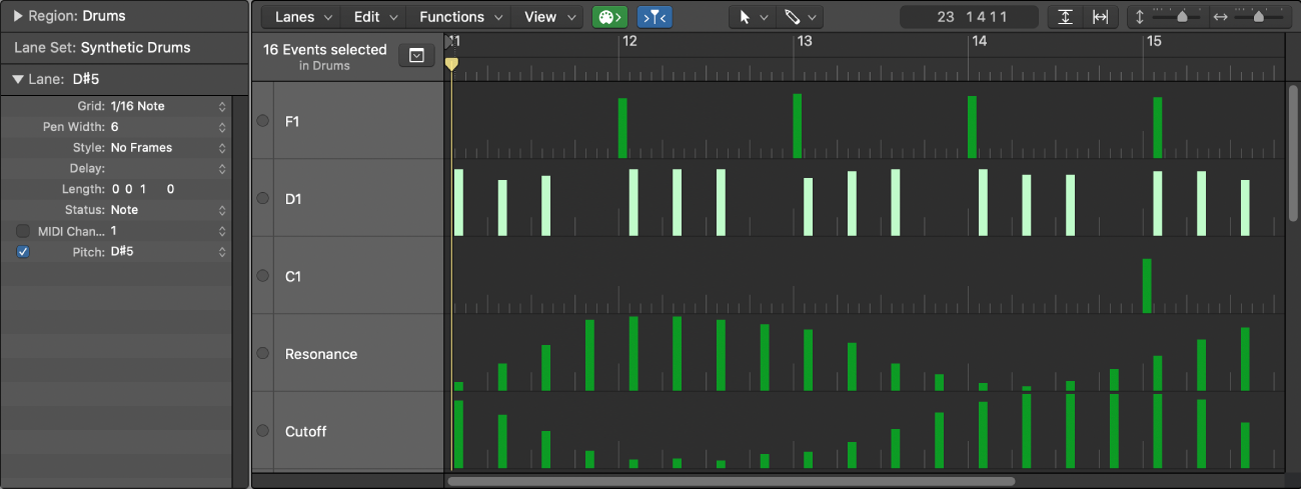
You can store a combination of lanes as a Lane Set. When a Lane Set is saved, the vertical zoom setting of the Step Editor is stored. You can save as many Lane Sets as required in each project.
The Lane Set functions let you limit the Step Editor display to only the required MIDI event types. For example, imagine you have recorded a synthesizer lead MIDI region. You could create a Lane Set that contains individual lanes for each note pitch in the region. Drag each note event step vertically to adjust its level. Within the same Lane Set, you could create two more lanes to control the lead synthesizer’s filter cutoff and resonance parameters, allowing you to create or precisely edit filter changes.

The Step Editor provides two default Lane Sets: MIDI Controls and GM Drum Kit.
MIDI Controls: Provides lanes for Volume, Pan, Modulation, and several other commonly used controller types.
GM Drum Kit: Provides lanes that match the note names of the General MIDI (GM) drum map. This option lets you draw note events (steps) for drum parts, and is similar to the use of pattern-based drum machines, where each beat is manually entered on a grid. You can use this Lane Set for any instrument type.
If you leave the Lane Set pop-up menu set to Automatic, lanes are automatically added for each kind of event in the MIDI region.
Switch between Lane Sets
You can switch the Step Editor display to show particular event types by loading an existing Lane Set.
In Logic Pro, choose a Lane Set from the Lane Set pop-up menu in the inspector.
Create a Lane Set
In Logic Pro, do one of the following:
Choose Lanes > New Lane Set from the Step Editor menu bar (or use the Lane Set pop-up menu, or corresponding key command).
The new Lane Set contains a default lane for the Volume controller (#7). Any changes you make, such as adding or changing lanes or lane parameters, or adjusting the vertical zoom setting, are automatically stored in the current Lane Set.
Choose Lanes > New Lane Set for Current Events (or use the Lane Set pop-up menu, or corresponding key command) to create a new Lane Set, consisting of the currently selected event types.
Create a Lane Set for a GM drum kit
General MIDI has an established keyboard assignment pattern (a MIDI note map) for drum and percussion sounds. This mapping standard is often followed in non-GM, GS, or XG compliant sound modules, samplers, and synthesizers. In some cases, however, you need to make a few changes.
As the Step Editor is ideally suited for creating and editing drum kits, you may want to create a Lane Set that is specifically tailored for your drum sets, including the correct drum names and hi-hat modes.
In Logic Pro, choose Lanes > New Lane Set for GM Drums from the Step Editor menu bar (or use the Lane Set pop-up menu, or corresponding key command).
You can change the names, positioning, and hi-hat modes of each drum or percussion lane in the Lane Set. See Use the Lane inspector in Logic Pro, for information on renaming each drum sound in your kit, if it doesn’t match the GM mapping standard.
Define a hi-hat group
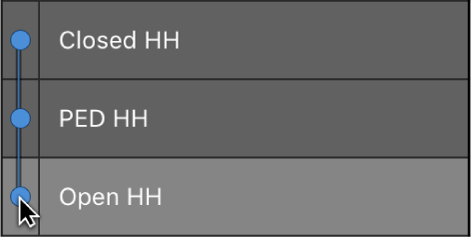
In hi-hat mode, lanes can be grouped together. Only one event from grouped lanes can be played at any ruler position. This function is typically used to prevent different hi-hat notes (open, closed, pedal) from being inserted at the same time position. This mirrors the real-world behavior of hi-hats, which can’t be simultaneously opened and closed.
In Logic Pro, click the dot shown to the left of a lane name (Open HH, for example).
Click the dot shown to the left of other (vertically adjacent) lane names (Ped HH, for example).
A dotted line links the two lanes in the left edge of the column.

Click the dots of each lane to turn off hi-hat mode.
All lanes in a hi-hat group must be vertically adjacent to each other. To group several events in nonadjacent lanes, move the lanes by dragging the names up or down the Step Editor window.
If you add an event to any lane in a hi-hat group, all existing events at this time position are deleted.
You can create as many hi-hat groups as needed in a Lane Set, but each group must be separated by at least one lane that does not belong to a hi-hat group.
Rename a Lane Set
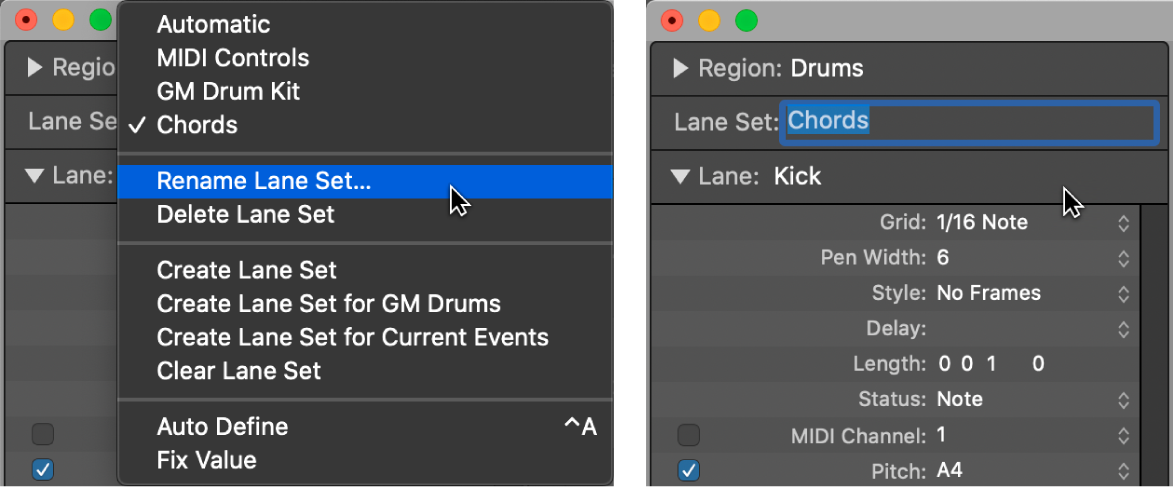
In Logic Pro, choose Rename Lane Set from the Lane Set pop-up menu. Enter a new name, then press Return.

Clear the current Lane Set
Clearing a Lane Set resets a Lane Set to its default, containing a single lane for the Volume controller.
In Logic Pro, do one of the following:
Choose Lanes > Clear Lane Set from the Step Editor menu bar (or use the corresponding key command).
Choose Clear Lane Set from the Lane Set pop-up menu in the inspector.
Delete the current Lane Set
In Logic Pro, do one of the following:
Choose Lanes > Delete Lane Set from the Step Editor menu bar (or use the corresponding key command).
Choose Delete Lane Set from the Lane Set pop-up menu in the inspector.