Final Cut Pro User Guide
- Welcome
-
- What’s new in Final Cut Pro 10.6
- What’s new in Final Cut Pro 10.5.3
- What’s new in Final Cut Pro 10.5
- What’s new in Final Cut Pro 10.4.9
- What’s new in Final Cut Pro 10.4.7
- What’s new in Final Cut Pro 10.4.6
- What’s new in Final Cut Pro 10.4.4
- What’s new in Final Cut Pro 10.4.1
- What’s new in Final Cut Pro 10.4
- What’s new in Final Cut Pro 10.3
- What’s new in Final Cut Pro 10.2
- What’s new in Final Cut Pro 10.1.2
- What’s new in Final Cut Pro 10.1
- What’s new in Final Cut Pro 10.0.6
- What’s new in Final Cut Pro 10.0.3
- What’s new in Final Cut Pro 10.0.1
-
- Intro to effects
-
- Intro to transitions
- How transitions are created
- Add transitions
- Set the default transition
- Delete transitions
- Adjust transitions in the timeline
- Adjust transitions in the inspector and viewer
- Merge jump cuts with the Flow transition
- Adjust transitions with multiple images
- Modify transitions in Motion
-
- Add storylines
- Use the precision editor
- Conform frame sizes and rates
- Use XML to transfer projects
-
- Glossary
- Copyright

Add shapes in Final Cut Pro
You can use the Shapes generator to add a shape—such as a star, a diamond, an arrow, or a heart—above the primary storyline. You can then animate the shape.
If the Titles and Generators sidebar isn’t already shown in Final Cut Pro, do one of the following:
Choose Window > Go To > Titles and Generators (or press Option-Command-1).
Click the Titles and Generators button in the top-left corner of the Final Cut Pro window.

Select the Elements category in the Titles and Generators sidebar, locate the Shapes generator, and add it to the timeline as a connected clip, so that it’s over the primary storyline and any other clips or storylines that you want the shape to appear over.
The default shape is a white circle.
Select the Shapes generator that you added to the timeline.
If the Generator inspector isn’t already shown, do one of the following:
Choose Window > Show in Workspace > Inspector (or press Command-4).
Click the Inspector button on the right side of the toolbar.

Click the Generator button at the top of the inspector.

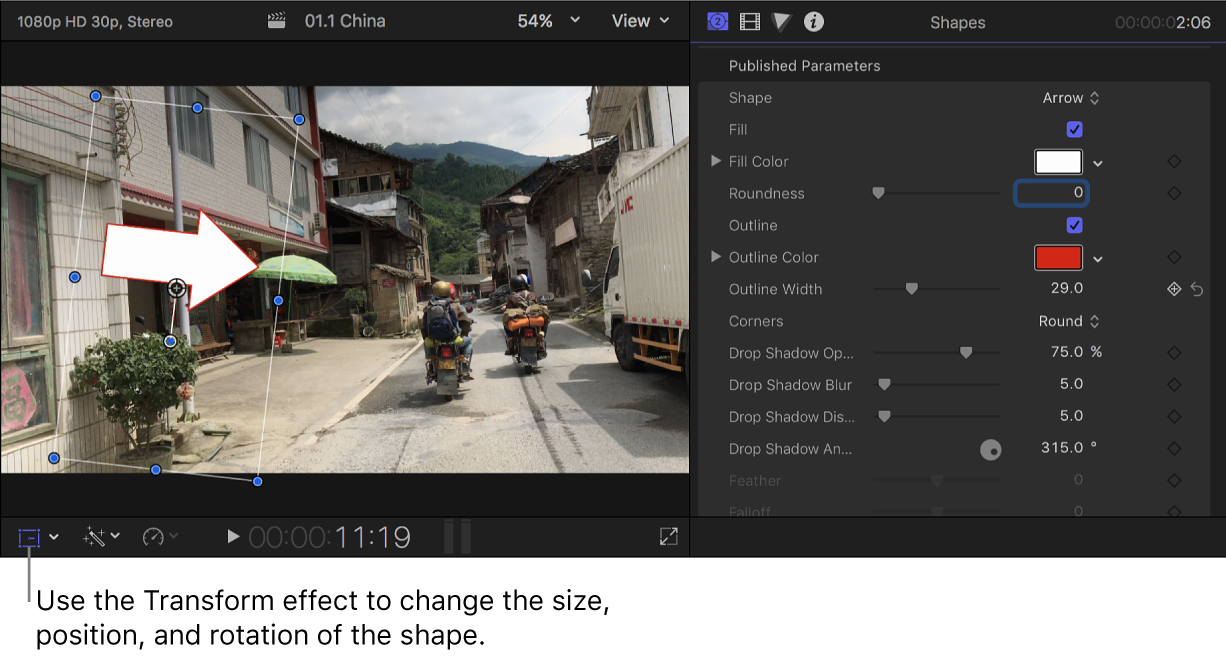
In the Generator inspector, click the Shape pop-up menu and choose the shape to use, then set the shape’s fill color, outline color and width, and drop shadow.
To return the generator to its default settings, click the Reset button
 .
.To change the shape’s size, position, and rotation, use the Transform or Distort built-in effect.

Using these effects also makes it possible to animate the shape. For example, you can have an arrow follow a person across a room.
To make the shape partially transparent, select it in the timeline and adjust its Opacity setting in the Video inspector.
To open the Video inspector, click the Video button at the top of the inspector.

Download this guide: Apple Books | PDF