
Edit an image in Numbers on Mac
After you add a photo or graphic to your spreadsheet, you can crop it, remove parts you don’t want, and make adjustments to its background and exposure. You can also use Image Generation to intelligently edit an image.
Mask (crop) a photo
You can hide unwanted portions of an image without modifying the image file.
Go to the Numbers app
on your Mac.Open a spreadsheet with an image, then double-click the image.
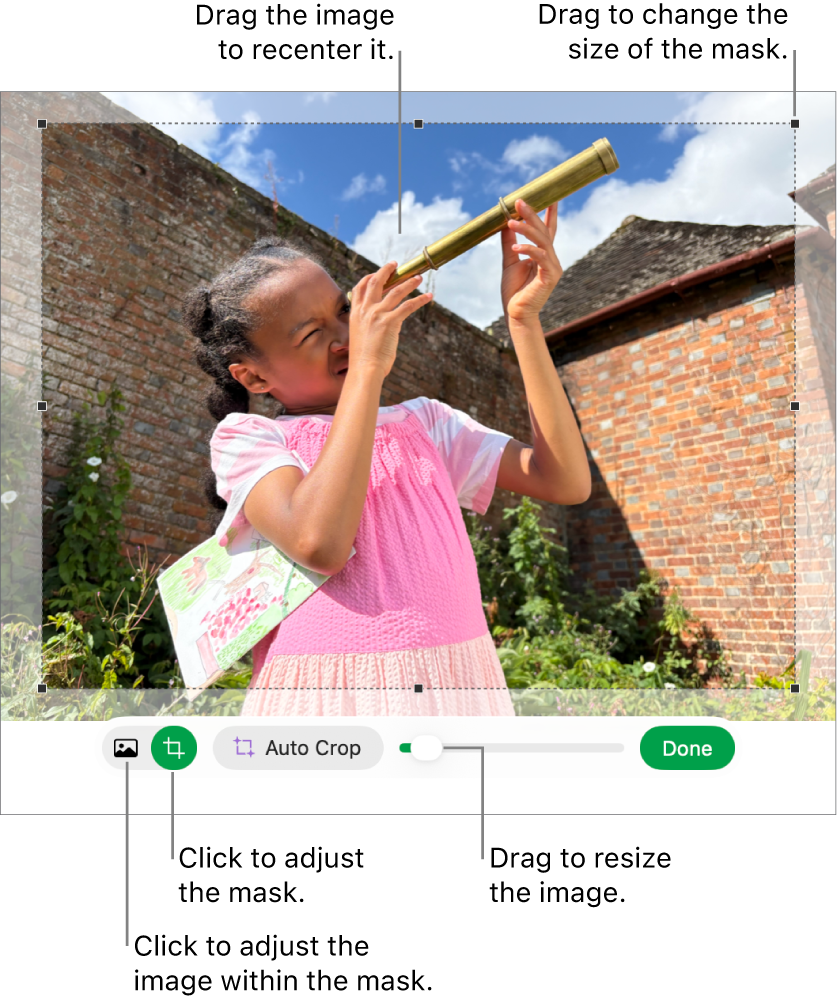
The mask controls appear. The default mask is the same size as your image.
Tip: To display the mask controls on a Mac with a Force Touch trackpad, force click the image (press firmly on the trackpad until you feel a deeper click).
Use the controls to frame just the parts of the image you want to be visible.
Click Done.

To mask an image with a shape, click the image to select it, choose Format > Image > Mask With Shape, then choose a shape. Drag the handles on the shape to adjust its dimensions.
You can also mask an image with your own drawn shape. Shift-click the drawing and image, choose Format > Image > Mask with Selection, then drag the handles on the drawing to adjust its dimensions.
Auto Crop a photo
If you are subscribed to Apple Creator Studio, you can use Auto Crop to intelligently generate suggestions to improve image composition.
Go to the Numbers app
on your Mac.Open a spreadsheet with an image, double-click the image to view the mask controls, then click Auto Crop to preview image suggestions.
Click a suggestion to update your image, then click Done.
Remove background and other elements from a photo
You can remove a background or color from an image with the Remove Background tool.
Go to the Numbers app
on your Mac.Open a spreadsheet with an image, then click the image to select it.
In the Format
 sidebar, click the Image tab, then click Remove Background.
If possible, the background is automatically removed.
Do any of the following:
Remove another color: Drag slowly over the color.
As you drag, the mask selection grows to include areas that use similar colors.
Remove instances of a color everywhere in the image: Option-drag over the color.
Add colors back to an image: Shift-drag over an area without color.
Undo all changes: Click the Reset button in the controls.
Click Done.
Adjust exposure, saturation, and other image settings
Go to the Numbers app
on your Mac.Open a spreadsheet with an image, then click the image to select it.
Click the Image tab in the Format
sidebar.Use the controls to make adjustments:
Exposure: Changes the overall lightness or darkness of the image.
Saturation: Changes the richness of color in the image. Dragging to the right makes the colors richer or more vibrant.
Enhance: Automatically adjusts the image by spreading the red, green, and blue tones evenly across the histogram.
To see the image histogram and adjust more advanced features like contrast, highlights, shadows, sharpness, de-noise, temperature, and tint, click
 .
.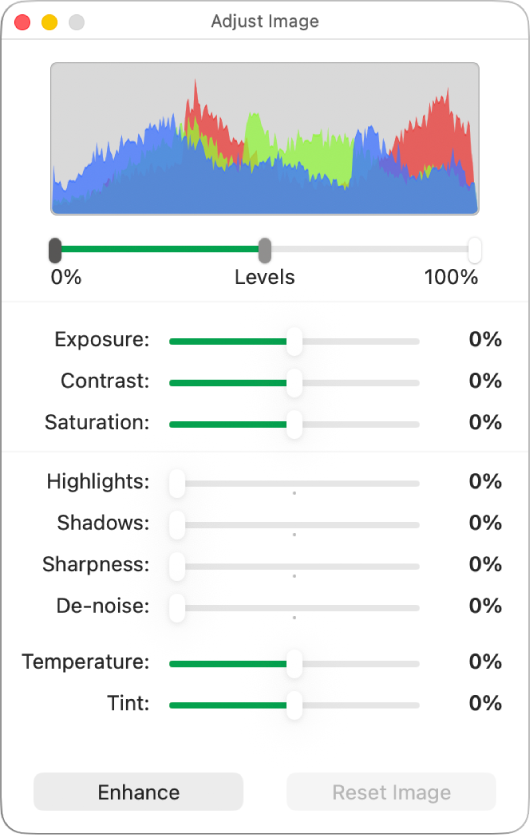
You can open the Adjust Image controls in a separate window that you can move anywhere. Choose View > Show Adjust Image (from the View menu at the top of your screen).
To restore the image’s original settings, click Reset, or click Reset Image in the Adjust Image window.
Edit an image with a text description
If you are subscribed to Apple Creator Studio, you can use Image Generation to intelligently edit images.
This feature is not available in all countries and regions. To learn more, see About Apple Creator Studio.
Go to the Numbers app
on your Mac.Open a spreadsheet, then click
 in the toolbar.
In the Generate an Image window, click
 , then choose the image you want to edit.
If you are asked to send the image, select Allow Once or Always Allow.
In the text field, describe the changes you want to make, then click
 .
.An image based on your text description is generated.
To edit the image, use the text field to describe your changes or choose a variable like Mood, Style, or Mash-up, then click
.To start over, click
 .
.Do one of the following:
Save the image: Click
 , then choose where you want to save the image.
Add the image to the sheet: Click the Insert button.
Important: Image Generation is subject to usage limitations. To check your usage status, choose Numbers > Intelligence Features > Show Usage Status.
Increase resolution with Super Resolution
If you are subscribed to Apple Creator Studio, you can use Super Resolution to increase the resolution of photos, making them clearer.
Go to the Numbers app
on your Mac.Open a spreadsheet with an image, click the image to select it, then click
 in the toolbar.
To work with multiple images at the same time, Shift-click the images.
Tip: You can also add these buttons to the toolbar: Adjust Image, Remove Background, and Mask.