Modify frame size in Compressor
You can modify the properties of applied or custom presets to set the frame size of your output and to specify how source media fills the frame.
Note: If you modify the properties of an applied preset in the output row of a job, the modifications apply to only that output. If you modify the properties of a custom preset, your modifications are saved for future use.
Set the frame size
In Compressor, select an applied or custom preset.
In the Video Properties section of the Video inspector, click the “Frame size” pop-up menu and choose a frame size (resolution) from the list (or enter custom values in the text field to the right).
Frame size options are divided into four categories:
Automatic: Adjusts the output based on the size of the input, and, in some formats, can be constrained “up to” a maximum resolution (in horizontal, vertical, or square aspect ratios).
Percentage: Adjusts the output based on a percentage of the input’s size.
Manual: Forces the output to a specific resolution.
Constrained: Constrains the output to a specific aspect ratio.
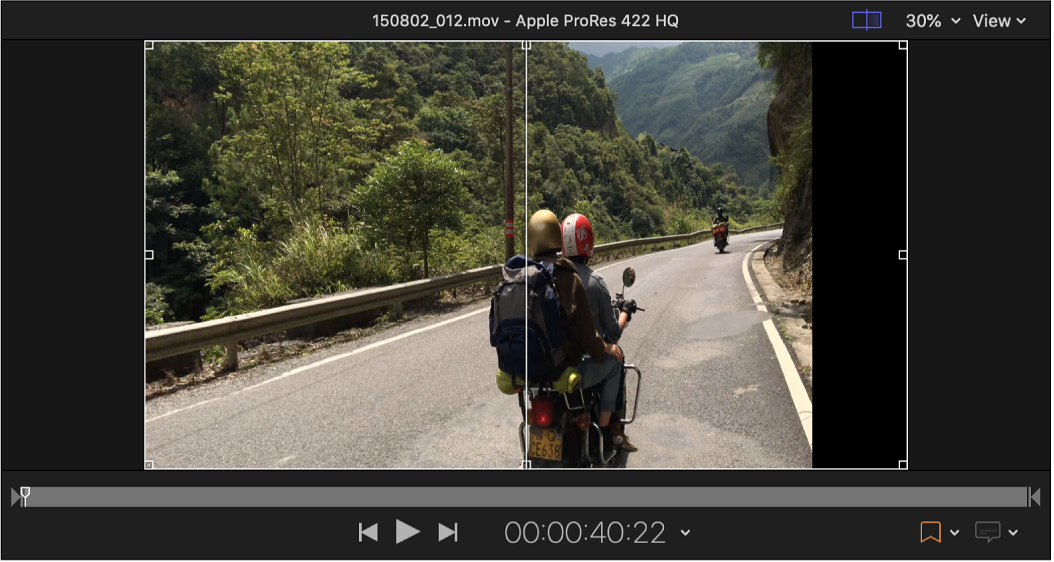
Crop the source image
You can use cropping controls to remove part of the original source image.
In Compressor, select an applied or custom preset.
In the Cropping, Padding, and Rotation section of the Video inspector, do any of the following:
Manually set cropping dimensions: In the Cropping property, enter a value in the Top, Bottom, Left, and Right fields to crop the source image by that many pixels.
Choose a cropping preset: Click the Cropping pop-up menu, then choose a preset aspect ratio.
Note: If the aspect ratio you choose doesn’t match the aspect ratio selected in the “Frame size” pop-up menu, you may see black bars around the edges of your picture after the file is transcoded.
Remove letterbox bars: Click the Cropping pop-up menu, then choose Letterbox Area of Source. This instructs Compressor to detect the black edges around the image in your source file and automatically enter crop values to remove them.
Drag the frame edges: In the preview area, click
 , then drag inward from any frame edge to crop the image.
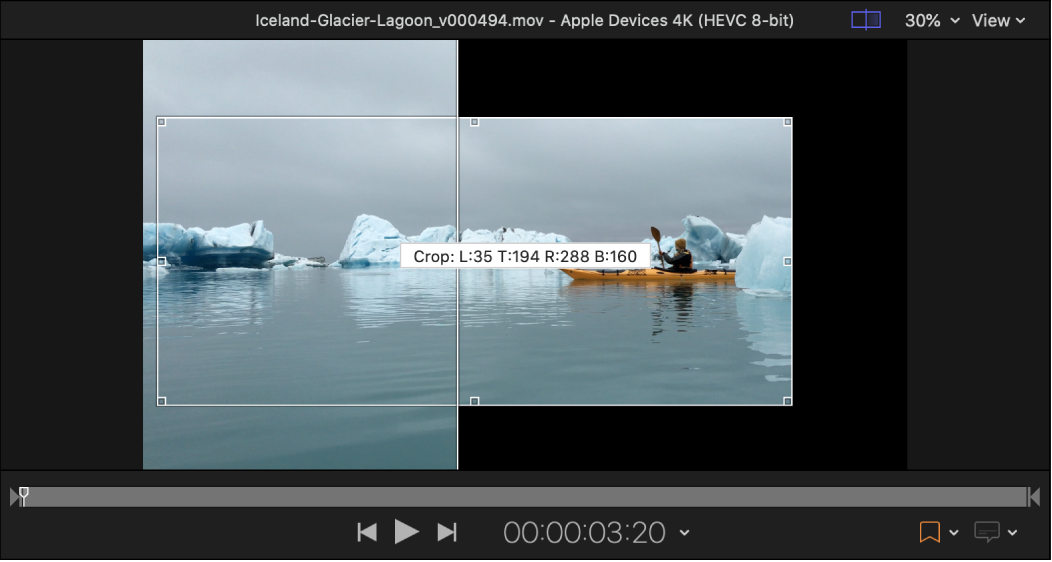
Pad the source image
Padding adds black to the edges of the source image to fit it into a different-size frame.
In Compressor, select an applied or custom preset.
In the Cropping, Padding, and Rotation section of the Video inspector, do any of the following:
Manually set padding dimensions: In the Padding property, enter a value in the Top, Bottom, Left, and Right fields to pad the source image by that many pixels.
Choose a padding preset: Click the Padding pop-up menu, then choose a preset aspect ratio.
Preserve the original frame size: Click the Padding pop-up menu, then choose Preserve Source Aspect Ratio. This ensures that the source clip remains at its native aspect ratio. If the “Frame size” pop-up menu is set to a different aspect ratio, black borders will be added to the transcoded output file.
Rotate or flip the source image
In Compressor, select an applied or custom preset.
In the Cropping, Padding, and Rotation section of the Video inspector, do one of the following:
Rotate the source image: Click the Rotation pop-up menu, then choose whether you want to rotate the image 90 degrees, 180 degrees, or 270 degrees.
Flip the source image: Click the Flip pop-up menu, then choose whether you want to flip the image horizontally, vertically, or both.
Note: The Rotation property is always applied before the Flip property.
Conform the source image to a specific frame size
You can use Compressor to conform video to specific frame sizes for editing or distribution. For example, you may have vertical video from an iPhone that you need to distribute as horizontal video, or you may want to create square video for social media distribution.

In Compressor, select an applied or custom preset.
In the Video Properties section of the Video inspector, click the “Frame size” pop-up menu, then choose an aspect ratio from the Constrained section.
Enter the dimensions of the conforming video frame in the text fields next to the “Frame size” pop-up menu.
In the Cropping, Padding, and Rotation section of the Video inspector, do one of the following:
Fill the frame: Choose None from the Cropping and Padding pop-up menus.
Crop the frame: Choose a setting from the Cropping pop-up menu that matches the frame size entered in step 3. Compressor crops to the center of your video to fill the frame. To reposition the crop, choose None from the Cropping pop-up menu, then drag the crop box in the Viewer.
Pad the frame: Click the Padding pop-up menu, then choose Preserve Source Aspect Ratio. Compressor pads your video to fill the frame.
You can also set the method for resizing quality in the Video inspector. See Set retiming and resizing quality.
Download this guide: PDF