Logic Pro User Guide for iPad
-
- What is Logic Pro?
- Working areas
- Work with function buttons
- Work with numeric values
-
- Intro to tracks
- Create tracks
- Create tracks using drag and drop
- Choose the default region type for a software instrument track
- Select tracks
- Duplicate tracks
- Reorder tracks
- Rename tracks
- Change track icons
- Change track colors
- Use the tuner on an audio track
- Show the output track in the Tracks area
- Delete tracks
- Edit track parameters
- Start a Logic Pro subscription
- How to get help
-
- Intro to recording
-
- Before recording software instruments
- Record software instruments
- Record additional software instrument takes
- Record to multiple software instrument tracks
- Record multiple MIDI devices to multiple tracks
- Record software instruments and audio simultaneously
- Merge software instrument recordings
- Spot erase software instrument recordings
- Replace software instrument recordings
- Capture your most recent MIDI performance
- Use the metronome
- Use the count-in
-
- Intro to arranging
-
- Intro to regions
- Select regions
- Cut, copy, and paste regions
- Move regions
- Remove gaps between regions
- Delay region playback
- Trim regions
- Loop regions
- Repeat regions
- Mute regions
- Split and join regions
- Stretch regions
- Separate a MIDI region by note pitch
- Bounce regions in place
- Change the gain of audio regions
- Create regions in the Tracks area
- Convert a MIDI region to a Drummer region or a pattern region
- Rename regions
- Change the color of regions
- Delete regions
- Create fades on audio regions
- Access mixing functions using the Fader
-
- Intro to Step Sequencer
- Use Step Sequencer with Drum Machine Designer
- Record Step Sequencer patterns live
- Step record Step Sequencer patterns
- Load and save patterns
- Modify pattern playback
- Edit steps
- Edit rows
- Edit Step Sequencer pattern, row, and step settings in the inspector
- Customize Step Sequencer
-
- Effect plug-ins overview
-
- Instrument plug-ins overview
-
- ES2 overview
- Interface overview
-
- Modulation overview
-
- Vector Envelope overview
- Use Vector Envelope points
- Use Vector Envelope solo and sustain points
- Set Vector Envelope segment times
- Vector Envelope XY pad controls
- Vector Envelope Actions menu
- Vector Envelope loop controls
- Vector Envelope release phase behavior
- Vector Envelope point transition shapes
- Use Vector Envelope time scaling
- Use the Mod Pad
- Modulation source reference
- Via modulation source reference
-
- Sample Alchemy overview
- Interface overview
- Add source material
- Save a preset
- Edit mode
- Play modes
- Source overview
- Synthesis modes
- Granular controls
- Additive effects
- Additive effect controls
- Spectral effect
- Spectral effect controls
- Filter module
- Low and Highpass filter
- Comb PM filter
- Downsampler filter
- FM filter
- Envelope generators
- Mod Matrix
- Modulation routing
- Motion mode
- Trim mode
- More menu
- Sampler
- Copyright
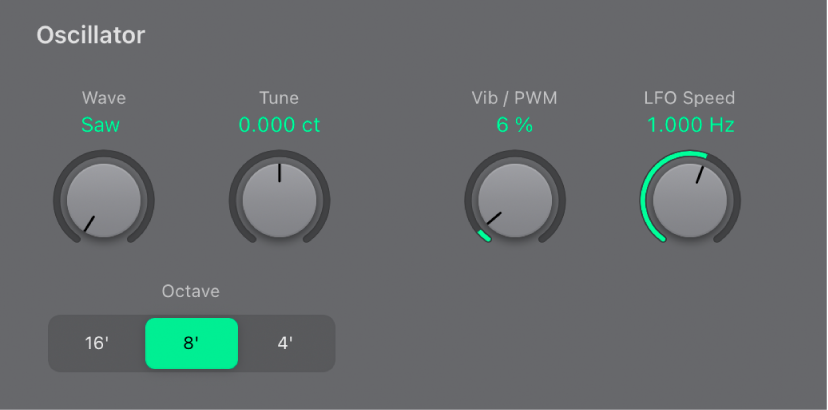
ES E oscillator parameters in Logic Pro for iPad
The ES E oscillator generates a waveform, which is then sent to other portions of the synthesizer engine for processing or manipulation.
ES E oscillator parameters include an LFO (low frequency oscillator), which generates a cyclic waveform that is used to modulate the ES E waveform.
The behavior and effect of the LFO depend on whether a sawtooth or pulse wave is selected.
If Wave is set to sawtooth, the LFO modulates the frequency of the waveform, resulting in a vibrato or siren effect—depending on the LFO speed and intensity.
If Wave is set to a pulse wave, the LFO modulates the waveform pulse width—pulse width modulation (PWM).

Oscillator parameters
Wave knob and field: Select the waveform of the oscillator, which is responsible for the basic color of the tone. The leftmost setting of the Wave parameter causes the oscillators to output sawtooth signals. Across the remaining range, the oscillators output pulse waves, with the average pulse width determined by the Wave parameter position.
Tune knob and field: Tune the instrument sound in cents. A cent is 1/100th of a semitone.
Octave buttons: Tap to switch the pitch in octaves—transpose it up or down. The lowest setting is 16 feet, and the highest is 4 feet. The use of the term feet to determine octaves comes from the measurements of organ pipe lengths. The longer and wider the pipe, the deeper the tone.
LFO parameters
Vib / PWM knob and field: Define the intensity of LFO modulation.
LFO Speed knob and field: Set the frequency of LFO modulation.
Note: When the pulse width becomes very narrow, the signal sounds as if it is being interrupted—“breaking up.” Given this potential artifact, set the PWM intensity with care. Set the Wave parameter to the 12 o’clock position (50% rectangular) for pulse width to attain the maximum modulation range.
Download this guide: PDF