Logic Pro User Guide for iPad
- What’s new in Logic Pro 1.1
-
- What is Logic Pro?
- Working areas
- Work with function buttons
- Work with numeric values
-
- Intro to tracks
- Create tracks
- Create tracks using drag and drop
- Choose the default region type for a software instrument track
- Select tracks
- Duplicate tracks
- Reorder tracks
- Rename tracks
- Change track icons
- Change track colors
- Use the tuner on an audio track
- Show the output track in the Tracks area
- Delete tracks
- Edit track parameters
- Start a Logic Pro subscription
- How to get help
-
- Intro to recording
-
- Before recording software instruments
- Record software instruments
- Record additional software instrument takes
- Record to multiple software instrument tracks
- Record multiple MIDI devices to multiple tracks
- Record software instruments and audio simultaneously
- Merge software instrument recordings
- Spot erase software instrument recordings
- Replace software instrument recordings
- Capture your most recent MIDI performance
- Use the metronome
- Use the count-in
-
- Intro to arranging
-
- Intro to regions
- Select regions
- Cut, copy, and paste regions
- Move regions
- Remove gaps between regions
- Delay region playback
- Trim regions
- Loop regions
- Repeat regions
- Mute regions
- Split and join regions
- Stretch regions
- Separate a MIDI region by note pitch
- Bounce regions in place
- Change the gain of audio regions
- Create regions in the Tracks area
- Convert a MIDI region to a Drummer region or a pattern region
- Rename regions
- Change the color of regions
- Delete regions
- Create fades on audio regions
- Access mixing functions using the Fader
-
- Intro to Step Sequencer
- Use Step Sequencer with Drum Machine Designer
- Record Step Sequencer patterns live
- Step record Step Sequencer patterns
- Load and save patterns
- Modify pattern playback
- Edit steps
- Edit rows
- Edit Step Sequencer pattern, row, and step settings in the inspector
- Customize Step Sequencer
-
- Effect plug-ins overview
-
- Instrument plug-ins overview
-
- ES2 overview
- Interface overview
-
- Modulation overview
-
- Vector Envelope overview
- Use Vector Envelope points
- Use Vector Envelope solo and sustain points
- Set Vector Envelope segment times
- Vector Envelope XY pad controls
- Vector Envelope Actions menu
- Vector Envelope loop controls
- Vector Envelope release phase behavior
- Vector Envelope point transition shapes
- Use Vector Envelope time scaling
- Use the Mod Pad
- Modulation source reference
- Via modulation source reference
-
- Sample Alchemy overview
- Interface overview
- Add source material
- Save a preset
- Edit mode
- Play modes
- Source overview
- Synthesis modes
- Granular controls
- Additive effects
- Additive effect controls
- Spectral effect
- Spectral effect controls
- Filter module
- Low and highpass filter
- Comb PM filter
- Downsampler filter
- FM filter
- Envelope generators
- Mod Matrix
- Modulation routing
- Motion mode
- Trim mode
- More menu
- Sampler
- Copyright
Mixer
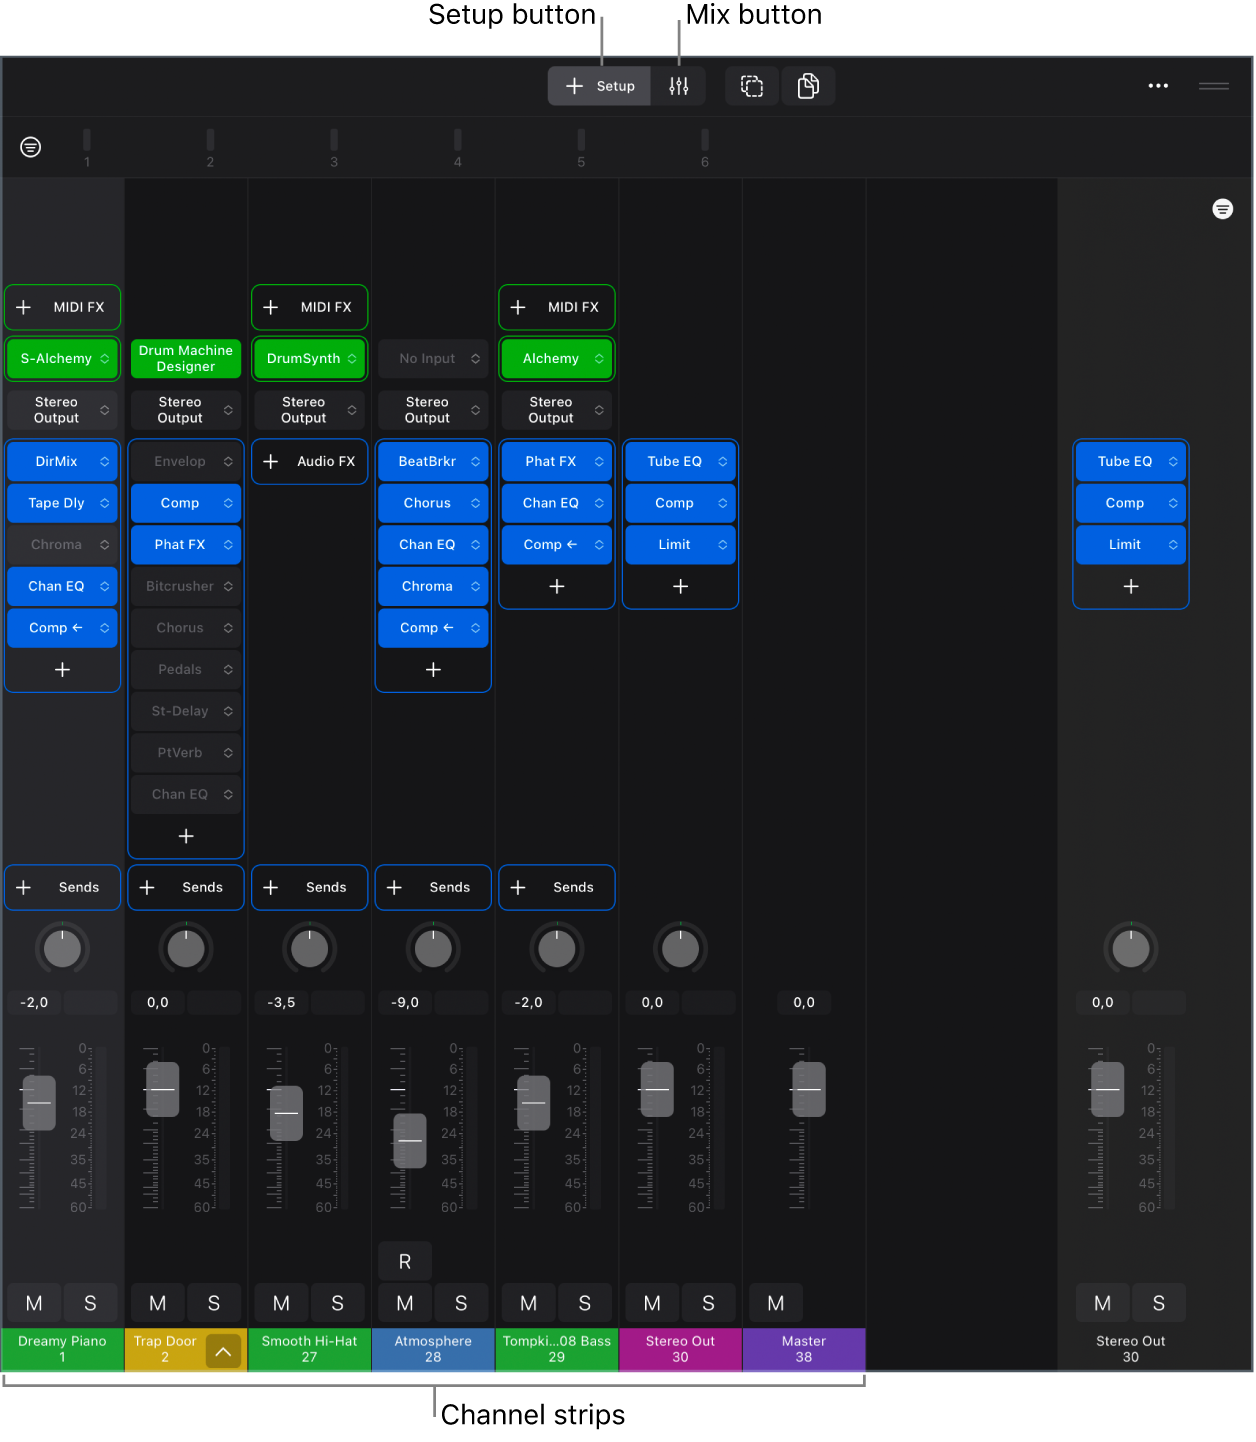
The Mixer shows the channel strips for the tracks in your project, including auxiliary and output channel strips and the master channel strip. This makes it easy to view and adjust relative levels and pan positions and perform other mixing functions. You can mute and solo tracks, add and edit effects, use busses and sends to control the signal flow, and use groups to control multiple channel strips together.

You work in the Mixer using the following two modes:
Setup mode: You can quickly add, replace, reorder, and remove plug-ins on the channel strips in the project.
Mix mode: You can open plug-ins in Details view to view and adjust all plug-in parameters, and quickly turn plug-ins on or off to hear how they affect the mix.
Channel strips in the Mixer include the following controls:
Plug-in slots: Add, replace, and remove effect plug-ins; on instrument channel strips, also replace the instrument plug-in.
Send slots: Add sends and adjust the send level.
Pan/Balance knob: Swipe up or down to adjust the pan position of the channel.
Volume fader: Drag the handle up or down to adjust the volume level of the channel.
Mute button: Tap to mute or unmute the channel strip.
Solo button: Tap to solo or unsolo the channel strip.
Channel name and number: Shows the name and number of the track corresponding to the channel strip.
Open the Mixer
Tap the Mixer button
 in the middle of the view control bar.
For information about working in the Mixer, see Intro to mixing.
Download this guide: PDF