Add and edit drawings in Keynote on iPad
You can use Apple Pencil or your finger to create and edit a drawing on your slide, then move or resize it.

Add a drawing
Do one of the following:
Use Apple Pencil: Tap anywhere on the slide with Apple Pencil, then tap one of the drawing tools (pen, pencil, crayon, or fill tool) in the toolbar at the bottom of the screen.
Use your finger: While viewing Keynote in landscape orientation, tap
 in the toolbar, tap Drawing, then tap one of the drawing tools (pen, pencil, crayon, or fill tool) in the toolbar at the bottom of the screen.
As you draw, you can do any of the following:
Switch drawing tools: Tap the pen, pencil, crayon, or fill tool in the toolbar at the bottom of the screen.
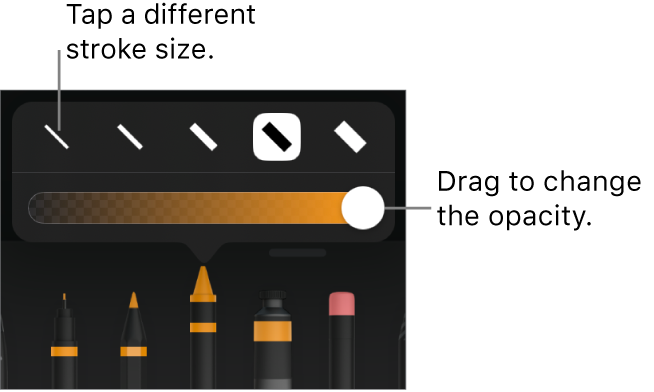
Adjust the stroke size (line thickness): Tap the pen, pencil, crayon, or eraser, tap it again, then tap a stroke size.

Adjust the color’s opacity: Tap the pen, pencil, crayon, or fill tool, tap it again, then drag the slider.
Change the color for the selected tool: For iPadOS 14, tap a preset color or tap the color wheel to choose a custom color. Use the controls to mix your own color, then tap
 to save the color as a favorite. To remove a favorite, touch and hold its color dot, then tap Delete. For iPadOS 13, tap the color well, then either tap a color in the grid or swipe left and create a custom color.
Fill an area with color: Tap the fill tool, then tap the area. To draw a shape already filled with color, tap the fill tool, then draw the shape.
Erase a stroke: Tap the eraser tool, tap it again, then tap Object Eraser. Tap the stroke or object fill you want to erase.
Erase pixels: Tap the eraser tool, tap it again, tap Pixel Eraser, then tap the dot you want to erase. For finer control, or to erase smaller dots, zoom the screen. You can drag across your drawing to erase segments of lines and fills, creating separate strokes and fills.
Scroll the slide: Swipe with two fingers; if you’re using Apple Pencil, swipe with one finger instead.
Show or hide the toolbar: Drag the toolbar handle down to minimize the toolbar. To return the toolbar to full size, tap the minimized version. To set the toolbar to automatically minimize when you’re writing, tap
 , then turn on Auto-minimize.
When you’re finished drawing, tap Done.
Move a drawing
If the drawing toolbar isn’t on the screen: Tap the drawing, then drag it with your finger.
If the drawing toolbar is on the screen: Tap the selection tool, drag around the part of the drawing you want to move, then drag the selection with your finger.
Resize a drawing
If the drawing toolbar isn’t on the screen: Tap the drawing, then drag any blue dot with your finger.
If the drawing toolbar is on the screen: Tap the selection tool, drag around the part of the drawing you want to resize, tap Resize, then drag any blue dot.
Edit a drawing
If the drawing toolbar isn’t on the screen: Tap the drawing with your finger, then tap Edit Drawing. Or, if you last used a drawing tool with Apple Pencil, tap the drawing with Apple Pencil to open the drawing toolbar.
If the drawing toolbar is on the screen: Tap a drawing tool, then make your changes.
Merge drawings
You can merge drawings so that they stay together as a single object. This makes it easier to move and resize the drawing as a whole.
Touch and hold one object, then tap the other objects with another finger.
Tap Merge.
Separate a drawing into parts
You can separate a drawing into individual objects that you can move, resize, or delete separately.
Double-tap the drawing with a finger.
Tap the selection tool, then drag around the part of the drawing you want to separate.
Tap Separate (you may need to tap
 to see it).
You can repeat this process to separate a drawing into multiple objects.
Animate a drawing
You can animate a drawing using the Line Draw build-in or build-out effect so that it appears in your presentation as if it’s being drawn or disappears as if it’s being erased.
Tap the drawing you want to animate, then tap Animate.
At the bottom of the screen, tap Add Build In or Add Build Out, select Line Draw from the Effects list, then tap
 .
.To edit the animation, tap Line Draw at the bottom of the screen, then do any of the following:
Adjust how long the animation plays: Drag the Duration slider.
Change how quickly the animation starts and stops: Tap Acceleration, then choose an option.
Change when to start the animation: Tap Start, then choose an option.
Preview the animation: Tap
 .
.Remove the animation: Tap Delete.
Tap Done in the upper-right corner of the screen.
To learn more, see Animate an object onto and off a slide.
Note: If you copy an animated drawing from Pages or Numbers into Keynote, the animation is removed. You can add the animation again using the steps above.
Add a drawing description
You can add a description to any drawing in your presentation. Drawing descriptions are read by assistive technology (for example, VoiceOver) when someone uses that technology to access your presentation. Drawing descriptions aren’t visible anywhere in your presentation.
Tap the drawing to select it, tap
 , then tap Drawing.
Tap Description, then tap in the text box and enter your text.
If you export your presentation as a PDF, drawing descriptions are still readable by assistive technology. See Export to PowerPoint or another file format in Keynote on iPad.
To add descriptions to an image or video, see Add an image description or Add a video description.
Share or save a drawing
You can share or save a drawing as an image.
On the slide, tap the drawing, then tap Share.
Do one of the following:
Share: Tap a method for sending the drawing.
Save: Tap Save to Files or, to save to Photos, tap Save Image.
Note: To use your Apple Pencil for selecting objects and scrolling instead of entering a view to write or draw, tap ![]() , scroll down to the Apple Pencil controls, then turn on Select and Scroll. If your Apple Pencil supports it, you can turn on Double-Tap to Switch, then double-tap the lower part of Apple Pencil to turn Select and Scroll on and off.
, scroll down to the Apple Pencil controls, then turn on Select and Scroll. If your Apple Pencil supports it, you can turn on Double-Tap to Switch, then double-tap the lower part of Apple Pencil to turn Select and Scroll on and off.