Use Switch Control on Mac
With Switch Control, you can use an adaptive device (such as a switch or joystick) to enter text, interact with items on the screen, and control your Mac. You use controls in the Switch Control Home panel to scan a panel or the user interface until you use a switch to select an item or perform an action.

Turn on Switch Control
On your Mac, choose Apple menu

 in the sidebar, then click Switch Control on the right. (You may need to scroll down.)
Turn on Switch Control.
The Switch Control Home panel is shown on your desktop.
By default, the Switch Control panel uses white text on a dark background. If you prefer dark text on a light background, choose a light appearance in Switch Control settings.
Set up switches
You can use Switch Control settings on your Mac to set up one or more adaptive switches to perform an action when pressed, or assign an existing switch a different action.
On your Mac, choose Apple menu

 in the sidebar, then click Switch Control on the right. (You may need to scroll down.)
Scroll down to Switches, then do any of the following:
Add a switch: Click
 , then press your adaptive switch. Enter a name, then select an action, such as Stop Scanning. To have the switch run a script or open an app, click Custom, then select a script or an app.
Remove a switch: Select a switch in the list, then click
 .
.Change a switch: Select a switch in the list, click
 , then change the name or action. To use a different switch for the action, click Reassign.
Use the Home Panel
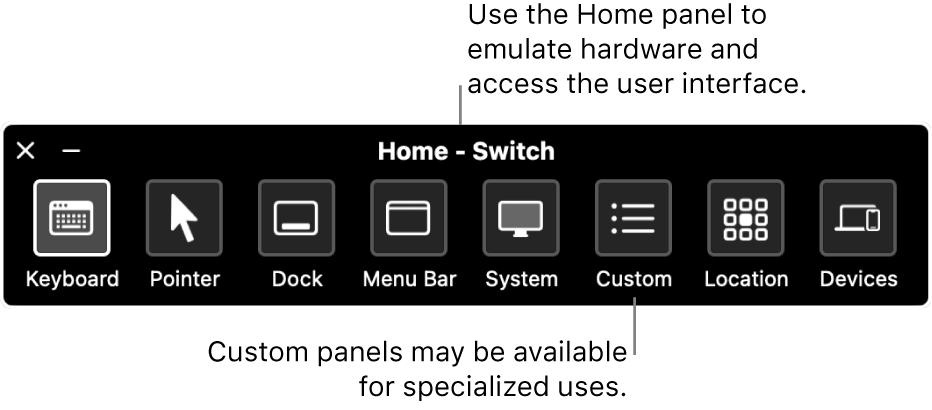
While you’re using Switch Control on your Mac, the Home Panel is shown on the desktop. The Home Panel contains the following items:
Keyboard: Shows the default keyboard. Type text in a document or field by scanning the keyboard in the panel, opening a group of keys, then selecting a key. Keep an eye on the group across the bottom of the keyboard; it contains suggested words, based on the keys pressed so far. You may save typing time by selecting a suggested word.
Pointer: Provides buttons to move and click the pointer. To move the pointer to an area of the screen, select Move; to automatically click the pointer when you get to an area of the screen, select Move & Click.
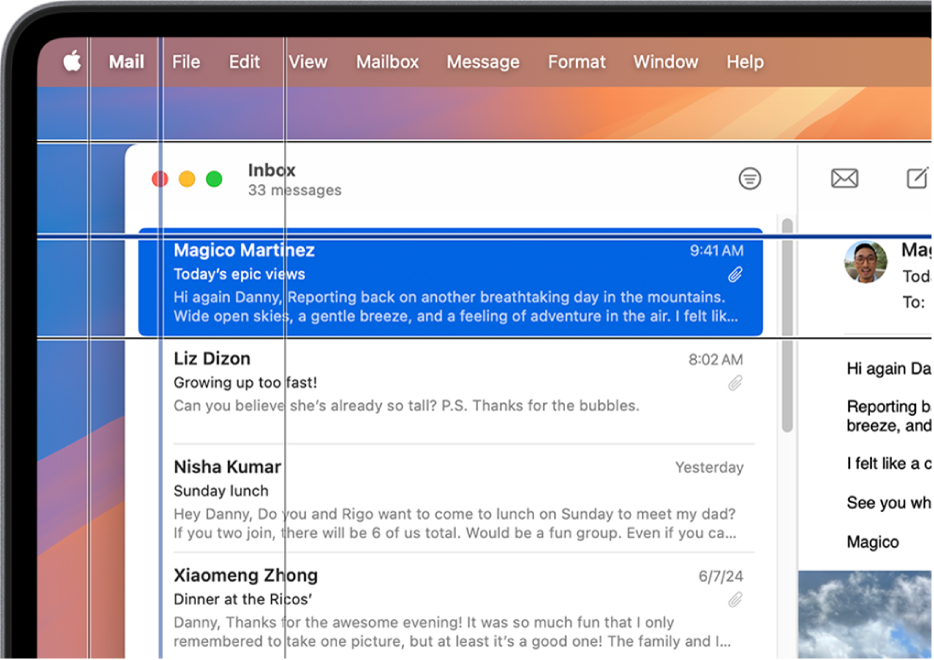
For both the Move and the Move & Click options, a vertical blue line starts to glide across the screen. When you press the Select Item switch, the line stops and a horizontal blue line starts to glide across the screen. The pointer moves to the intersection of the two blue lines; if you used Move & Click, the item located at the intersection of the two blue lines is selected.
If you want even more precision, set “Pointer precision” to High in Switch Control settings. Then, after the first vertical and horizontal lines stop, press the Select Item switch. A slower vertical (or horizontal) line moves across the screen, and you can stop exactly where you want.

Dock: Scans the items in the Dock.
Menu Bar: Scans the menu bar group, then the menu extras group.
System: Provides buttons to control the volume or display brightness of your Mac and control media playback.
If your Mac has a Touch Bar, System includes Toggle Touch Bar, which shows the Touch Bar across the bottom of the screen. This allows you to use Switch Control to point to and select items in the Touch Bar.
Custom: Shows custom panels that are available. You can create custom panels (using the Panel Editor) to streamline common tasks and actions for apps.
Location: Provides buttons to reposition the Switch Control panel on the screen.
Devices: Shows available Apple devices—such as iOS, iPadOS, and Apple TV devices—that you can control using Switch Control on your Mac, without having to pair your switch with the other device. Your Mac, iPhone, iPad, and Apple TV must be on the same Wi-Fi network, and you must be signed in to the same Apple Account on all the devices.
If you turned on “Allow platform switching to control your computer” in Switch Control settings, you can also use your other devices to control your Mac.
See the Apple Support article Use Switch Control on your device to control another Apple device.
Scan and select items
While you’re using Switch Control on your Mac, do any of the following:
Scan items with auto scanning: Press the Select Item switch to start auto scanning. For groups and user interface items, Switch Control highlights each item or group as it scans. For panels, it either highlights each button or group, or sets of buttons in an overlapping sequence, depending on how the panel was designed.
If you select an item, the scan pauses, unless “Auto scanning” is turned on in Switch Control settings. To resume the scan, press the switch. Switch Control repeats (or loops) a scan, as set in Switch Control settings.
Scan items without auto scanning: If you turned auto scanning off, press the Move To Next Item switch.
Select an item: When an item is highlighted, press the Select Item switch. If the selected item is a group, press the switch again to scan the items in the group, then press the switch once more to select an item. To exit a group, press the switch when the group is highlighted (or when “step out” is announced, if you set the option to have Switch Control speak while navigating).
If you turn on “Resume auto scanning after selection” in Switch Control settings, Switch Control automatically starts scanning the items in the group when you select it.
Use panels
While you’re using Switch Control on your Mac, do any of the following:
Set panel options: In a panel, press the Select Item switch when
 in the top-right corner is highlighted. Press the switch again when the option you want to set is highlighted. You can decrease or increase the size of the panel, and increase or decrease its transparency.
Return to the Home Panel: In a panel, press the Select Item switch when
 in the top-right corner is highlighted. In the user interface, press the switch when the Home Panel is highlighted.
Control the pointer
While you’re using Switch Control on your Mac, you can use panels to move and control the pointer. For example, the Pointer panel in the Home Panel offers Move and Move & Click. The following methods may also be used in panels:
Glide: The action is the same as Move in the Pointer panel.
Rotate: When you press the Select Item switch, a sector (shaped like a pie slice) starts to rotate around the screen from the current location of the pointer, or around the frontmost window from the center of the window (depending on how Boundary was set in the Panel Editor). When you press the switch a second time, the sector stops on the screen, then a blue line starts to glide across the sector. When you press the switch a third time, the blue line stops, then the pointer starts to glide along the blue line. Press the switch again to stop the pointer on the blue line.
If you set “Pointer precision” to High in Switch Control settings, Switch Control adds intermediate stages to provide greater control of the pointer. For example, the third time you press the Select Item switch, the blue line moves much slower as it glides across the sector. Press the switch a fourth time to start the pointer gliding along the blue line. Press it a fifth time to slow the pointer even more. Press the switch a sixth time to stop the pointer on the blue line.
Directional Move: When you press the Select Item switch, the pointer moves across the screen from its current location in one of several ways: It either moves in one direction (for example, left, down, or diagonally). Or, it repeats or reverses the last directional move it made. If you press the switch, the pointer stops moving; if you don’t, the pointer continues until it reaches a boundary, where it reverses direction, or stops if “Reverse cursor direction after hitting edge” is turned off in Switch Control settings.
You can customize Switch Control in Switch Control settings. To learn about the available options, see Change Switch Control settings.