Enter text and numbers in Numbers on iPhone
You can add content to a table in several ways. You can type directly into cells using the standard keyboard or special keyboards for certain types of data and controls. You can also copy and paste content from somewhere else or let Numbers complete patterns for you with auto fill.
Note: If you can’t modify a table, make sure it’s unlocked. Select the table, then tap Unlock (if you don’t see Unlock, the table isn’t locked).
Type content in cells
Tap the cell, then begin entering content.
If the keyboard isn’t open, tap
 at the bottom of the screen.
To switch to a different keyboard, tap one of the buttons at the top of the keyboard (if you don’t see the buttons, tap
 ).
).Numeric keyboard: Tap
 .
.You can enter numbers, currency values and fractions (like 1 1/3); add a star rating or tick box to a cell and type a date or time (such as 31/12 or 2:15 pm).
Text keyboard: Tap
 .
.You can type words, numbers, dates and so on. What you type determines how the data is interpreted and used in calculations. For example, numbers with currency symbols are interpreted as monetary values, numbers with per cent symbols (%) are interpreted as fractions of 100 and so on. For information about data formats, see Format dates, currency and more in Numbers on iPhone.
Date and time keyboard: Tap
 .
.Duration keyboard: Tap
 .
.Formula keyboard: Tap
 .
.
To edit what you typed (except a formula), tap to place the insertion point where you want to type (drag the insertion point to reposition it).
To edit a cell that has a formula, see Change an existing formula.
To insert a line break or a tab in a cell, tap to place the insertion point where you want the break; tap Insert, then tap Tab or Line Break.
To reposition the insertion point, drag it.
When you finish, tap Done to dismiss the keyboard.
To delete content from a cell, tap the cell, then tap Delete (if you don’t see Delete, tap the cell again).
You can also add an image or other object, insert functions in cells, and insert a link in a cell.
Enter data using forms
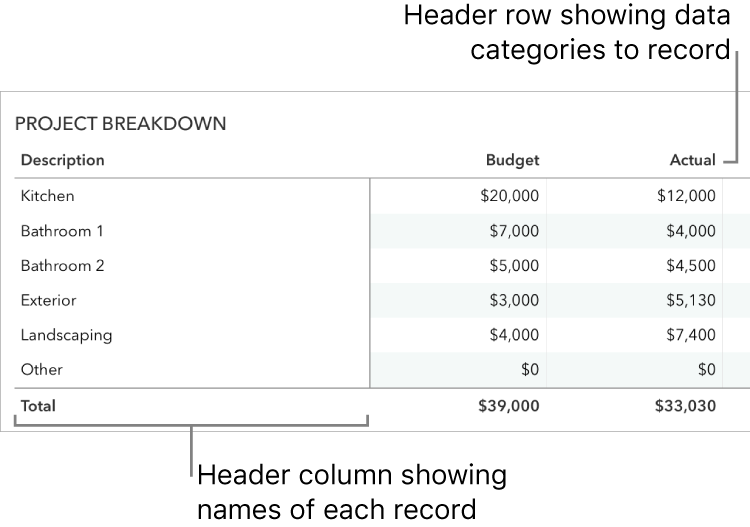
A systematic and quick way to enter data into a large table, row-by-row, is to display the table as a form. With a form, you can edit all the data within a single table row and quickly move between rows. Forms can speed up your workflow; if, for example, you’re entering similar data about a large population sample and you want to move quickly between individual records.
You can use forms for entering data in a table only if the table includes a header row and doesn’t include any merged cells. A header column is optional.
Note: When you share a spreadsheet that has a form, the form is no longer visible.
Create a table with a header row listing the data categories you want to enter in each record, and a header column listing the record names (optional).

Tap
 in the top-left corner of the sheet, then tap New Form.
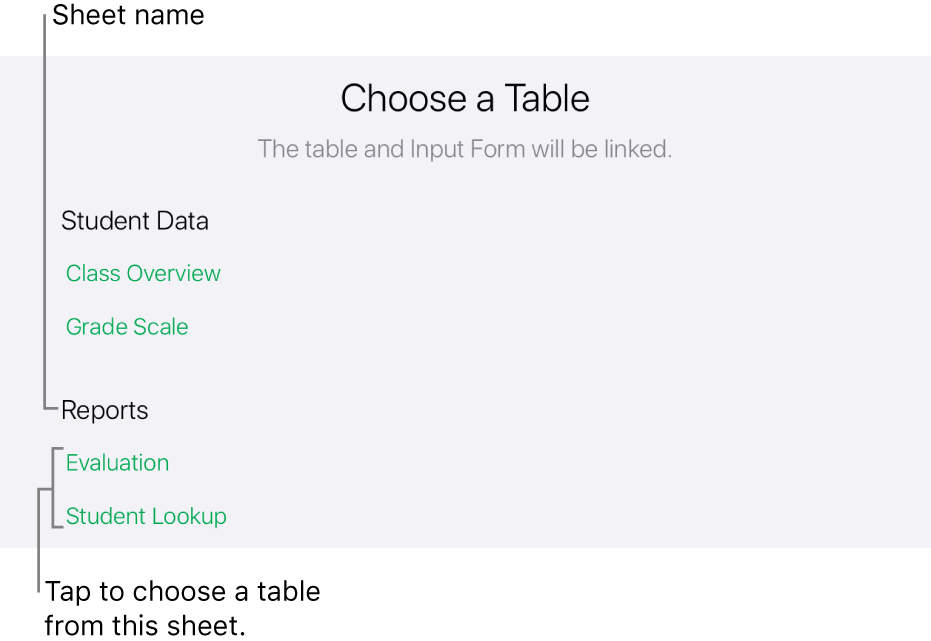
If your spreadsheet includes several tables, a list of tables appears.
Tap the name of the table you want to create a form for.

In the form, tap a field in the right column to edit it.
To move between the fields in the form, tap an Up Arrow or Down Arrow key on the keyboard or scroll the form to see all the fields, then tap the one you want to edit.
If you can’t place the insertion point in a field, it means that field contains the result of a calculation and can’t be edited from the form.
To add, edit or delete records, do any of the following:
Go to the next or previous record: Tap
 or
or  .
.Add a record: Tap
 .
.Delete the current record: Tap
 .
.
To exit the form, tap another tab.
Auto fill cells
You can quickly fill cells, a row or column, with the same formula, data or a logical sequence of data — for example, a series of numbers, letters or dates.
Do any of the following:
Autofill one or more cells with content from one or more adjacent cells: Select the cell or cells with the content you want to copy, tap
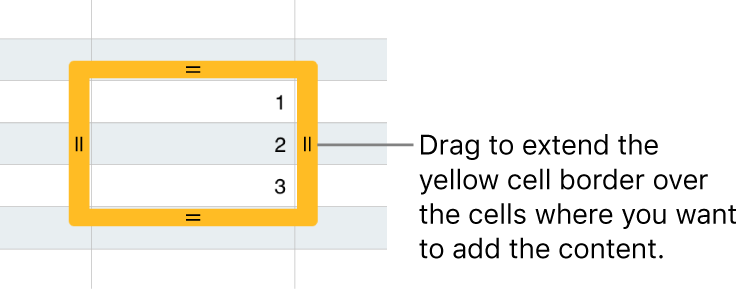
 at the bottom of the screen, tap Autofill Cells, then drag the yellow border to encompass the cells where you want to add the content.
Any data, cell format, formula, cell border or fill associated with the selected cells is added, but comments aren’t. Auto filling overwrites the existing data.
Auto fill cells with sequential content or patterns from adjacent cells: Type the first two items of the series in the first two body cells of the row or column you want to fill; for example, type A and B. Select the cells, tap
 , tap Autofill Cells, then drag the yellow border to encompass the cells you want to fill.
You can also auto fill cells using a pattern of values. For example, if two selected cells contain 1 and 4, the values 7 and 10 are added when you drag over the adjacent two cells (values are incremented by 3).
Auto filling doesn’t establish an ongoing relationship among cells in the group. After auto filling, you can change the cells independently of each other.
When you auto fill cells, any formulas that refer to those cells are updated automatically to use the new value.
Copy or move cell content
When you copy a cell or move a cell’s data to a new location in the table, the cell’s properties are also copied or moved, including its data format, fill, border and comments.
Select the cells you want to copy or move.
Do one of the following:
Paste and overwrite existing content: Tap Copy (if you don’t see Copy, tap the selected cells again). Select the top-left cell where you want to paste the data, then tap Paste (if you don’t see Paste, tap the cell again).
If your data range contains formulas, tap Paste Formulas or Paste Values. The data overwrites any existing data.
Move the data: Touch and hold the selection until the cells appear to rise off the table, then drag them to another location in the table. Existing data is replaced by the new data.
Paste outside of an existing table to create a new table: Tap Copy (if you don’t see Copy, tap the selected cells again). Tap the sheet outside the table, tap the sheet again to see the contextual menu, then tap Paste. A new table is created with the pasted cells.