Send a Keynote presentation on Mac
You can send a copy of a Keynote presentation using AirDrop, Mail, Messages or another service. You can also send a copy in another format, such as PDF, Microsoft PowerPoint, Movie and more.
Tip: Before you send a copy of your presentation to a recipient, you can lock it to prevent anyone from modifying the copy, or password-protect it to restrict access to the presentation and provide extra security.
Send a copy of your Keynote presentation
With the presentation open, do one of the following:
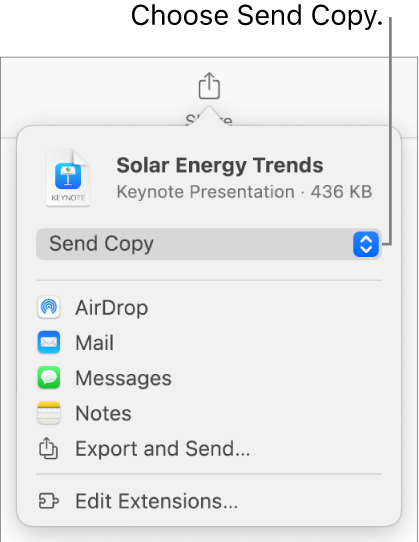
macOS Ventura 13 or later: Click Share
 in the toolbar, click the pop-up menu, then choose Send Copy.
Note: If you have not saved the presentation yet, you will be asked to do so before you can share it.
macOS 12 or earlier: Choose File > Send a Copy (from the File menu at the top of your screen).
To select how you want to send the presentation, click one of the following:
AirDrop: Click the name of the recipient. The recipient must be on the same network and must accept the file to receive it.
Mail or Messages: Type an email address or phone number for each recipient, add a note if you want, then click Send (for Mail) or press Enter (for Messages).
Notes: To save a copy in the Notes app, choose the note where you want to save it (or create a new one), add text if you want, then click Save.
Send a copy of a Keynote presentation in another format
With the presentation open, do one of the following:
macOS Ventura 13 or later: Click Share
 in the toolbar, then click Export and Send.
macOS 12 or earlier: Choose File > Send a Copy (from the File menu at the top of your screen), then click how you want to send the presentation.
Select a format for the copy, then specify the settings you want to use:
PDF: You can open and sometimes edit these files with applications like Preview and Adobe Acrobat. Each slide appears on its own page of the PDF. Select the tick box next to presenter notes and skipped slides if you want to print them. If you select “Print each stage of builds”, each build is printed on its own page in the same order as they appear in the presentation. To include comments in the PDF, select the “Include comments” tick box.
Click the Image Quality pop-up menu, then choose an option (the higher the image quality, the larger the file size). If you added image, drawing, audio or video descriptions for assistive technology (for example, VoiceOver), they’re automatically exported. To include accessibility tags for large tables, click Advanced Options, then choose On in the Accessibility pop-up.
PowerPoint: You can open and edit these files with Microsoft PowerPoint in .pptx format.
Movie: You can export the slides in .mov format and include any audio in the presentation. To export only part of the presentation, select From and enter the first and last slide numbers. If you recorded a narration, you can click the Playback pop-up menu, then select Slide show Recording. Otherwise, your presentation is self-playing and advances to the next slide or build according to the time intervals you enter. If you have an animation that’s set to advance following a previous build or transition, it’s not affected by the time interval you enter.
Click the Resolution pop-up menu, then choose a resolution. To set a custom resolution, click Custom at the bottom of the menu.
Animated GIF: You can export selected slides as an animated GIF that you can send or post. See Create an animated GIF.
Images: Select the slides you want to export as images and select an image format for your slides. The higher quality the image, the larger the file size.
HTML: You can send the presentation as an index.html file that can be viewed in a web browser. Animations and builds are also exported with your presentation.
Keynote ‘09: You can open this format with Keynote 5.0 through 5.3 on a Mac.
If there’s a password tick box, do one of the following:
Set a password: Select the “Require password to open” tick box, then enter a password. It applies only to the exported copy.
Keep the original presentation password: Make sure the “Require password to open” tick box is selected.
Use a different password for the exported copy: Select the password tick box, click Change Password, then set a new password.
Export the copy without a password: Deselect the “Require password to open” tick box.
Click Send a Copy in the bottom-right of the controls, then choose a sending option:
AirDrop: Click the name of the recipient. The recipient must be on the same network and must accept the file to receive it.
Mail or Messages: Type an email address or phone number for each recipient, add a note if you want, then click Send (for Mail) or press Enter (for Messages).
Notes: To save a copy in the Notes app, choose the note where you want to save it (or create a new one), add text if you want, then click Save.
To make your presentation easier to send, post or share, you can reduce its file size.