Turn on device accessibility features in iTunes on PC
iPhone, iPad and iPod include many accessibility features that make it easier to use your device if you have visual, auditory or other physical disabilities.
The following accessibility features are available on iPhone 3GS (or later), iPad and iPod touch (3rd generation or later):
VoiceOver
Zoom
Invert Colours
Mono Audio
Speak Auto-text
These accessibility features work with all apps preinstalled on the devices, as well as many apps downloaded from the App Store.
iPod nano (6th generation) also includes VoiceOver, White on Black and Mono Audio. iPod nano (4th or 5th generation) includes spoken menus.
Note: To turn on device accessibility features on iPod classic, iPod nano or iPod shuffle, use iTunes on Windows 10.
Turn on accessibility features
Connect your device to your computer.
You can connect your device using a USB or USB-C cable or a Wi-Fi connection. To turn on Wi-Fi syncing, see Sync iTunes content on PC with devices on Wi-Fi.
In the iTunes app
 on your PC, click the Device button near the top left of the iTunes window.
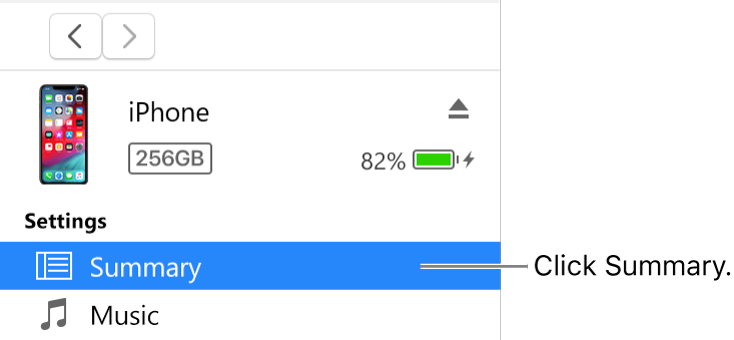
Click Summary.

Click Configure Accessibility (below Options).
Select the accessibility features you want to use, then click OK.
See the Accessibility section of the user guide for iPhone, iPad or iPod touch. If a device doesn’t have the latest version of iOS or iPadOS, get the user guide from the Apple Support Manuals website.
Turn on spoken menus for iPod nano (4th or 5th generation)
You can use spoken menus with iPod nano (4th or 5th generation) to hear information about the selected song, such as title, artist and album.
Connect your device to your computer.
You can connect your device using a USB or USB-C cable or a Wi-Fi connection. To turn on Wi-Fi syncing, see Sync iTunes content on PC with devices on Wi-Fi.
In the iTunes app
 on your PC, click the Device button near the top left of the iTunes window.
Click Summary.
Select “Enable spoken menus for accessibility” or “Enable Spoken Menus.”
If you turned on Microsoft Narrator, this option is already selected.
Click Apply.
When spoken menus are turned on, it might take longer to sync your iPod nano.
Install the VoiceOver Kit and turn on VoiceOver on your iPod
VoiceOver makes it easy to navigate through your content by announcing the names of playlists, songs, artists and more. To hear these announcements, you need to install the VoiceOver Kit and enable VoiceOver in iTunes.
Note: If you have an iPod nano (6th generation), follow the instructions in “Turn on accessibility features", above, to turn on VoiceOver and other accessibility features.
Connect your device to your computer.
You can connect your device using a USB or USB-C cable or a Wi-Fi connection. To turn on Wi-Fi syncing, see Sync iTunes content on PC with devices on Wi-Fi.
In the iTunes app
 on your PC, click the Device button near the top left of the iTunes window.
Click Summary.
Select Enable VoiceOver, then click Apply.
Follow the onscreen instructions to download and install the VoiceOver Kit.
Select VoiceOver settings.
Click Apply to sync your iPod with iTunes.
When syncing is complete, VoiceOver is on.
Change VoiceOver settings or turn off VoiceOver
Connect your device to your computer.
You can connect your device using a USB or USB-C cable or a Wi-Fi connection. To turn on Wi-Fi syncing, see Sync iTunes content on PC with devices on Wi-Fi.
In the iTunes app
 on your PC, click the Device button near the top left of the iTunes window.
Click Summary.
Select new VoiceOver settings. To turn off VoiceOver, unselect Enable VoiceOver.
Click Apply to sync your iPod with iTunes.
When syncing is complete, VoiceOver is turned off.
Important: Before disconnecting your device from your computer, click the Eject button ![]() .
.