Change the look of text in Pages on iPad
You can change how text looks by changing its font, size or colour, or by adding bold, italic or other formatting. You can also fill text with gradients or images, or add an outline. To highlight text, you can add colour behind it.

Change text using the keyboard
You can use the shortcut bar above the keyboard to quickly change the font. The shortcut bar on iPad Pro is different from the one shown below.

Note: If you can’t see the shortcut bar, go to Settings > General > Keyboards and turn Shortcuts on.
Do any of the following:
Change the font: Tap the font name on the left side of the predictive text fields, then tap a font.
Change the font style: Tap the font name, tap
 next to the font name, then tap a format (regular, bold, italic or semibold, for example).
Change the font size: Tap
 , then tap a size.
Add bold, italic or underline: Tap
 , then tap a style at the bottom of the menu. On iPad Pro, tap
  to the left of the font size button, then tap a style.
Change text using the Format controls
Select the text you want to change — or tap a text box, shape or table cell — then tap
 .
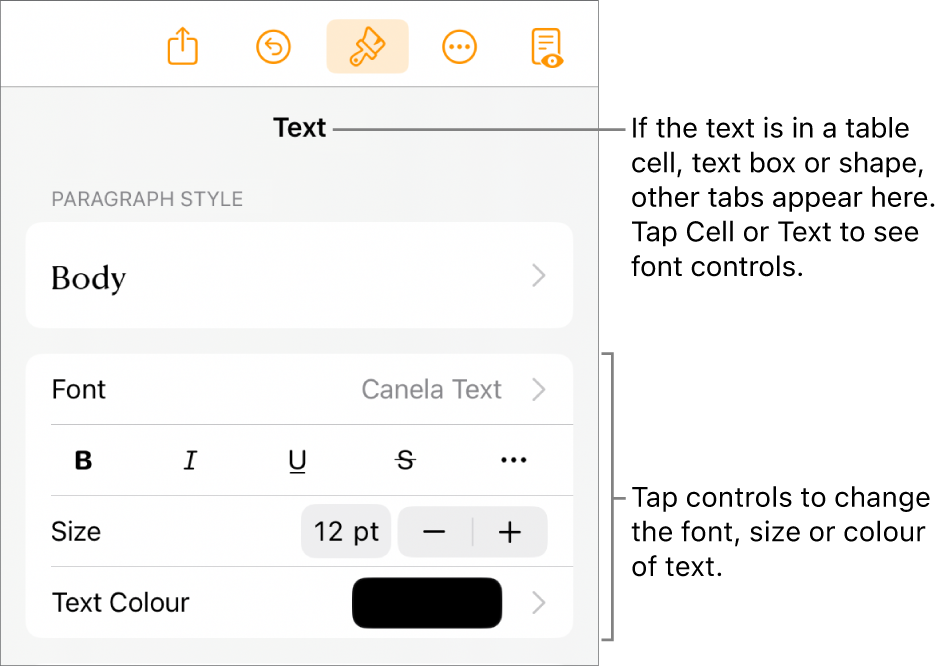
.If you can’t see text controls, tap Cell or Text.
Do any of the following:
Apply a different paragraph style: Tap the style name below Paragraph Style, then tap a new paragraph style (scroll to see more). You can’t apply a paragraph style to text in a table cell.
Change the font: Tap Font, then tap a new font. To see more options for the font, tap
 next to the font name, then tap a format (condensed, light or semibold, for example).
Apply bold, italic, underline or strikethrough: Tap any of the buttons below Font.
Change the size: Tap
 next to Size to decrease or increase the font size, or tap the font size and enter a new value.
Change the colour of text
Select the text you want to change — or tap a text box, shape or table cell — then tap
 .
.If you can’t see text controls, tap Cell or Text.
Tap Text Colour, then choose one of the following:
A colour or gradient designed to go with the template: Tap Preset, swipe left or right to see all the choices, then tap a colour.
Any colour: Tap Colour, then tap a colour. To preview text in different colours, touch and hold a colour, then drag across the grid. A colour label appears for each previewed colour to help you reproduce an exact match. Release your finger to select a colour.
A colour from elsewhere on the page: Tap Colour, then swipe left to the colour wheel. Tap
 , then tap any colour outside the selected text. To preview colours, touch and hold a colour on the page, then drag across other colours on the page. Release your finger to select a colour.
A custom colour: Tap Colour, swipe left to the colour wheel, then drag the slider around the wheel. To change colour brightness, drag the top horizontal slider. To change colour saturation, drag the bottom slider. To revert to the previous colour, tap the circle in the centre of the colour wheel (the left half shows the previous colour).
A recently created custom colour or a recently selected colour from elsewhere on the page: Tap Colour, swipe left to the colour wheel, then tap a colour well to the right of
 .
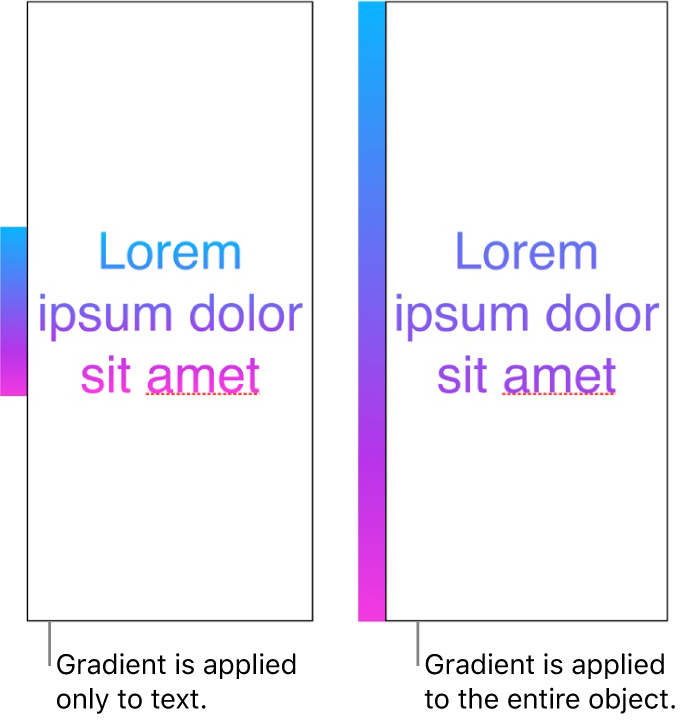
.A two-colour gradient fill: Tap Gradient, tap Start Colour or End Colour, then tap a colour or swipe left to use the colour wheel. To switch the gradient direction, tap Flip Colour. To change the gradient angle, drag the Angle slider. To apply the gradient based on the length of the shape or text box (not the size of the selected text), select the tick box next to Apply Gradient to Entire Object. The gradient changes when the size of the object or text box changes. To apply the gradient across the full length of the page, select the tick box next to Apply Gradient to Entire Page.

Fill text with an image
Select the text you want to change — or tap a text box, shape or table cell — then tap
 .
.Tap Cell (for text in a table) or Text (for text in a shape or text box) to show the text controls.
Tap Text Colour or Colour, then tap Image.
Tap Change Image, then do one of the following:
Tap an album, then tap a photo.
Tap Take Photo.
Tap “Insert from” to choose an image from iCloud Drive.
If the image doesn’t look the way you expected or you want to change how the image fills the object, tap an option:
Original Size: Places the image inside the text without altering the image’s original dimensions. To resize the image, drag the Scale slider.
Stretch: Resizes the image to fit the text’s dimensions, which might change the image’s proportions.
Tile: Repeats the image inside the text. To resize the image, drag the Scale slider.
Scale to Fill: Makes the image larger or smaller to leave no space in the text.
Scale to Fit: Resizes the image to fit the text’s dimensions, but maintains the image’s proportions. Some text might not be filled.
To create a tinted image, turn on Colour Overlay and tap Fill to select a tint colour.
To make the tint more or less transparent, drag the Opacity slider.
Add or remove a text outline
Select the text you want to change — or tap a text box, shape or table cell — then tap
 .
.Tap Cell (for text in a table) or Text (for text in a shape or text box) to show the text controls.
Tap
 in the Font section of the controls.
Turn Outline on or off.
If you add an outline, use the controls to change its line type, colour and width.
Tip: You can remove the text colour to emphasise the outline. Tap ![]() , tap Text, then tap Text Colour. Tap Preset, swipe to the black and white options, and then tap No Fill.
, tap Text, then tap Text Colour. Tap Preset, swipe to the black and white options, and then tap No Fill.
Add a background colour to text
You can add colour behind any selection of text — individual characters, words or entire paragraphs — to create a highlight effect.
Select the text you want to change — or tap a text box or shape — then tap
 .
.If you can’t see text controls, tap Text.
Tap
 in the Font section of the controls.
Swipe up, then tap Text Background.
Swipe left or right to see colours (tap Preset or Colour to change the options), then tap one.
For more information about colour options, see "Change the colour of text” above.
To remove the background colour from selected text, tap Preset, then swipe to the black and white options and tap No Fill.
Add a background colour to a paragraph
Use this method when you want the colour behind the text to extend from margin to margin as a block of colour.
Note: If the paragraph is in a table cell, you need to add the background colour to the table cell. See Change the border and background of table cells.
Tap the paragraph or select multiple paragraphs where you want the background colour to appear.
Tap
 in the toolbar, tap Text at the top of the menu, then tap Paragraph Borders & Background (you may need to scroll down).
Tap Background, then do one of the following:
Choose a colour designed to go with the template: Tap Preset, swipe left or right to see all the choices, then tap a colour.
Choose any colour: Tap Colour, then tap a colour. To preview different background colours, touch and hold a colour, then drag across the grid. A colour label appears for each previewed colour to help you reproduce an exact match. Release your finger to select a colour.
A colour from elsewhere on the page: Tap Colour, swipe left, then tap
 . Tap any colour on the page. To preview colours, touch and hold a colour on the page, then drag across other colours on the page. Release your finger to select a colour.
Remove a background colour from behind paragraphs
If the colour you want to remove extends from margin to margin, you can use this method to remove it.
Select the paragraphs you want to remove the background colour from.
Tap
 , then tap Paragraph Borders & Background in the Text menu.
Tap Background, tap Preset, then tap No Fill (you may need to swipe left first).
When you open a document that uses fonts you don’t have, a missing font notification appears briefly at the top of the page. If you want to replace the missing fonts, tap the notification, tap Resolve Font Warnings, then tap Resolve. If the notification is no longer visible, tap ![]() , tap Document Options, tap Show Document Warnings, tap Resolve Font Warnings, then tap Resolve.
, tap Document Options, tap Show Document Warnings, tap Resolve Font Warnings, then tap Resolve.
To install a new or missing font on your iPad, you can download it from the App Store. See the iPad User Guide for instructions.
You can keep text formatting consistent in a document by using text styles.