Final Cut Pro User Guide for Mac
- Welcome
- What’s new
-
- Intro to effects
-
- Intro to transitions
- How transitions are created
- Add transitions and fades
- Quickly add a transition with a keyboard shortcut
- Set the default duration for transitions
- Delete transitions
- Adjust transitions in the timeline
- Adjust transitions in the inspector and viewer
- Merge jump cuts with the Flow transition
- Adjust transitions with multiple images
- Modify transitions in Motion
-
- Add storylines
- Use the precision editor
- Conform frame sizes and rates
- Use XML to transfer projects
- Glossary
- Copyright

Adjust transitions in the inspector and viewer in Final Cut Pro for Mac
You can adjust a transition using the controls in the Transition inspector and viewer.
In the Final Cut Pro timeline, select the transition to adjust.
This example explains how to modify the Circle transition, but you can modify any transition.
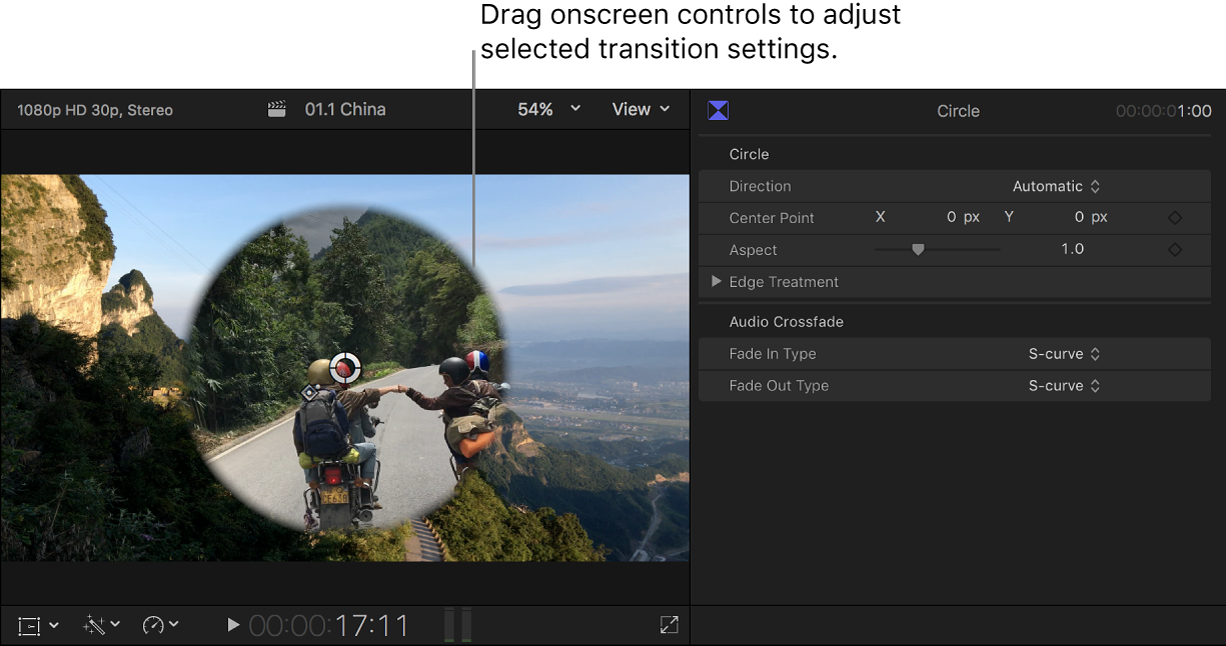
The viewer shows the onscreen controls for the selected transition.

In the above example, which uses the Circle transition, you can drag the white circle in the viewer to position the circle wipe’s center, and the diamond-shaped handle to set the border width (in this case, its softness).
If the inspector is not already shown, do one of the following:
Choose Window > Show in Workspace > Inspector (or press Command-4).
Click the Inspector button on the right side of the toolbar.

The Transition inspector shows the other parameters available for you to adjust. In the above example, the Transition inspector includes a setting for the circle wipe’s aspect ratio and edge treatment (including the border color if you choose a hard edge). Some transitions also have an image well for selecting a video frame that appears as part of the transition.
Common transition controls include:
Ease: Sets the acceleration of the transition at its beginning or end, or at both points. An Ease Amount slider lets you adjust how rapidly the effect ramps up or ramps down.
Direction: Sets which quadrant of the frame an animated transition (such as a wipe) begins in.
Edge Type: Sets the edge hardness of wipe transitions.
Graphics HDR Level: Some transitions include SDR colors or graphic elements. When applied to clips in an HDR project, these elements may look dimmer than the bright areas in the HDR clips, or colors may seem muted relative to the HDR media. You can increase the intensity or vibrancy of these elements by adjusting the Graphics HDR Level slider.
Audio Transition Fade In Type and Fade Out Type: Sets the type of crossfade curve applied to audio during transitions between video clips that have an audio component. Choose one of the following:
Linear: Maintains a constant rate of change over the length of the fade.
+3dB: Fade-ins start quickly and end slowly; fade-outs start slowly and end quickly. This is the default setting and is best for maintaining a natural volume when crossfading between two clips.
–3dB: Fade-ins start slowly and end quickly; fade-outs start quickly and end slowly.
S-curve: Eases in and out of the fade with the midpoint at 0 dB.
Additionally, many transitions have parameters that you can animate using keyframes. For example, you could have the circle effect move across the video frame as the clip plays.
Download this guide: Apple Books | PDF