Logic Pro User Guide for iPad
-
- What is Logic Pro?
- Working areas
- Work with function buttons
- Work with numeric values
- Undo and redo edits in Logic Pro for iPad
-
- Intro to tracks
- Create tracks
- Create tracks using drag and drop
- Choose the default region type for a software instrument track
- Select tracks
- Duplicate tracks
- Reorder tracks
- Rename tracks
- Change track icons
- Change track colors
- Use the tuner on an audio track
- Show the output track in the Tracks area
- Delete tracks
- Edit track parameters
- Start a Logic Pro subscription
- How to get help
-
- Intro to recording
-
- Before recording software instruments
- Record software instruments
- Record additional software instrument takes
- Record to multiple software instrument tracks
- Record multiple MIDI devices to multiple tracks
- Record software instruments and audio simultaneously
- Merge software instrument recordings
- Spot erase software instrument recordings
- Replace software instrument recordings
- Capture your most recent MIDI performance
- Route MIDI internally to software instrument tracks
- Record with Low Latency Monitoring mode
- Use the metronome
- Use the count-in
-
- Intro to arranging
-
- Intro to regions
- Select regions
- Cut, copy, and paste regions
- Move regions
- Remove gaps between regions
- Delay region playback
- Trim regions
- Loop regions
- Repeat regions
- Mute regions
- Split and join regions
- Stretch regions
- Separate a MIDI region by note pitch
- Bounce regions in place
- Change the gain of audio regions
- Create regions in the Tracks area
- Convert a MIDI region to a Session Player region or a pattern region
- Replace a MIDI region with a Session Player region in Logic Pro for iPad
- Rename regions
- Change the color of regions
- Delete regions
-
- Intro to chords
- Add and delete chords
- Select chords
- Cut, copy, and paste chords
- Move and resize chords
- Loop chords on the Chord track
- Color chords on the Chord track
- Edit chords
- Work with chord groups
- Use chord progressions
- Change the chord rhythm
- Choose which chords a Session Player region follows
- Analyze the key signature of a range of chords
- Create fades on audio regions
- Extract vocal and instrumental stems with Stem Splitter
- Access mixing functions using the Fader
-
- Intro to Step Sequencer
- Use Step Sequencer with Drum Machine Designer
- Record Step Sequencer patterns live
- Step record Step Sequencer patterns
- Load and save patterns
- Modify pattern playback
- Edit steps
- Edit rows
- Edit Step Sequencer pattern, row, and step settings in the inspector
- Customize Step Sequencer
-
- Intro to mixing
-
- Channel strip types
- Channel strip controls
- Peak level display and clipping
- Set channel strip volume
- Set channel strip input format
- Set the output for a channel strip
- Set channel strip pan position
- Mute and solo channel strips
- Reorder channel strips in the Mixer in Logic Pro for iPad
- Replace a patch on a channel strip using drag and drop
- Work with plug-ins in the Mixer
- Search for plug-ins in the Mixer in Logic Pro for iPad
-
- Effect plug-ins overview
-
- Instrument plug-ins overview
-
- ES2 overview
- Interface overview
-
- Modulation overview
- Use the Mod Pad
-
- Vector Envelope overview
- Use Vector Envelope points
- Use Vector Envelope solo and sustain points
- Set Vector Envelope segment times
- Vector Envelope XY pad controls
- Vector Envelope Actions menu
- Vector Envelope loop controls
- Vector Envelope point transition shapes
- Vector Envelope release phase behavior
- Use Vector Envelope time scaling
- Modulation source reference
- Via modulation source reference
-
- Sample Alchemy overview
- Interface overview
- Add source material
- Save a preset
- Edit mode
- Play modes
- Source overview
- Synthesis modes
- Granular controls
- Additive effects
- Additive effect controls
- Spectral effect
- Spectral effect controls
- Filter module
- Low, bandpass, and highpass filters
- Comb PM filter
- Downsampler filter
- FM filter
- Envelope generators
- Mod Matrix
- Modulation routing
- Motion mode
- Trim mode
- More menu
- Sampler
- Studio Piano
- Copyright
Add automation points in Logic Pro for iPad
You add automation points to a track’s automation curve to create changes over time to volume, pan, and virtually any control in your channel strips and plug-ins. You can adjust automation points by moving them up or down to change their value or by moving them left or right to change their position along the timeline.
Default automation curve in track automation
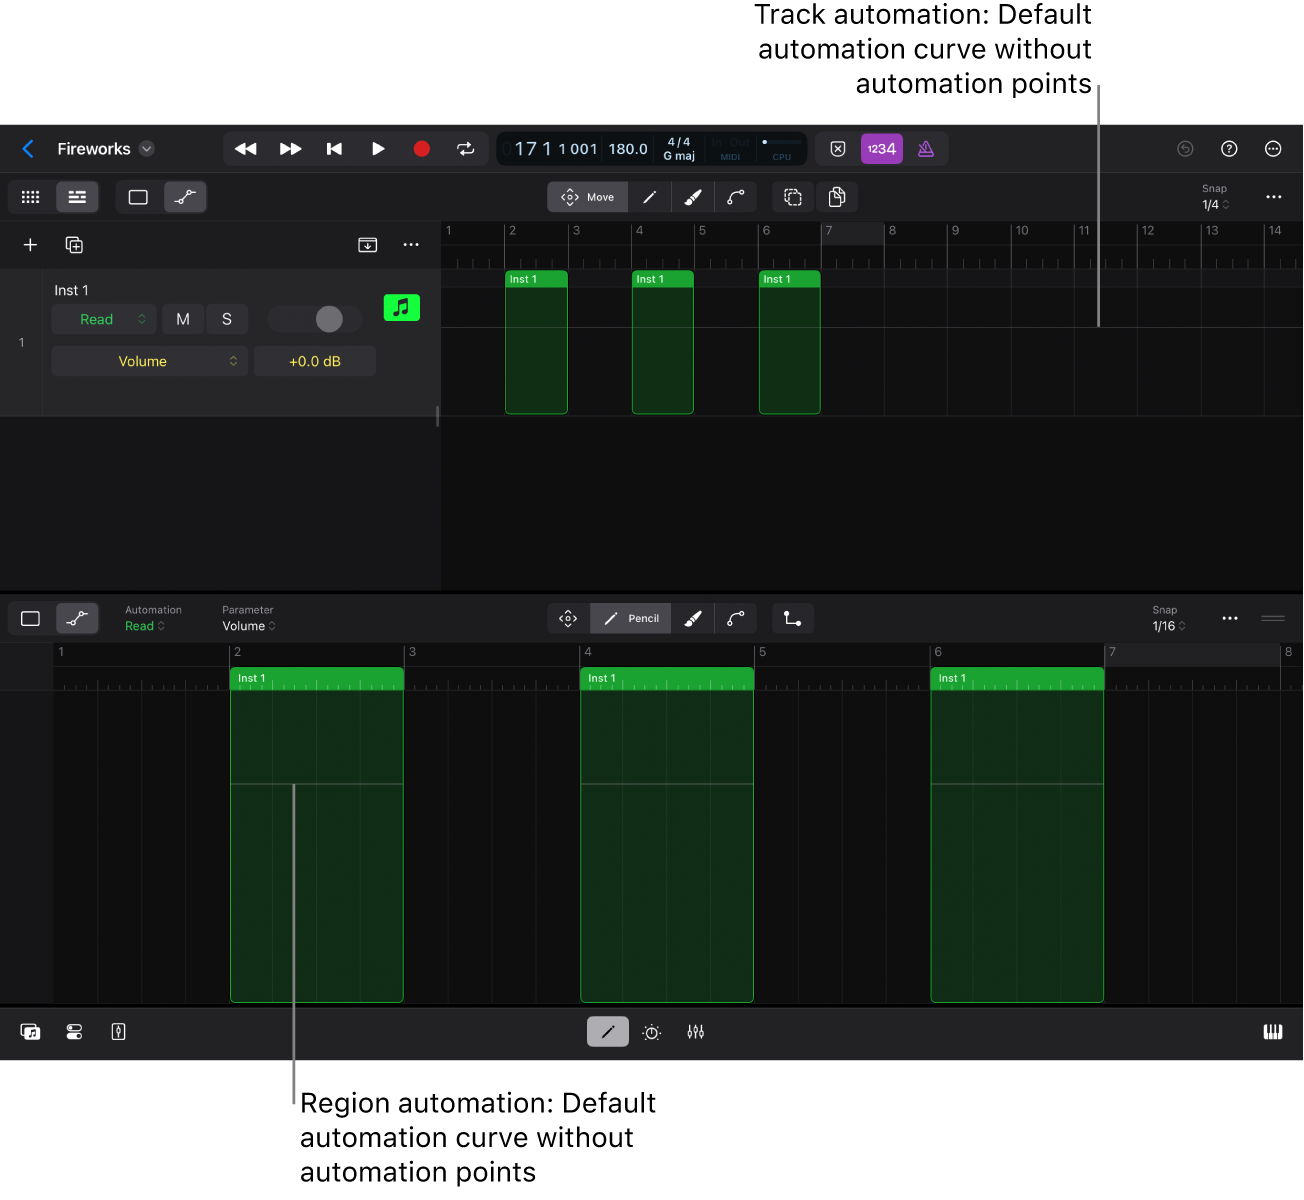
In Automation view in the Tracks area, selecting an automation parameter with no automation data created yet will show the automation curve as a gray horizontal line from the beginning to the end of the project. It has no automation points. The vertical position of this line represents the current value of the corresponding control, and adjusting the control moves the line up or down accordingly.
Default automation curve in region automation
In Automation view in the Editors area with no automation data created yet, a thin horizontal line is displayed without any automation points or MIDI data points from the beginning to the end of each region in the Editors area.

Default automation point
Once you add your first automation point, the following will happen:
The automation point will be added as a dot on the automation curve at the tap position.
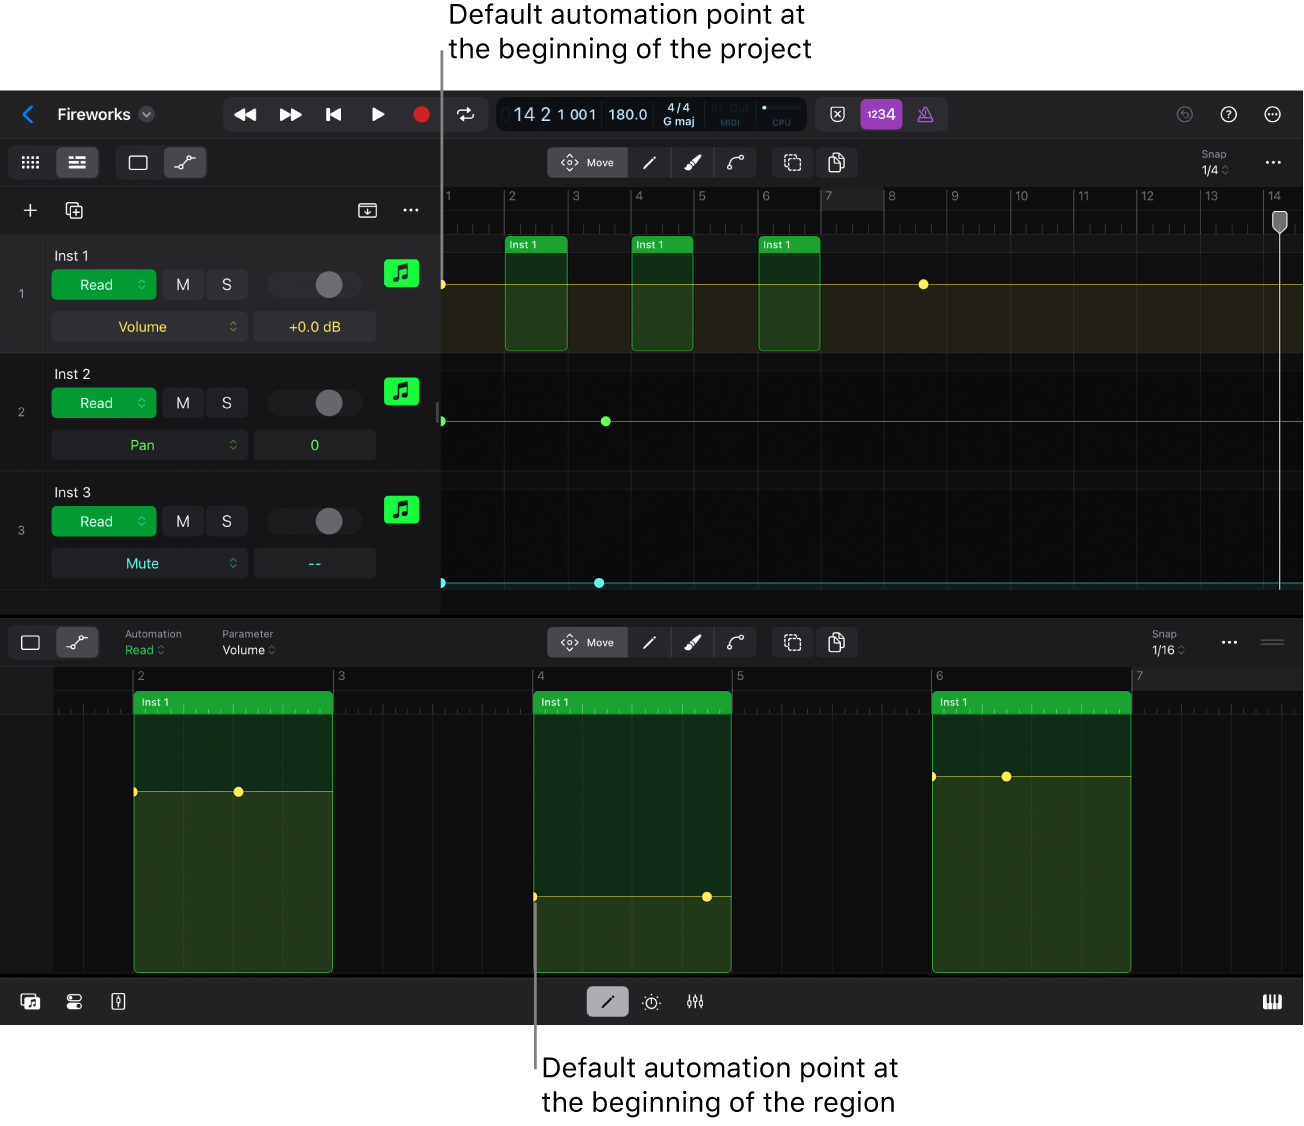
With track automation, an additional default automation point with the same value will automatically be added at the beginning of the automation curve, which is the beginning of the project.
With region automation, an additional default automation point with the same value will automatically be added at the beginning of the automation curve, which is the left border of the region.
The automation curve and the automation points will be displayed in the color of the corresponding automation parameter (for example, yellow = volume, green = pan, and turquoise = mute).

Add single automation points to an automation curve
The steps for creating automation points are the same for track automation and region automation.
Tap the Automation View button
 in the Tracks area menu bar (for track automation) or the Editors area menu bar (for region automation), or press A on your external keyboard.
Tap the Pencil button
 , then do any of the following to create a single automation point:
Tap a track lane (for track automation), or tap a region in the Editors area (for region automation).
Touch and hold the track lane (for track automation) or a region in the Editors area (for region automation). Now you can drag up-down or left-right before releasing your finger to adjust the position of the automation point.
A tag shows its corresponding parameter value, and a vertical line indicates the time position while dragging the automation point. The current Snap value restricts the horizontal movement.
The horizontal position of an automation point determines its position along the timeline, and the vertical position determines the parameter’s value. A new automation point will change the shape of the automation curve unless it is placed directly on the line.
Draw an automation curve
Tap the Automation View button
 in the Tracks area menu bar (for track automation) or the Editors area menu bar (for region automation), or press A on your external keyboard.
Tap the Brush button
 .
.Touch and hold a track lane (for track automation) or a region in the Editors area (for region automation), then drag left-right and up-down, drawing the shape of the automation curve.
Once you release your finger, your newly drawn automation curve overwrites the existing automation points in that section.
The following rules apply:
Automation points are created along the path you draw on the screen.
Vertical directions determine the parameter values.
The points are automatically connected, forming the automation curve that resembles your drawing.
The more slowly you move your finger, the more automation points will be created, and the finer the resolution of the curve will be.
The value in the Snap pop-up menu restricts the density of the automation points. See Snap automation to grid position.
The shape of the automation curve depends on the status of the Stepped Automation button
 . See Stepped automation curve.
Using Apple Pencil lets you draw the automation curve more precisely.
Add automation points by splitting a region
When splitting a region that contains region automation, an automation point is automatically added to the automation curves of the original region and the new region at the split point. This guarantees the integrity of the automation curve of the two regions when moving them apart or placing other regions in between. For more information, see Split regions in Tracks view.
Download this guide: PDF