Add a Magnetic Mask in Final Cut Pro for Mac
In Final Cut Pro, use the Magnetic Mask to easily isolate people, objects, and shapes from the background using machine learning. You can then apply the mask to the rest of a video clip automatically, without time-consuming manual tracking or rotoscoping.
You can also drag any other video effect from the Effects browser and use the Magnetic Mask to control where the effect is applied. See Add a Magnetic Mask to a video effect in Final Cut Pro for Mac.
Note: You can also isolate a subject from the background using the Scene Removal Mask, but the Scene Removal Mask has specific requirements for how the video is shot.
Add a Magnetic Mask to isolate a subject from its background
Adding the Magnetic Mask effect to a clip creates a matte, which allows you to composite the isolated foreground image over a different background image.
In Final Cut Pro, add a clip to the timeline.
Select the clip in the timeline, then position the playhead at a point within the clip that shows the area you want to mask.
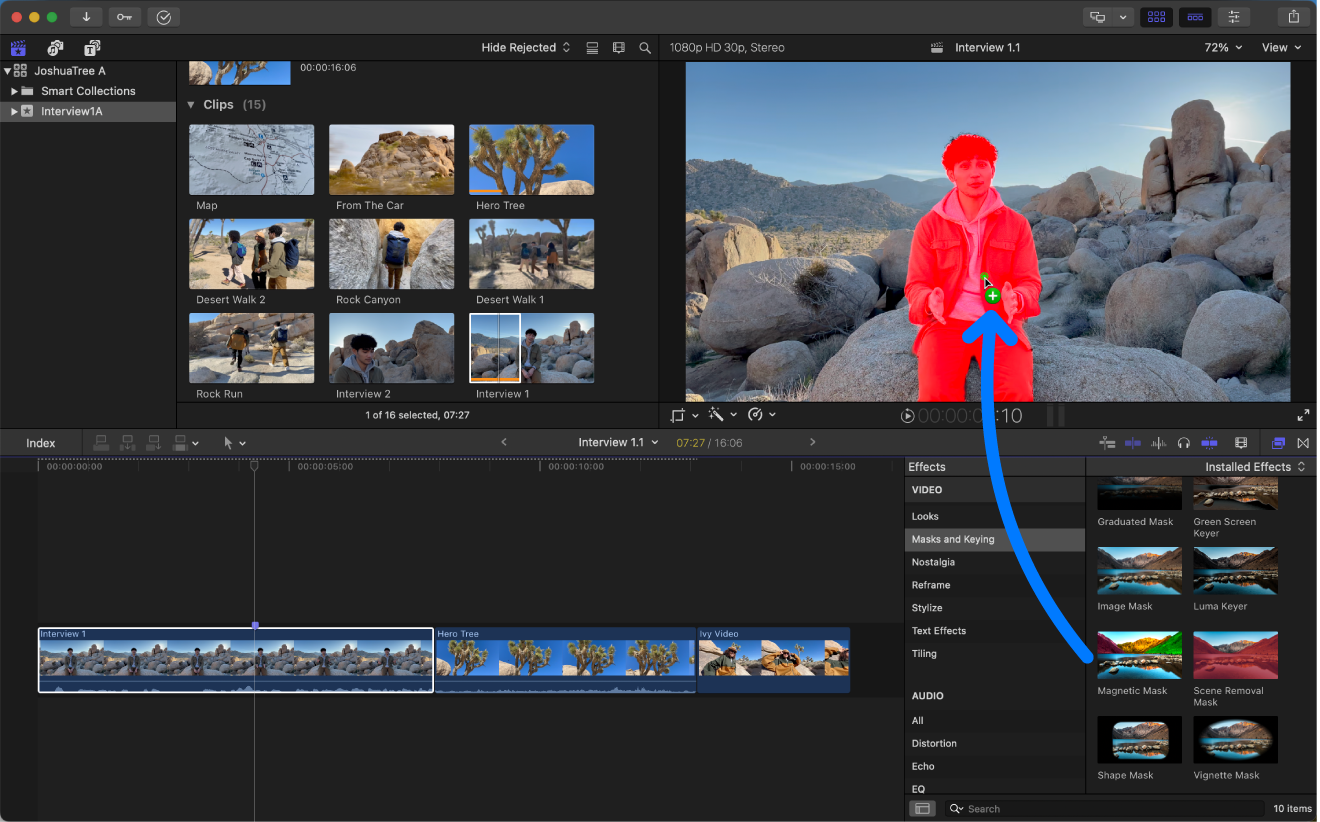
Open the Effects browser, then select the Magnetic Mask effect.
Tip: To quickly find the Magnetic Mask effect, type “magnetic” in the Effects browser search field.
Do one of the following:
Drag the effect to the viewer, directly onto the object or shape that you want to mask.
As you drag the effect over the viewer, objects and shapes in the image are highlighted in a bright color.

Note: If you don’t see colorful highlighting as you drag in the viewer, choose Final Cut Pro > Settings > General, then click the Drop Effect in Player pop-up menu and choose Add Magnetic Mask (instead of Add Tracker). Or, to temporarily switch between the two drag-to-viewer options, press and hold the Command key while dragging. See Drop Effect in Player.
Drag the effect to the timeline clip.
Double-click the Magnetic Mask effect thumbnail in the Effects browser.
Choose Modify > Add Magnetic Mask (or press Control-Command-M).
Click the Enhancements pop-up menu below the viewer and choose Add Magnetic Mask.
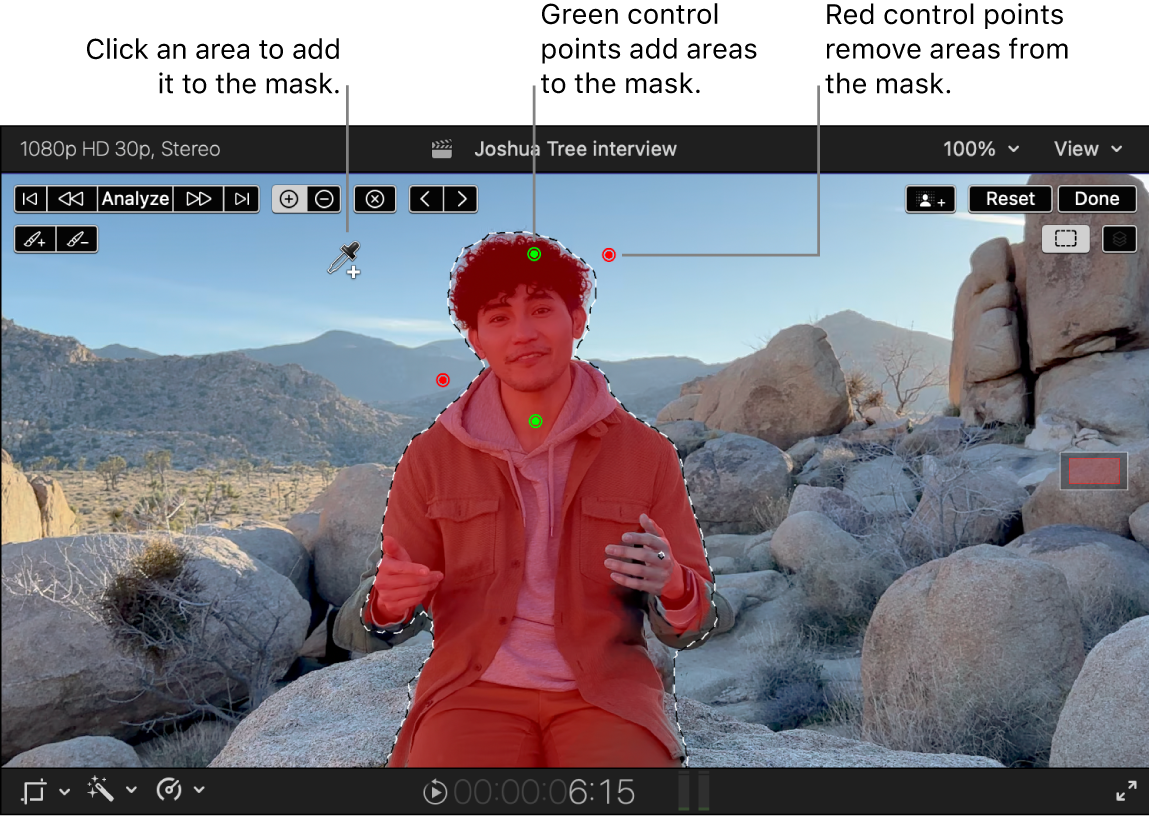
Magnetic Mask controls appear at the top of the viewer and in the Effects section of the Video inspector. By default, the pointer changes to the Add eyedropper
 (for adding parts of the image to the mask).
In the viewer, position the eyedropper on an object or shape in the image that you want to mask, then click to select it. (This step may not be necessary if you dragged the effect directly onto the object or shape.)
To adjust the mask area, do any of the following:
Add to the selection: Click an area in the viewer with the Add eyedropper
 . Each click with the Add eyedropper places a green control point, adding an area to the mask.
Subtract from the selection: Click the Remove button
 at the top of the viewer, then click an area in the viewer with the Remove eyedropper
  . Each click with the Remove eyedropper places a red control point, removing an area from the mask.
To switch back to the Add eyedropper, click the Add button
 .
.
Tip: To switch between eyedroppers temporarily, press and hold the Option key. When you release the Option key, the tool reverts to the previously active eyedropper.
In most cases, you need only a handful of control points to select the object or shape you want to mask. There’s no measurable effect after about 20 control points.

Use the analysis buttons at the top of the viewer to extend the Magnetic Mask to additional frames of the clip.

Do one of the following:
Apply the mask to the previous or next frame: Click the Previous Frame button
 or the Next Frame button
  .
.Apply the mask to the portion of the clip before or after the current frame: Click the Analyze Backward button
 or the Analyze Forward button
  .
.Apply the mask to the entire clip: Click Analyze.
Note: To cancel the analysis, press the Esc (Escape) key, or press Command-Period (.).
In the timeline, move the playhead to the beginning of the analyzed section and play it back.
Do any of the following:
Change the highlight color for a mask: Click the color well for the mask in the Video inspector.
Show or hide the selection outline for a mask: With a mask selected in the Video inspector, click the Mask Contour button
 in the upper-right corner of the viewer.
View masks in color, black and white, or as an alpha channel: In the Video inspector, click the down arrow next to View Masks and choose Black and White or Color. To switch between viewing the image and the alpha channel, click View Masks.
Make any needed adjustments to the Magnetic Mask.
See Edit a Magnetic Mask selection with control points or the brush tool.
When you’re satisfied with the Magnetic Mask, click Done in the upper-right corner of the viewer.
The background is removed and replaced with a transparent background.
To composite the clip over a different background, use connected clips. See Connect clips in Final Cut Pro for Mac.
Add multiple Magnetic Masks
You can apply multiple Magnetic Masks to a clip. For example, you might apply a different Magnetic Mask to each person or object in a clip, so that you can isolate and track each one individually for color correction.
In Final Cut Pro, select a clip in the timeline that has a Magnetic Mask applied.
Position the playhead at a point within the clip that shows the area you want to mask.
If the Video inspector isn’t already shown, choose Window > Show in Workspace > Inspector (or press Command-4), then click the Video button at the top of the inspector.

To add another mask, click the Add Mask button
 at the top of the viewer.
By default, the pointer changes to the Add eyedropper
 (for adding parts of the image to the mask). The new mask is added to the Video inspector, in a row below the existing mask.
In the viewer, position the eyedropper on an object or shape in the image that you want to mask, then click to select it.
Edit the new mask selection, as needed.
Use the analysis buttons at the top of the viewer to extend the Magnetic Mask to additional frames of the clip.
See step 7 in Add a Magnetic Mask to isolate a subject from its background, above.
Do any of the following:
Change the highlight color for a mask: Click the color well for the mask in the Video inspector.
Show all masks or the active mask only: With a mask selected in the Video inspector, click the Show Active Mask button
 in the upper-right corner of the viewer.
Show or hide the selection outline for a mask: With a mask selected in the Video inspector, click the Mask Contour button
 in the upper-right corner of the viewer.
Change the active mask: Click a mask’s row in the Video inspector.
View masks in color, black and white, or as an alpha channel: In the Video inspector, click the down arrow next to View Masks and choose Black and White or Color. To switch between viewing the image and the alpha channel, click View Masks.
Magnetic Mask best practices
When using the Magnetic Mask in your projects, there are some guidelines to keep in mind.
If you want to combine retiming or stabilization with Magnetic Masks, apply the retiming or stabilization first, then add the Magnetic Masks. See Intro to retiming clips in Final Cut Pro for Mac and Correct shaky video in Final Cut Pro for Mac.
Avoid moving clips inside a compound clip that has a Magnetic Mask.
Avoid copying a clip that has a Magnetic Mask to a timeline with a different frame rate.
Magnetic Masks aren’t included when you copy effects between clips.
For the best performance, use a Mac with Apple silicon when working with Magnetic Masks.
Magnetic Masks are not included in XML exports.
You can add a Magnetic Mask to almost any video effect except color correction presets that you create. See Save color correction presets in Final Cut Pro for Mac.
To make changes to a Magnetic Mask, see Edit Magnetic Masks in Final Cut Pro for Mac.
Tip: If you’re working extensively with the Magnetic Mask on high-resolution media, the analysis files may use a significant amount of storage. To remove unused analysis files, see Delete unused Magnetic Mask files.
Download this guide: PDF