Logic Pro User Guide for iPad
- What’s new in Logic Pro 1.1
-
- What is Logic Pro?
- Working areas
- Work with function buttons
- Work with numeric values
-
- Intro to tracks
- Create tracks
- Create tracks using drag and drop
- Choose the default region type for a software instrument track
- Select tracks
- Duplicate tracks
- Reorder tracks
- Rename tracks
- Change track icons
- Change track colors
- Use the tuner on an audio track
- Show the output track in the Tracks area
- Delete tracks
- Edit track parameters
- Start a Logic Pro subscription
- How to get help
-
- Intro to recording
-
- Before recording software instruments
- Record software instruments
- Record additional software instrument takes
- Record to multiple software instrument tracks
- Record multiple MIDI devices to multiple tracks
- Record software instruments and audio simultaneously
- Merge software instrument recordings
- Spot erase software instrument recordings
- Replace software instrument recordings
- Capture your most recent MIDI performance
- Use the metronome
- Use the count-in
-
- Intro to arranging
-
- Intro to regions
- Select regions
- Cut, copy, and paste regions
- Move regions
- Remove gaps between regions
- Delay region playback
- Trim regions
- Loop regions
- Repeat regions
- Mute regions
- Split and join regions
- Stretch regions
- Separate a MIDI region by note pitch
- Bounce regions in place
- Change the gain of audio regions
- Create regions in the Tracks area
- Convert a MIDI region to a Drummer region or a pattern region
- Rename regions
- Change the color of regions
- Delete regions
- Create fades on audio regions
- Access mixing functions using the Fader
-
- Intro to Step Sequencer
- Use Step Sequencer with Drum Machine Designer
- Record Step Sequencer patterns live
- Step record Step Sequencer patterns
- Load and save patterns
- Modify pattern playback
- Edit steps
- Edit rows
- Edit Step Sequencer pattern, row, and step settings in the inspector
- Customize Step Sequencer
-
- Effect plug-ins overview
-
- Instrument plug-ins overview
-
- ES2 overview
- Interface overview
-
- Modulation overview
-
- Vector Envelope overview
- Use Vector Envelope points
- Use Vector Envelope solo and sustain points
- Set Vector Envelope segment times
- Vector Envelope XY pad controls
- Vector Envelope Actions menu
- Vector Envelope loop controls
- Vector Envelope release phase behavior
- Vector Envelope point transition shapes
- Use Vector Envelope time scaling
- Use the Mod Pad
- Modulation source reference
- Via modulation source reference
-
- Sample Alchemy overview
- Interface overview
- Add source material
- Save a preset
- Edit mode
- Play modes
- Source overview
- Synthesis modes
- Granular controls
- Additive effects
- Additive effect controls
- Spectral effect
- Spectral effect controls
- Filter module
- Low and highpass filter
- Comb PM filter
- Downsampler filter
- FM filter
- Envelope generators
- Mod Matrix
- Modulation routing
- Motion mode
- Trim mode
- More menu
- Sampler
- Copyright
Create relative volume and pan automation in Logic Pro for iPad
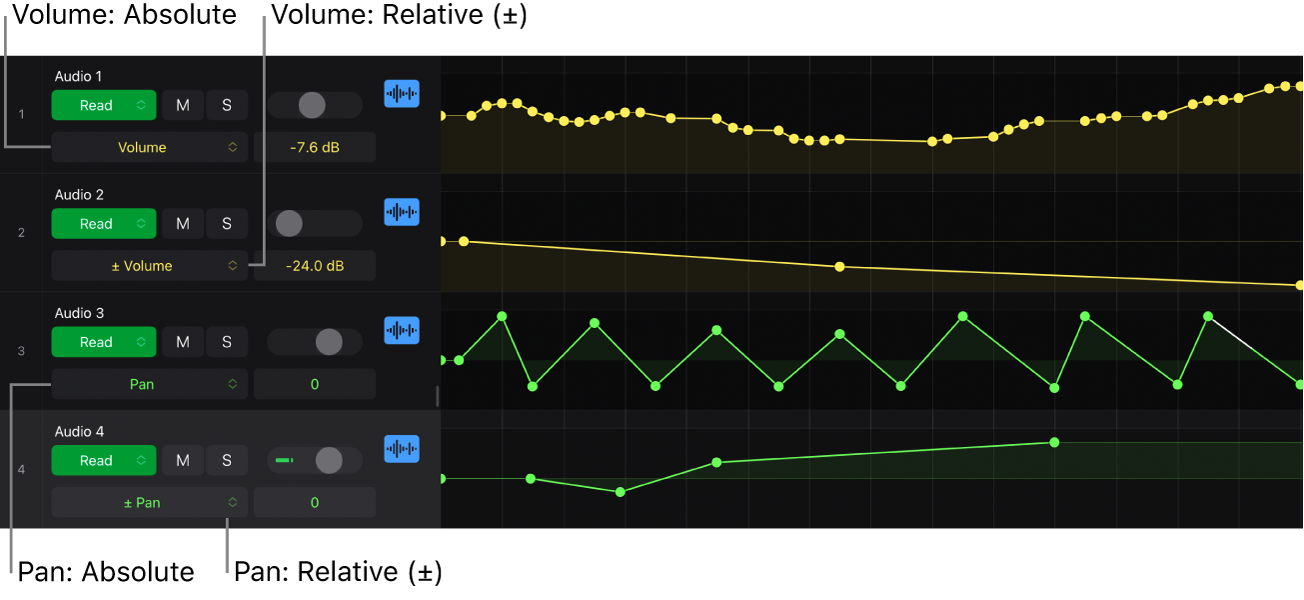
Volume and Pan controls on a track have two automation parameters, Absolute and Relative (±), that you can choose from the Automation Parameter pop-up menu. They represent two separate automation curves that together produce the combined automation result for that control.

Absolute automation curve
The absolute automation curve is the default automation that determines the value changes for the volume or pan parameter over time.
Relative automation curve
The relative automation curve is available as a separate option in the Automation Parameter pop-up menu as “Volume (±)” and “Pan (±).” When selected, it displays its own automation curve. By default, its value is 0, which means it has no effect on the absolute parameter. You can add automation points and edit them the same way as any other automation points. This relative curve then functions as an offset for the corresponding absolute automation curve.
If you’ve created a complex curve to automate the volume of a vocal track, you can create a relative automation curve–for example, a straight line at –3 dB. The result will be the movement of the absolute curve, played back 3 dB lower. Or you can create a fade-out with the relative curve while maintaining the absolute automation curve you might have created for the volume parameter.
Note: Relative volume and pan automation can only be created by adding those points manually. Writing automation in real time will always create absolute volume and pan automation.
Absolute volume and pan parameters, when selected, are displayed in the track header as Volume and Pan, and relative volume and pan parameters are displayed as “± Volume” and “± Pan.”

Add and edit relative automation
Tap the Automation View button
 in the Tracks area menu bar (for track automation) or the Editors area menu bar (for region automation).
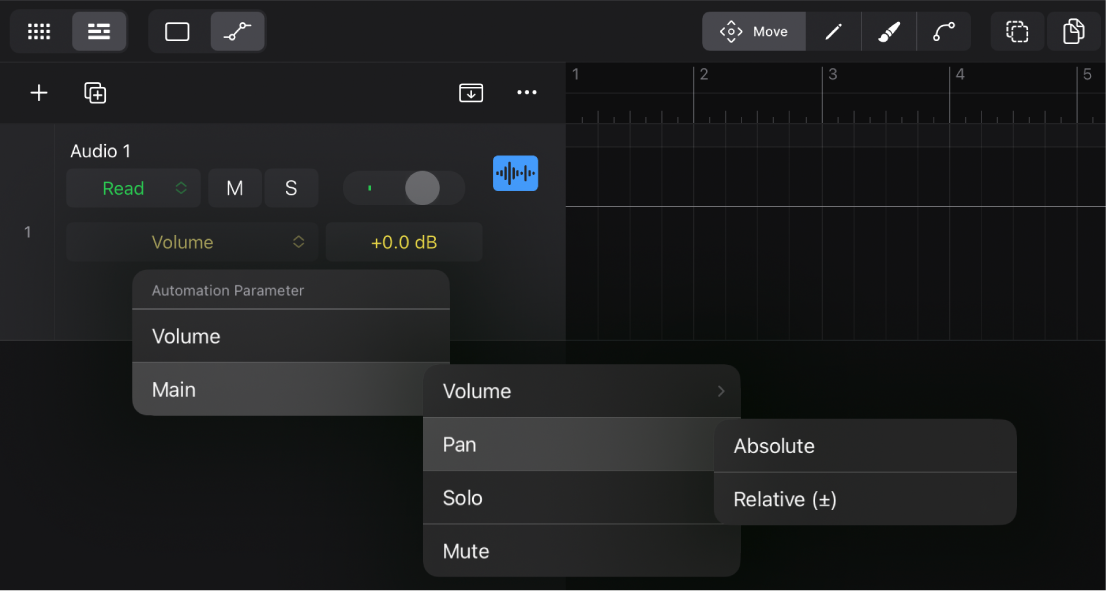
Tap the Automation Parameter pop-up menu and choose one of the following:
Main > Volume > Volume (±)
Main > Pan > Pan (±)
Add new automation points or edit existing ones for the relative parameter using the same procedures as for absolute parameters.
Download this guide: PDF