Logic Pro User Guide for iPad
-
- What is Logic Pro?
- Working areas
- Work with function buttons
- Work with numeric values
- Undo and redo edits in Logic Pro for iPad
-
- Intro to tracks
- Create tracks
- Create tracks using drag and drop
- Choose the default region type for a software instrument track
- Select tracks
- Duplicate tracks
- Reorder tracks
- Rename tracks
- Change track icons
- Change track colors
- Use the tuner on an audio track
- Show the output track in the Tracks area
- Delete tracks
- Edit track parameters
- Start a Logic Pro subscription
- How to get help
-
- Intro to recording
-
- Before recording software instruments
- Record software instruments
- Record additional software instrument takes
- Record to multiple software instrument tracks
- Record multiple MIDI devices to multiple tracks
- Record software instruments and audio simultaneously
- Merge software instrument recordings
- Spot erase software instrument recordings
- Replace software instrument recordings
- Capture your most recent MIDI performance
- Route MIDI internally to software instrument tracks
- Record with Low Latency Monitoring mode
- Use the metronome
- Use the count-in
-
- Intro to arranging
-
- Intro to regions
- Select regions
- Cut, copy, and paste regions
- Move regions
- Remove gaps between regions
- Delay region playback
- Trim regions
- Loop regions
- Repeat regions
- Mute regions
- Split and join regions
- Stretch regions
- Separate a MIDI region by note pitch
- Bounce regions in place
- Change the gain of audio regions
- Create regions in the Tracks area
- Convert a MIDI region to a Session Player region or a pattern region
- Replace a MIDI region with a Session Player region in Logic Pro for iPad
- Rename regions
- Change the color of regions
- Delete regions
-
- Intro to chords
- Add and delete chords
- Select chords
- Cut, copy, and paste chords
- Move and resize chords
- Loop chords on the Chord track
- Color chords on the Chord track
- Edit chords
- Work with chord groups
- Use chord progressions
- Change the chord rhythm
- Choose which chords a Session Player region follows
- Analyze the key signature of a range of chords
- Create fades on audio regions
- Extract vocal and instrumental stems with Stem Splitter
- Access mixing functions using the Fader
-
- Intro to Step Sequencer
- Use Step Sequencer with Drum Machine Designer
- Record Step Sequencer patterns live
- Step record Step Sequencer patterns
- Load and save patterns
- Modify pattern playback
- Edit steps
- Edit rows
- Edit Step Sequencer pattern, row, and step settings in the inspector
- Customize Step Sequencer
-
- Intro to mixing
-
- Channel strip types
- Channel strip controls
- Peak level display and clipping
- Set channel strip volume
- Set channel strip input format
- Set the output for a channel strip
- Set channel strip pan position
- Mute and solo channel strips
- Reorder channel strips in the Mixer in Logic Pro for iPad
- Replace a patch on a channel strip using drag and drop
- Work with plug-ins in the Mixer
- Search for plug-ins in the Mixer in Logic Pro for iPad
-
- Effect plug-ins overview
-
- Instrument plug-ins overview
-
- ES2 overview
- Interface overview
-
- Modulation overview
- Use the Mod Pad
-
- Vector Envelope overview
- Use Vector Envelope points
- Use Vector Envelope solo and sustain points
- Set Vector Envelope segment times
- Vector Envelope XY pad controls
- Vector Envelope Actions menu
- Vector Envelope loop controls
- Vector Envelope point transition shapes
- Vector Envelope release phase behavior
- Use Vector Envelope time scaling
- Modulation source reference
- Via modulation source reference
-
- Sample Alchemy overview
- Interface overview
- Add source material
- Save a preset
- Edit mode
- Play modes
- Source overview
- Synthesis modes
- Granular controls
- Additive effects
- Additive effect controls
- Spectral effect
- Spectral effect controls
- Filter module
- Low, bandpass, and highpass filters
- Comb PM filter
- Downsampler filter
- FM filter
- Envelope generators
- Mod Matrix
- Modulation routing
- Motion mode
- Trim mode
- More menu
- Sampler
- Studio Piano
- Copyright
Write automation in real time in Logic Pro for iPad
Writing automation in real time means changing the controls in a channel strip or plug-in while playing back your project and recording those changes as automation data. For example, say you increase the volume of the vocal track during the chorus or mute the drum track at a specific bar. After that, whenever you play back (or bounce) your project, those parameter changes are performed automatically.
The automation data is written as track automation or region automation, depending on the selection in the Automation Mode pop-up menu.
Automation modes
There are several automation modes that determine whether to play existing automation or not, or what happens to any existing automation data when you write new automation.
Each track can be set independently to one of the following automation modes:
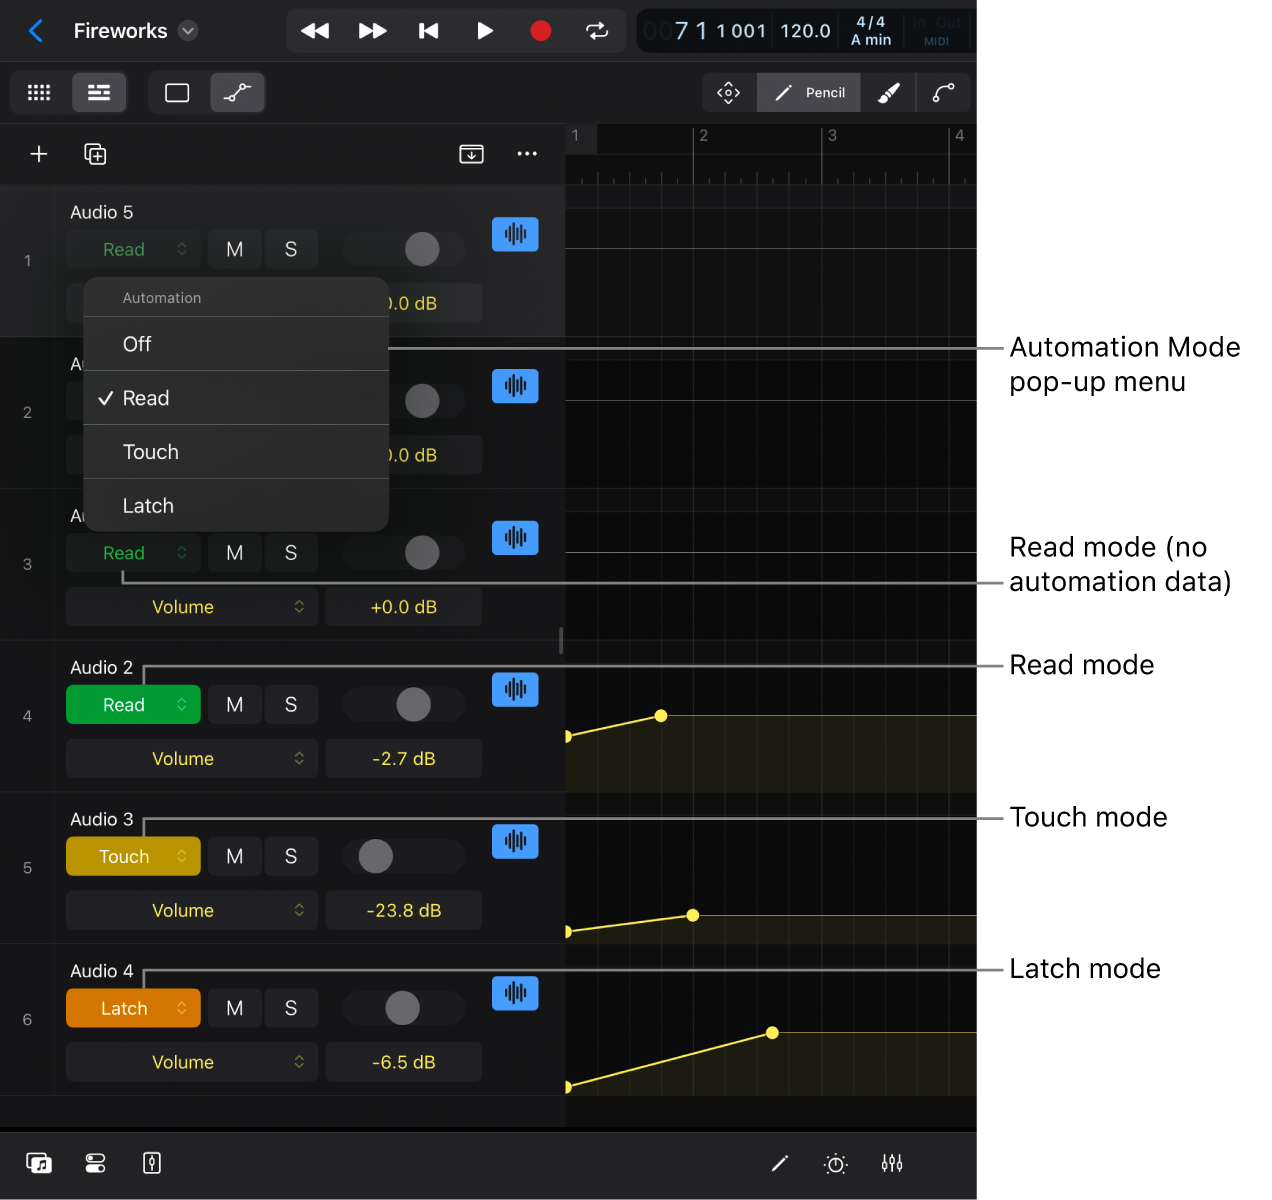
Read: Plays back all automation data that exists on the track (track automation and region automation). Any onscreen control in the track header, channel strip, or plug-ins (sliders, knobs, and switches) will move accordingly during playback (in Play mode or Record mode) based on automation data. When you stop playback, you can change the value of any parameter, but once you start playback, the control jumps back to follow the values of the existing automation data.
Touch: Plays back automation in the same way as Read mode. However, once you touch a control, that parameter now writes that new value based on your movements, overwriting any existing automation data. After you release the fader or knob, the parameter follows existing automation again. You can then touch the same control or a different control to write or overwrite another section in your project.
Latch: Works like Touch mode, but after the fader or knob is released (while still playing back the project), that value continues to be written, replacing existing automation for that automation parameter until you stop playback. From that point on, the existing automation remains unchanged.
Off: Temporarily turns off all existing automation data, track automation, and region automation. The automation curves turn gray. This is useful when you have already written automation but want to experiment with parameter changes without overwriting existing data.
Note: Selecting Touch or Latch in the Tracks area creates track automation, and selecting Touch or Latch in the Editors area creates region automation. The Mixer and Plug-ins area have separate Region and Track options for Touch and Latch.
Set the automation mode for the track
In the Tracks area menu bar, tap the Automation View button
 (or press A on your external keyboard).
Make sure to swipe the track list to the right to reveal the track controls in the track headers.
In the track header of a track, tap the Automation Mode pop-up menu and choose one of the four options.
Note: Selecting an automation mode on a track that is a member of a Mixer group sets all tracks in that group to the same automation mode. See Create Mixer groups.
The Automation Mode button in the track header changes color depending on the chosen mode. Read mode has two appearances: green text on a gray background indicates that there is no existing automation data on that track, and white text on a green background indicates that there is automation that will be active when playing back your project.
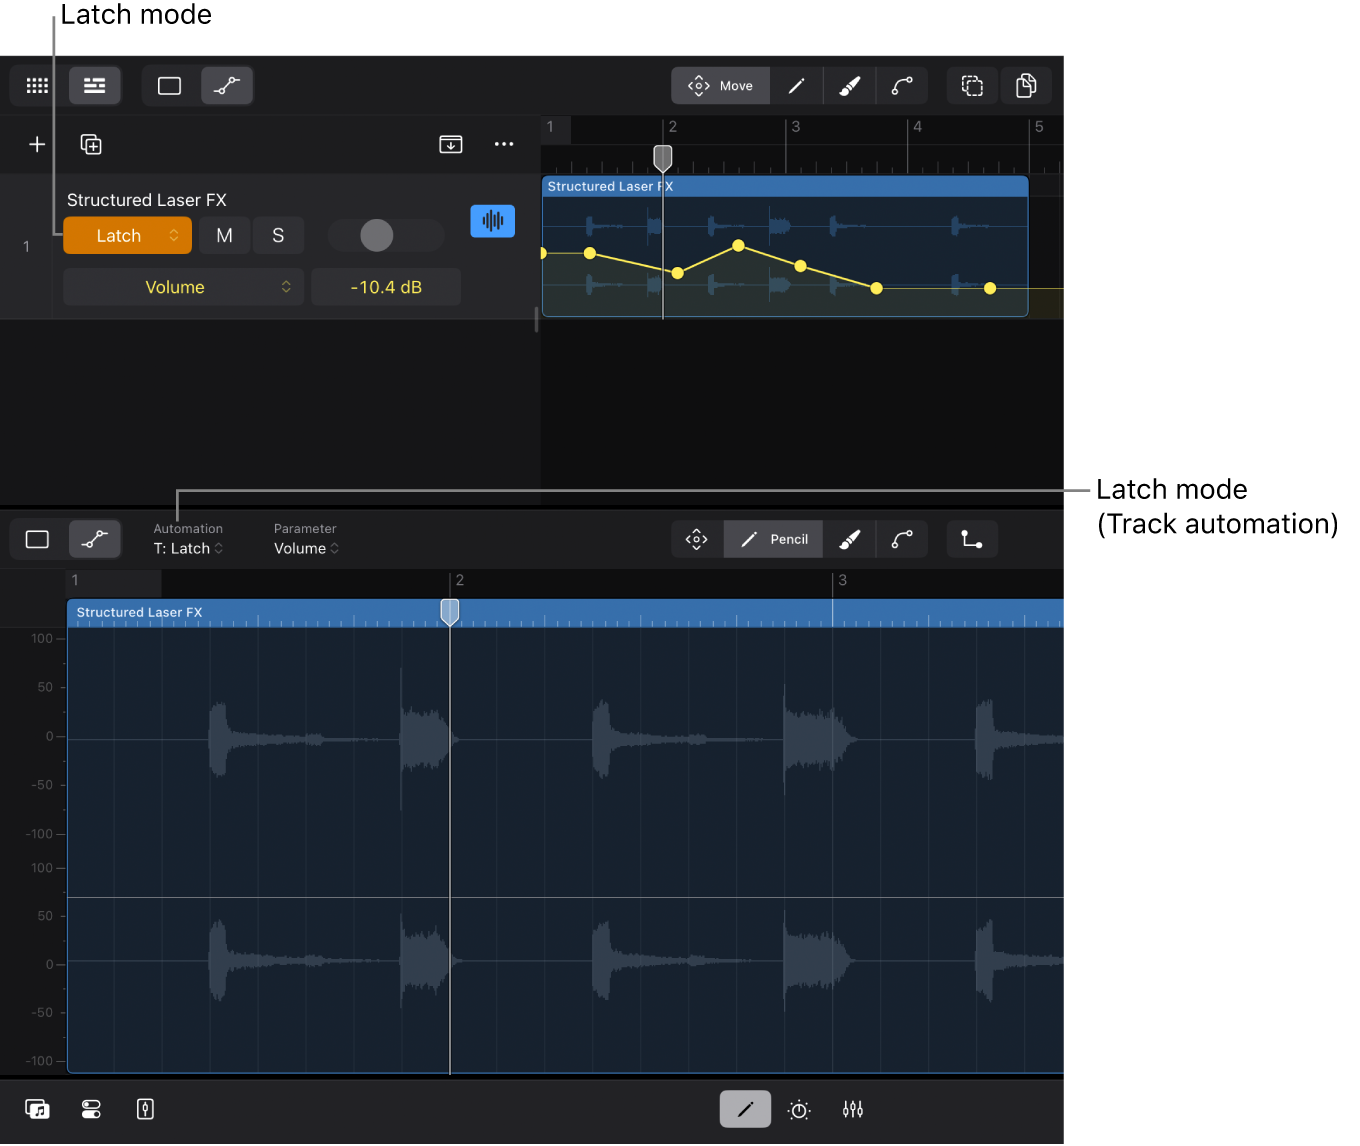
If Touch or Latch is selected in the track header, the Automation Mode pop-up menu in the Editors area menu bar displays that mode preceded by the letter T (either “T: Touch” or “T: Latch”). This indicates that any movement of an onscreen control will be written as track automation. The Mixer and Plug-ins area show similar indications, whether automation is written as track automation or region automation.
Set the same automation mode for selected tracks
In the Tracks area menu bar, tap the Automation View button
 (or press A on your external keyboard), then tap the Move button
  .
.Tap the Multiple Select button
 to select it, then select all the tracks you want to change their automation mode by tapping the track icon in their track header.
You can also touch and hold the Multiple Select button
 in momentary mode or press and hold the Shift key on your external keyboard, make the track selection, and then release the button or the Shift key.
On one of the selected tracks, tap the Automation Mode pop-up menu and choose one of the four options.
Tap the Multiple Select button
 again to deselect it.
Once you’re done performing an action on multiple selected tracks, tap the empty area below the last track header to deselect the tracks and avoid applying edits to multiple tracks unintentionally.
Set the automation mode for region automation
In the Tracks area menu bar, tap the Tracks View button
 , then tap the regions that you want to write automation to.
Tap the Editors button
 in the view control bar, tap the Automation View button
  in the Editors area menu bar (or press A on your external keyboard), then tap the Automation Mode pop-up menu next to it and choose one of the four options.
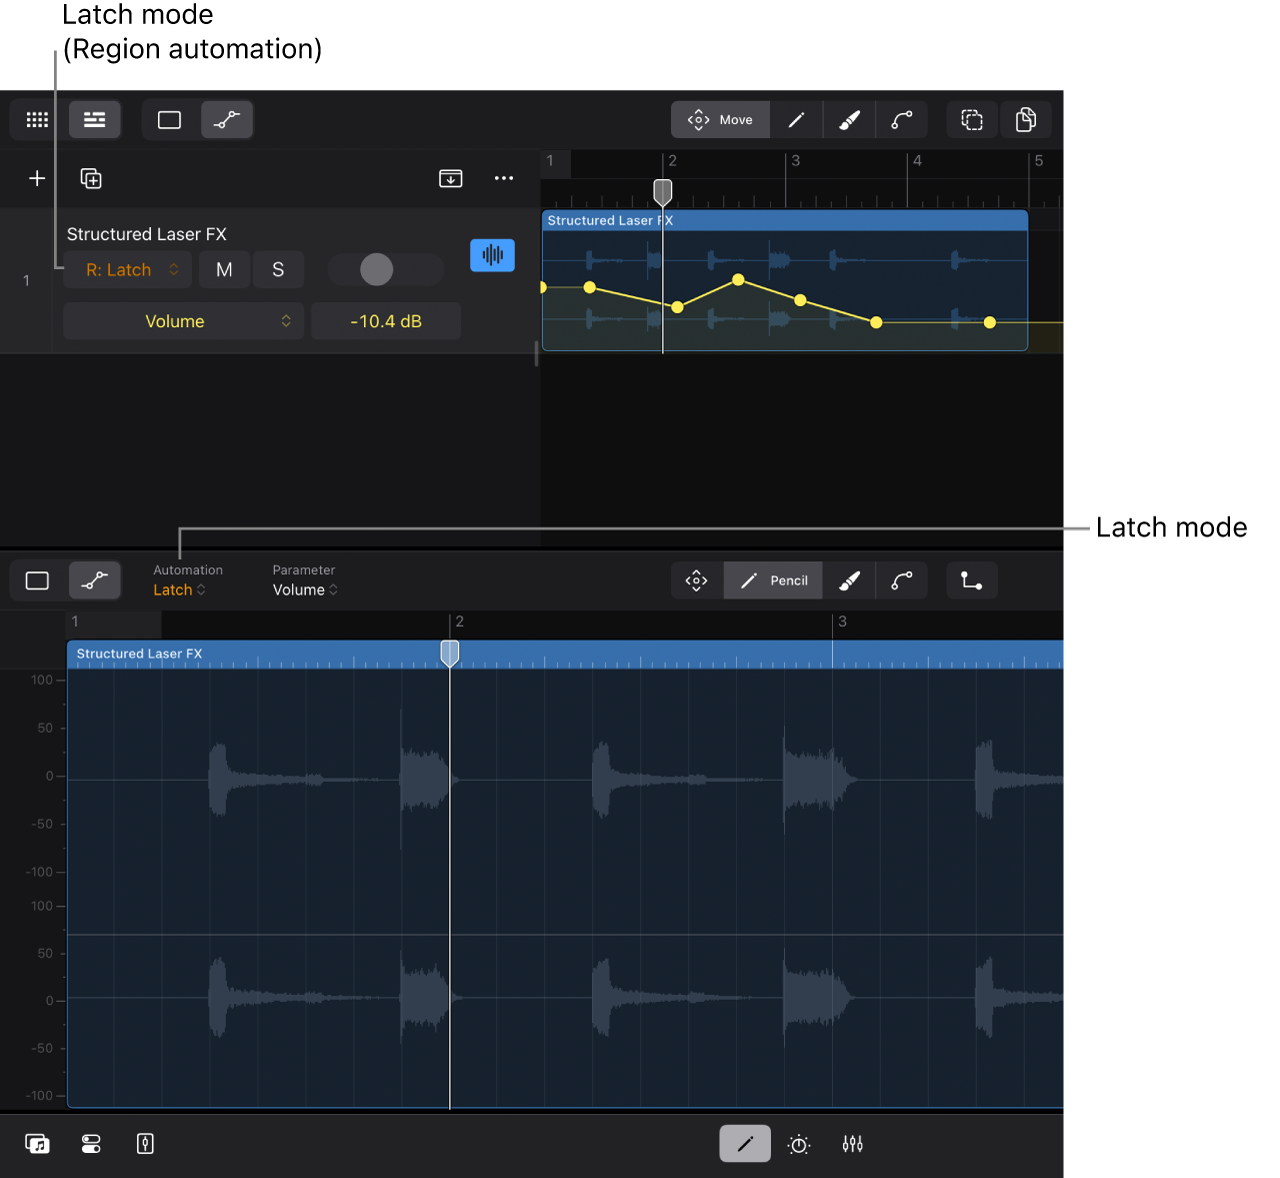
Choosing Read or Off changes the automation modes in the corresponding track header to the same mode. Choosing Touch or Latch will also change the track header’s Automation Mode pop-up menu to Touch and Latch (if Automation view is selected), but now with the letter R (either “R: Touch” or “R: Latch”). This indicates that any automation is written to the region (region automation) and not to the track (track automation).
Set the automation mode in the Plug-ins area
In the Tracks area, tap the track icon of the track you want to write automation to.
Tap the Plug-ins button
 in the middle of the view control bar (or press B on your external keyboard).
You can also double-tap the track icon to open the Plug-ins area (and for software instrument tracks also the Play Surfaces).
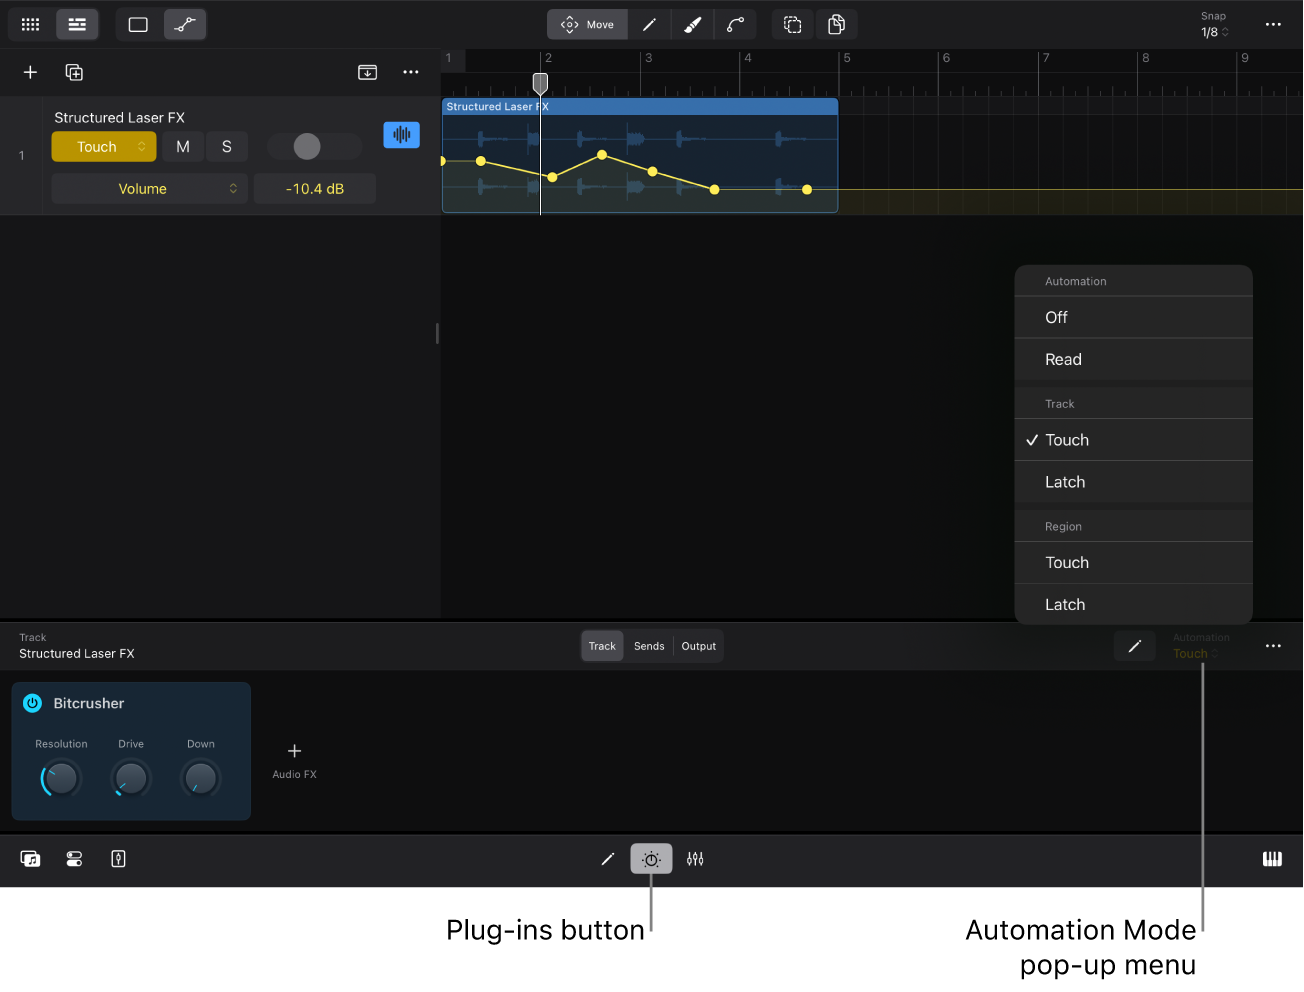
Tap the Automation Mode pop-up menu on the right side of the Plug-ins area menu bar and choose one of the options.
The pop-up menu has a Track and a Region section; both provide the option Touch and Latch so that you can choose whether you want to write track automation or region automation.
Set the automation mode in the Mixer
Tap the Mixer button
 in the middle of the view control bar to show the Mixer.
Tap the Filter button
 at the top of the output track on the far right to open the Component Filter list, tap Automation to select it, then tap the Filter button again to close the list.
This step is only necessary if the Automation Mode pop-up menu is not displayed in the channel strips. By default, it is visible.
Tap the Automation Mode pop-up menu in any of the channel strips and choose one of the options.
The pop-up menu has a Track and a Region section; both provide the option Touch and Latch so that you can choose whether you want to write track automation or region automation.
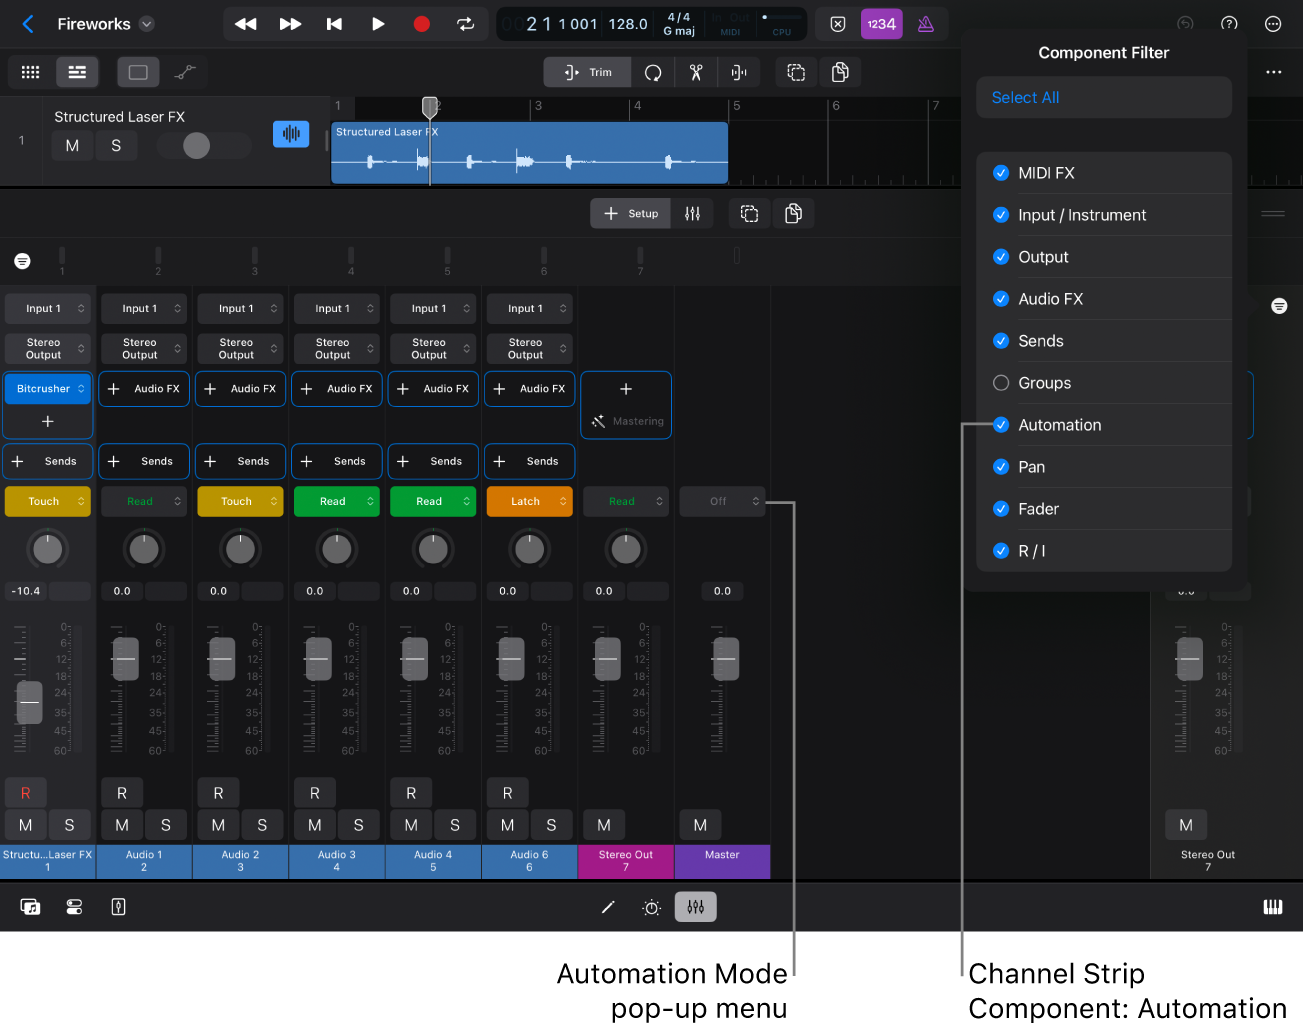
Note: Selecting an automation mode in an aux channel strip, output channel strip, or master channel strip creates the corresponding track in the Tracks area.
Set the automation mode for a Mixer group
When you choose an automation mode on a track that is part of a Mixer group, all tracks in that group change to the same automation mode. See Create Mixer groups.
Tap the Mixer button
 in the middle of the view control bar.
Tap the Filter button
 in the upper-right area of the Mixer and select Groups in the Component Filter list to make the Group slot visible in the channel strips.
In each channel strip you want to add to a group, tap the Group slot and choose the same group.
You can also select the channel strips first and then tap the Group slot in one of the selected channel strips to choose a group.
Tap the Automation Mode pop-up menu in any of the channel strips and choose one of the options.
Write automation in real time
Choose either Touch or Latch from the Automation Mode pop-up menu on the track where you want to write automation.
Tap the Play button
 in the control bar, or press the Space bar on your external keyboard to start playback.
You can also write automation while in Record mode.
Adjust any controls (faders, knobs, or switches), and the values for those parameters are written as automation data based on your movements.
As the playhead moves across the timeline, the automation curve is being created on the track lane at the playhead position. Region automation can only be written between the left and right borders of a region.
Tap the Stop button
 in the control bar or press the Space bar on your external keyboard to stop playback.
You can place the playhead at any position and start playback again to continue writing automation or overwriting existing automation. Alternatively, you can edit the automation data graphically.
Note: While still writing automation during playback, you can scroll to other tracks or switch the view to open different plug-ins on that track to access the controls you want to adjust. You can also use Multi-Touch gestures to move multiple controls and write that as automation data at the same time.
Download this guide: PDF