Logic Pro User Guide for iPad
-
- What is Logic Pro?
- Working areas
- Work with function buttons
- Work with numeric values
-
- Intro to tracks
- Create tracks
- Create tracks using drag and drop
- Choose the default region type for a software instrument track
- Select tracks
- Duplicate tracks
- Reorder tracks
- Rename tracks
- Change track icons
- Change track colors
- Use the tuner on an audio track
- Show the output track in the Tracks area
- Delete tracks
- Edit track parameters
- Start a Logic Pro subscription
- How to get help
-
- Intro to recording
-
- Before recording software instruments
- Record software instruments
- Record additional software instrument takes
- Record to multiple software instrument tracks
- Record multiple MIDI devices to multiple tracks
- Record software instruments and audio simultaneously
- Merge software instrument recordings
- Spot erase software instrument recordings
- Replace software instrument recordings
- Capture your most recent MIDI performance
- Use the metronome
- Use the count-in
-
- Intro to arranging
-
- Intro to regions
- Select regions
- Cut, copy, and paste regions
- Move regions
- Remove gaps between regions
- Delay region playback
- Trim regions
- Loop regions
- Repeat regions
- Mute regions
- Split and join regions
- Stretch regions
- Separate a MIDI region by note pitch
- Bounce regions in place
- Change the gain of audio regions
- Create regions in the Tracks area
- Convert a MIDI region to a Drummer region or a pattern region
- Rename regions
- Change the color of regions
- Delete regions
- Create fades on audio regions
- Access mixing functions using the Fader
-
- Intro to Step Sequencer
- Use Step Sequencer with Drum Machine Designer
- Record Step Sequencer patterns live
- Step record Step Sequencer patterns
- Load and save patterns
- Modify pattern playback
- Edit steps
- Edit rows
- Edit Step Sequencer pattern, row, and step settings in the inspector
- Customize Step Sequencer
-
- Effect plug-ins overview
-
- Instrument plug-ins overview
-
- ES2 overview
- Interface overview
-
- Modulation overview
-
- Vector Envelope overview
- Use Vector Envelope points
- Use Vector Envelope solo and sustain points
- Set Vector Envelope segment times
- Vector Envelope XY pad controls
- Vector Envelope Actions menu
- Vector Envelope loop controls
- Vector Envelope release phase behavior
- Vector Envelope point transition shapes
- Use Vector Envelope time scaling
- Use the Mod Pad
- Modulation source reference
- Via modulation source reference
-
- Sample Alchemy overview
- Interface overview
- Add source material
- Save a preset
- Edit mode
- Play modes
- Source overview
- Synthesis modes
- Granular controls
- Additive effects
- Additive effect controls
- Spectral effect
- Spectral effect controls
- Filter module
- Low and Highpass filter
- Comb PM filter
- Downsampler filter
- FM filter
- Envelope generators
- Mod Matrix
- Modulation routing
- Motion mode
- Trim mode
- More menu
- Sampler
- Copyright
Compressor side chain parameters in Logic Pro for iPad
The side chain parameters allow you to use the signal from another channel or bus to control Compressor.
You should note that side chain parameters are active even if no external side chain source is selected. As with hardware VCA compressors, the (compressor) audio input is “normal-ed” as a side chain source when no external side chain signal is patched.

Note: Not all parameters listed are available in each Compressor model.
Compressor side chain parameters
Side Chain Detection buttons: Choose the way stereo side chain signals are handled at the side chain input.
Max button: Turn on to compress both channels if either stereo channel exceeds or falls below the threshold.
Sum button: When enabled, the combined level of both channels must exceed the threshold before compression occurs.
Peak/RMS buttons: Use in conjunction with the Max and Sum buttons. Choose Peak or RMS to determine whether signal peaks or a signal average is used for detection. These can help with avoiding artifacts such as clicks in the processed signal, depending on the type of audio material and parameter settings (notably Attack).
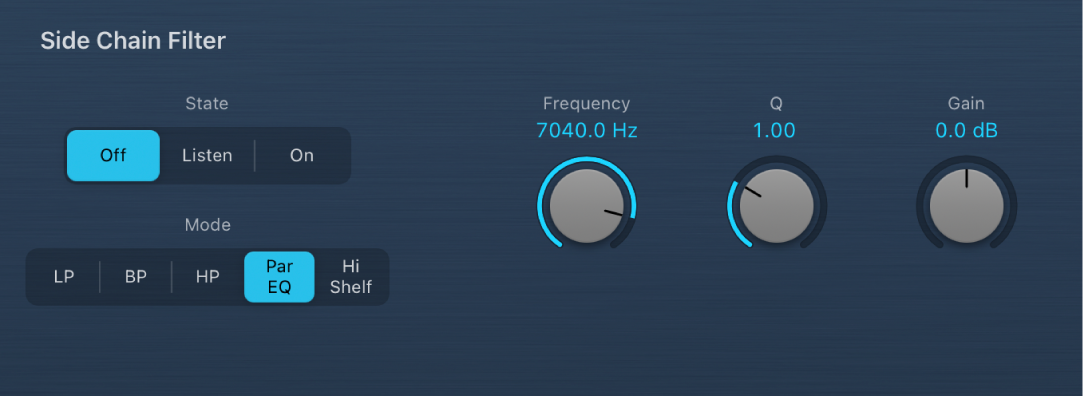
State buttons: Turn the sidechain filter on or off. Tap Listen to monitor the side chain signal.
Filter mode buttons: Choose the type of filter used to process the incoming (or internal) side chain signal. Filtering the side chain input signal can enhance the precision of trigger signals, resulting in more surgical compression. The choices are LP (lowpass), BP (bandpass), HP (highpass), Par EQ (parametric), and Hi Shelf (high shelving).
Frequency knob and field: Set the center frequency for the side chain filter.
Q knob and field: Set the width of the frequency band affected by the side chain filter.
Gain knob and field: Set the side chain filter level when Par EQ or Hi Shelf mode is active.
Download this guide: PDF