
Add borders and rules (lines) in Pages on iPhone
You can add a solid, dashed, or dotted rule (line) above, below, or on either side of a paragraph in the document body (if the text is in a text box or shape, you can only add a rule above or below the text). You can also quickly add a full (4-sided) border around one or more paragraphs, and choose curved (instead of straight) corners.
Note: If the text is in a table cell, you can only add a border around the cell. See Change the border and background of table cells.
Add a border or rule to paragraphs
Select the text where you want to add the border or rule.
Tap
 in the toolbar, tap Paragraph Borders & Background, then turn on Borders.
A rule appears above the each paragraph you selected.
Do any of the following:
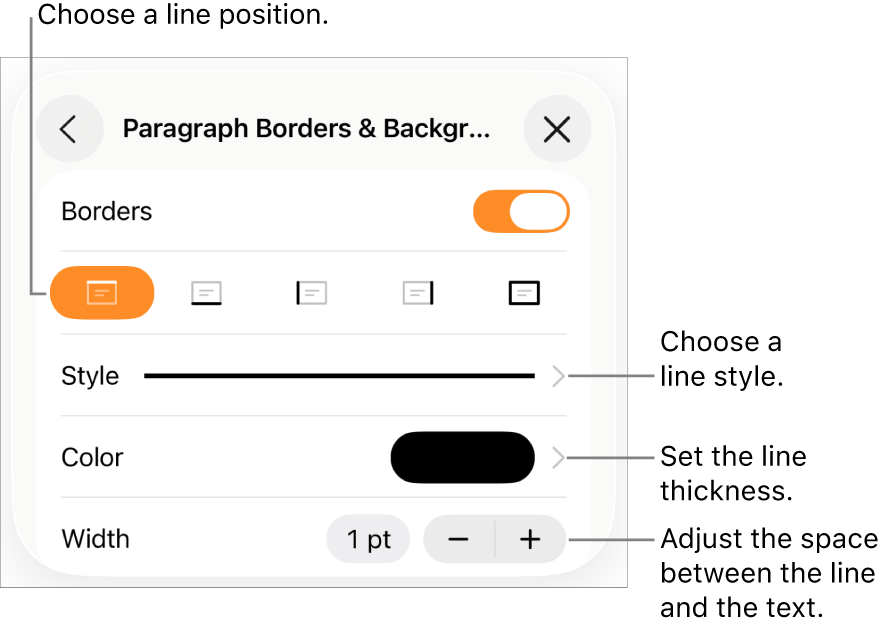
Add one or more lines: Tap one or more position buttons under the Borders switch.
Add a full (4-sided) border: Tap the far-right position button (with the bold rectangle). To round the corners, turn on Rounded Corners (this switch is only available after you add the full border).
Choose a different line style: Tap Style, then make a selection.
Choose a color that goes with your template: Tap Color, tap Preset, swipe left or right to see all the options, then tap a color.
Choose any color: Tap Color, tap Color, then select a color.
Choose a color from elsewhere on the page: Tap Color, tap Color, tap
 , then tap any color on the page.
To preview colors, touch and hold the color on the page, then drag across other colors on the page. Release your finger to select a color.
Change the line thickness: Tap the + or – next to Width.
Change the amount of space between the line or border and the text: Tap the + or – next to Border Offset.
To quickly remove the border or rule, select the text with the border or rule, tap ![]() , tap Paragraph Borders & Background, then turn off Borders.
, tap Paragraph Borders & Background, then turn off Borders.
You can also add a border around a page, then set the border as a section layout object so it appears on all the pages of your document. To learn more, see Add a border around a page.