Final Cut Pro User Guide for Mac
- Welcome
- What’s new
-
- Intro to effects
-
- Intro to transitions
- How transitions are created
- Add transitions and fades
- Quickly add a transition with a keyboard shortcut
- Set the default duration for transitions
- Delete transitions
- Adjust transitions in the timeline
- Adjust transitions in the inspector and viewer
- Merge jump cuts with the Flow transition
- Adjust transitions with multiple images
- Modify transitions in Motion
-
- Add storylines
- Use the precision editor
- Conform frame sizes and rates
- Use XML to transfer projects
- Glossary
- Copyright

Organize files during import into Final Cut Pro for Mac
You can choose how to organize your media when you import it into Final Cut Pro.
You can copy the source files into the library or link to them at their current location. If your source files have Finder tags or the folders containing the files have meaningful names, you can choose to have the tags and folder names applied to the files as keywords during import.
If your source footage contains shots of people, you can have Final Cut Pro analyze the footage during import and apply keywords for the number of people in each shot and the shot type.
A Keyword Collection is created for each keyword added to your clips during import. Select a Keyword Collection in the Libraries sidebar to see all the clips with that keyword applied.
In Final Cut Pro, choose File > Import > Media, then select the file or files you want to import.
Use the settings on the right side of the Media Import window to choose how you want to organize the imported media in your library:
Add the imported media to an existing event: Select “Add to existing event,” then choose the event from the pop-up menu.
Create a new event: Select “Create new event in,” use the pop-up menu to choose the library in which you want to create the event, then type a name (for example, “Chris and Kim Wedding”) in the text field.
To learn more about events, see Intro to libraries in Final Cut Pro for Mac. If you want to import media into a new library, you must create the new library before importing your media.
In the Files section, select a file storage option:
Copy to library: This option duplicates the media files and places the copies in the current library storage location.
Note: The name of this option changes to “Copy to library storage location: location name” when the current library is set to an external storage location.
For information about setting the library storage location, see Set storage locations in Final Cut Pro for Mac.
Leave files in place: This option links to the source media files at their current location. If you import files with this option selected, Final Cut Pro creates symbolic links (also known as symlinks), which are special files that point to the media files without copying them. When you move, copy, or back up events and projects that use these files, only the symbolic links are moved or copied (not the source media files). If, after you move or copy your project or event, you want to replace the symbolic links with the actual source media files, select the events and choose File > Consolidate Event Files. For more information about files and clips, see Media files and clips in Final Cut Pro for Mac.
In the Keywords section, select any of the following options:
From Finder tags: Creates a keyword for each Finder tag in the files you’re importing. For each keyword, a Keyword Collection is also created. For more information about Finder tags, see macOS Help (click the desktop to make the Finder active, choose Help > macOS Help, then search for “tags”).
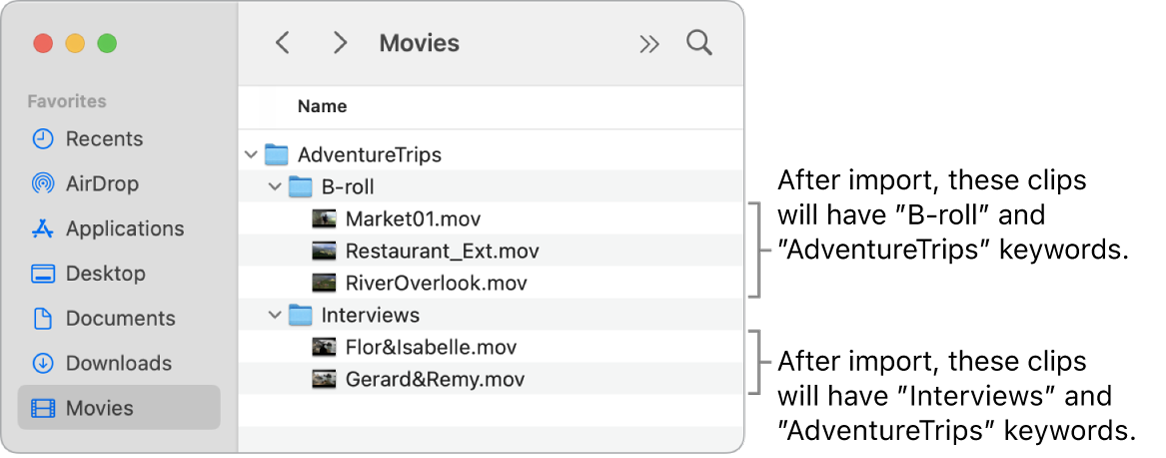
From folders: Creates a keyword for each folder name and applies the keyword to all the files in the folder during import. Additionally, a Keyword Collection is created for each keyword.

In the Analyze Video section, select any of the following options:
Remove pulldown in video: Analyzes video clips and removes pulldown patterns.
Important: This option is available only when importing from a tape-based camera or device.
Balance color: Select to detect color cast and contrast issues. (To correct issues in browser clips, click the Enhancements pop-up menu in the toolbar and choose Balance Color.)
Find people: Analyzes video clips and still images for the number of people present and shot types. After analysis, any of the following keywords are added to the clip: One Person, Two Persons, Group, Close Up Shot, Medium Shot, and Wide Shot. For each keyword, a Keyword Collection is also created. The “Consolidate find people results” checkbox simplifies and summarizes all of the “find people” analysis keywords. If you’re analyzing to find people, it’s recommended that you also select the Create Smart Collections checkbox. See Intro to analyzing media in Final Cut Pro for Mac.
If you want to create optimized or proxy media, analyze the audio, or override automatic role assignment, select the relevant checkboxes in the Transcode, Analyze Audio, and Assign Audio Role sections.
If you don’t specify that Final Cut Pro analyze your media during the import process, you can analyze it later in the browser.
Click Import Selected or Import All.
The Import button changes its name based on your clip selection. By default, the Media Import window closes when you click Import. You can begin working with your clips in the browser. Your media is imported in the background.
If you selected any options in the previous step, the files are transcoded and optimized after the import is complete. You can view the progress of the import and other background tasks in the Background Tasks window.
Download this guide: PDF