Logic Pro User Guide for iPad
-
- What is Logic Pro?
- Working areas
- Work with function buttons
- Work with numeric values
-
- Intro to tracks
- Create tracks
- Create tracks using drag and drop
- Choose the default region type for a software instrument track
- Select tracks
- Duplicate tracks
- Reorder tracks
- Rename tracks
- Change track icons
- Change track colors
- Use the tuner on an audio track
- Show the output track in the Tracks area
- Delete tracks
- Edit track parameters
- Start a Logic Pro subscription
- How to get help
-
- Intro to recording
-
- Before recording software instruments
- Record software instruments
- Record additional software instrument takes
- Record to multiple software instrument tracks
- Record multiple MIDI devices to multiple tracks
- Record software instruments and audio simultaneously
- Merge software instrument recordings
- Spot erase software instrument recordings
- Replace software instrument recordings
- Capture your most recent MIDI performance
- Use the metronome
- Use the count-in
-
- Intro to arranging
-
- Intro to regions
- Select regions
- Cut, copy, and paste regions
- Move regions
- Remove gaps between regions
- Delay region playback
- Trim regions
- Loop regions
- Repeat regions
- Mute regions
- Split and join regions
- Stretch regions
- Separate a MIDI region by note pitch
- Bounce regions in place
- Change the gain of audio regions
- Create regions in the Tracks area
- Convert a MIDI region to a Drummer region or a pattern region
- Rename regions
- Change the color of regions
- Delete regions
- Create fades on audio regions
- Access mixing functions using the Fader
-
- Intro to Step Sequencer
- Use Step Sequencer with Drum Machine Designer
- Record Step Sequencer patterns live
- Step record Step Sequencer patterns
- Load and save patterns
- Modify pattern playback
- Edit steps
- Edit rows
- Edit Step Sequencer pattern, row, and step settings in the inspector
- Customize Step Sequencer
-
- Effect plug-ins overview
-
- Instrument plug-ins overview
-
- ES2 overview
- Interface overview
-
- Modulation overview
-
- Vector Envelope overview
- Use Vector Envelope points
- Use Vector Envelope solo and sustain points
- Set Vector Envelope segment times
- Vector Envelope XY pad controls
- Vector Envelope Actions menu
- Vector Envelope loop controls
- Vector Envelope release phase behavior
- Vector Envelope point transition shapes
- Use Vector Envelope time scaling
- Use the Mod Pad
- Modulation source reference
- Via modulation source reference
-
- Sample Alchemy overview
- Interface overview
- Add source material
- Save a preset
- Edit mode
- Play modes
- Source overview
- Synthesis modes
- Granular controls
- Additive effects
- Additive effect controls
- Spectral effect
- Spectral effect controls
- Filter module
- Low and Highpass filter
- Comb PM filter
- Downsampler filter
- FM filter
- Envelope generators
- Mod Matrix
- Modulation routing
- Motion mode
- Trim mode
- More menu
- Sampler
- Copyright
EVOC 20 PS analysis controls in Logic Pro for iPad
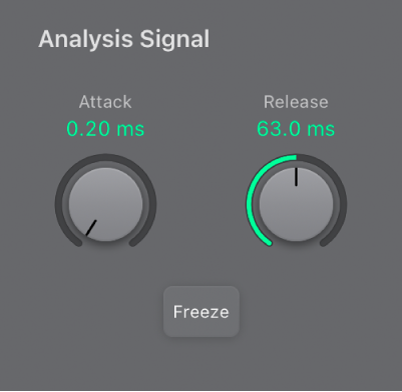
The parameters in the Analysis Signal section control how EVOC 20 PS analyzes and uses the input signal. Be precise with these parameters to attain the best possible speech intelligibility and the most accurate tracking.

Sidechain analysis parameters
Attack knob: Determine how quickly each envelope follower—coupled to each analysis filter band—reacts to rising signal levels. Longer attack times result in a slower tracking response to transients—level spikes—of the analysis input signal. A long attack time on percussive input signals—a spoken word or hi-hat part, for example—will translate into a less articulated vocoder effect. Set the Attack parameter to the lowest possible value to enhance articulation.
Release knob: Determine how quickly each envelope follower—coupled to each analysis filter band—reacts to falling signal levels. Longer release times cause the analysis input signal transients to sustain for a longer period at the vocoder output. A long release time on percussive input signals—a spoken word or hi-hat part, for example—will translate into a less articulated vocoder effect. Use of extremely short release times results in rough, grainy vocoder sounds. Release values of around 8 to 10 milliseconds are useful starting points.
Freeze button: Turn on to hold, or freeze, the current analysis sound spectrum indefinitely. When Freeze is enabled, the analysis filter bank ignores the input source, and the Attack and Release knobs have no effect.
Freeze the input signal
Freezing the input signal lets you capture a particular characteristic of the signal, which is then imposed as a complex sustained filter shape on the Synthesizer section. Here are some examples of when this could be useful:
If you’re using a spoken word pattern as a source, the Freeze button could capture the attack or tail phase of an individual word within the pattern—the vowel a, for example.
People cannot sustain sung notes indefinitely. To compensate for this human limitation, use the Freeze button. If the synthesis signal needs to be sustained but the analysis source signal—a vocal part—is not sustained, use the Freeze button to lock the current formant levels of a sung note, even during gaps in the vocal part, between words in a vocal phrase. The Freeze parameter can be automated, which may be useful in this situation.
In Logic Pro, tap the Freeze button to hold, or sustain, the sound spectrum of the analysis input signal.
Download this guide: PDF