Logic Pro User Guide for iPad
-
- What is Logic Pro?
- Working areas
- Work with function buttons
- Work with numeric values
- Undo and redo edits in Logic Pro for iPad
-
- Intro to tracks
- Create tracks
- Create tracks using drag and drop
- Choose the default region type for a software instrument track
- Select tracks
- Duplicate tracks
- Reorder tracks
- Rename tracks
- Change track icons
- Change track colors
- Use the tuner on an audio track
- Show the output track in the Tracks area
- Delete tracks
- Edit track parameters
- Start a Logic Pro subscription
- How to get help
-
- Intro to recording
-
- Before recording software instruments
- Record software instruments
- Record additional software instrument takes
- Record to multiple software instrument tracks
- Record multiple MIDI devices to multiple tracks
- Record software instruments and audio simultaneously
- Merge software instrument recordings
- Spot erase software instrument recordings
- Replace software instrument recordings
- Capture your most recent MIDI performance
- Route MIDI internally to software instrument tracks
- Record with Low Latency Monitoring mode
- Use the metronome
- Use the count-in
-
- Intro to arranging
-
- Intro to regions
- Select regions
- Cut, copy, and paste regions
- Move regions
- Remove gaps between regions
- Delay region playback
- Trim regions
- Loop regions
- Repeat regions
- Mute regions
- Split and join regions
- Stretch regions
- Separate a MIDI region by note pitch
- Bounce regions in place
- Change the gain of audio regions
- Create regions in the Tracks area
- Convert a MIDI region to a Session Player region or a pattern region
- Replace a MIDI region with a Session Player region in Logic Pro for iPad
- Rename regions
- Change the color of regions
- Delete regions
-
- Intro to chords
- Add and delete chords
- Select chords
- Cut, copy, and paste chords
- Move and resize chords
- Loop chords on the Chord track
- Color chords on the Chord track
- Edit chords
- Work with chord groups
- Use chord progressions
- Change the chord rhythm
- Choose which chords a Session Player region follows
- Analyze the key signature of a range of chords
- Create fades on audio regions
- Extract vocal and instrumental stems with Stem Splitter
- Access mixing functions using the Fader
-
- Intro to Step Sequencer
- Use Step Sequencer with Drum Machine Designer
- Record Step Sequencer patterns live
- Step record Step Sequencer patterns
- Load and save patterns
- Modify pattern playback
- Edit steps
- Edit rows
- Edit Step Sequencer pattern, row, and step settings in the inspector
- Customize Step Sequencer
-
- Intro to mixing
-
- Channel strip types
- Channel strip controls
- Peak level display and clipping
- Set channel strip volume
- Set channel strip input format
- Set the output for a channel strip
- Set channel strip pan position
- Mute and solo channel strips
- Reorder channel strips in the Mixer in Logic Pro for iPad
- Replace a patch on a channel strip using drag and drop
- Work with plug-ins in the Mixer
- Search for plug-ins in the Mixer in Logic Pro for iPad
-
- Effect plug-ins overview
-
- Instrument plug-ins overview
-
- ES2 overview
- Interface overview
-
- Modulation overview
- Use the Mod Pad
-
- Vector Envelope overview
- Use Vector Envelope points
- Use Vector Envelope solo and sustain points
- Set Vector Envelope segment times
- Vector Envelope XY pad controls
- Vector Envelope Actions menu
- Vector Envelope loop controls
- Vector Envelope point transition shapes
- Vector Envelope release phase behavior
- Use Vector Envelope time scaling
- Modulation source reference
- Via modulation source reference
-
- Sample Alchemy overview
- Interface overview
- Add source material
- Save a preset
- Edit mode
- Play modes
- Source overview
- Synthesis modes
- Granular controls
- Additive effects
- Additive effect controls
- Spectral effect
- Spectral effect controls
- Filter module
- Low, bandpass, and highpass filters
- Comb PM filter
- Downsampler filter
- FM filter
- Envelope generators
- Mod Matrix
- Modulation routing
- Motion mode
- Trim mode
- More menu
- Sampler
- Studio Piano
- Copyright
Retro Synth global and controller settings in Logic Pro for iPad
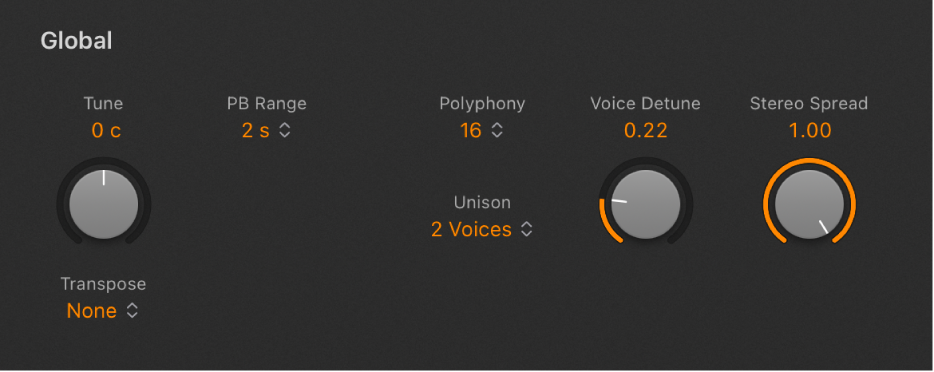
Retro Synth global controls are used to set the overall tuning, polyphony, and other aspects of your instrument.
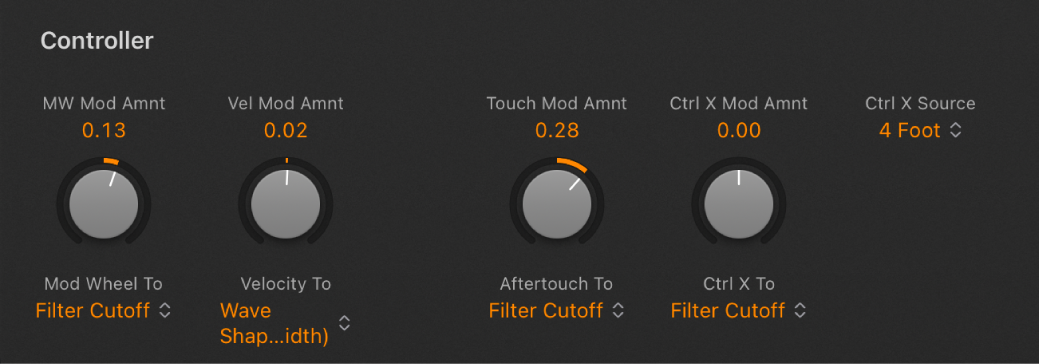
The controller settings let you assign MIDI keyboard features to Retro Synth controls. You can use three MIDI controllers—velocity, modulation wheel, and aftertouch—to change Filter Cutoff, Wave Shape (Pulse Width), or LFO/Vibrato Rate controls. Multiple MIDI controllers can be assigned to the same control, so you could change filter cutoff with both velocity and aftertouch, for example. Alternatively, a single MIDI controller can be assigned to multiple Retro Synth parameters—with aftertouch affecting both filter cutoff and LFO speed, for example.
If you’re new to synthesizers and the concepts behind modulation controls, see Intro to synthesizers.

Global parameters
Tune knob and field: Tune Retro Synth in semitone steps.
Transpose pop-up menu: Choose a value to transpose Retro Synth ±2 octaves.
PB Range pop-up menu: Choose a value to set the maximum upward/downward pitch bend. Pitch bend modulation is typically performed with your MIDI keyboard pitch bend wheel or joystick.
Polyphony pop-up menu: Choose the maximum number of notes that can be played simultaneously (up to 16) or run as a monophonic synthesizer.
If you choose Legato and play in a legato style (strike a new key while holding another) the envelope generators are triggered only for the first note you play legato, and continue their curve until you release the last legato played key. This means that if you play legato, a portamento occurs (the portamento time is set with the Autobend / Glide Time control). If you release each key before pressing a new one, the envelope is not triggered by the new note, and there is no portamento.
If you choose Mono, staccato playing retriggers the envelope generators every time a new note is played.
Unison pop-up menu: Set the number of voices played in unison mode. Behavior in unison mode depends on the Polyphony parameter value. One of the strengths of polyphonic analog synthesizers is unison—or stacked voices—mode. Traditionally, in unison mode classic analog polysynths run monophonically, with all voices playing simultaneously when a single note is struck. Because the voices of an analog synthesizer are never perfectly in tune, this results in a rich, chorus-like effect with great sonic depth.
Polyphonic unison mode: When 2–16 voices are selected in the Polyphony pop-up menu, voices are stacked, but you can play polyphonically.
Monophonic unison mode: When Mono or Legato is chosen in the Polyphony pop-up menu, all voices are stacked, but you can only play monophonically or in a legato style.
Voice Detune knob and field: Tune Retro Synth in cents (1 cent = 1/100th semitone).
Stereo Spread knob and field: Set the amount of voice panning, relative to the center position. Voices are panned left or right in an alternating, symmetrical pattern.
Note: Detuning and panning works in Single and Double voice mode. In Double voice mode, detuning and panning affects the respective voice pairs.
Controller parameters
The modulation targets available in the pop-up menus listed below change when different synthesizer engines are active.

MW Mod Amnt knob and field: Set the maximum modulation depth for your keyboard mod wheel.
Mod Wheel To pop-up menu: Choose a modulation target for your keyboard mod wheel.
Vel Mod Amnt knob and field: Set the maximum modulation depth with keyboard velocity.
Velocity To pop-up menu: Choose a target for modulation with keyboard velocity.
Touch Mod Amnt knob and field: Set the maximum modulation depth with keyboard aftertouch.
Aftertouch To pop-up menu: Choose a target for modulation with keyboard aftertouch.
Ctrl X Mod Amnt knob and field: Set the maximum modulation depth with the MIDI controller chosen in the Ctrl X Source pop-up menu.
Ctrl X To pop-up menu: Choose a target for modulation with the MIDI controller chosen in the Ctrl X Source pop-up menu.
Ctrl X Source pop-up menu: Choose a MIDI continuous controller to use as a control source.
Note: This modulation source is ideal for use with MIDI CC#4 Foot Controller that’s often used in conjunction with aftertouch. It’s also useful for MPE devices that offer enhanced controller functions.
Download this guide: PDF