Add borders and rules (lines) in Keynote for iCloud
You can add a solid, dashed, or dotted rule (line) above or below a paragraph in a text box or shape.
Note: If the text is in a table cell, you can add a border around the cell. See Add borders and gridlines.
Add a border or rule
Go to Keynote for iCloud
 , then sign in to your Apple Account (if necessary).
In your presentation, click in a blank line, a paragraph, or select multiple paragraphs where you want to add a border or rule.
In the Format
 sidebar on the right, click the Layout button near the top.
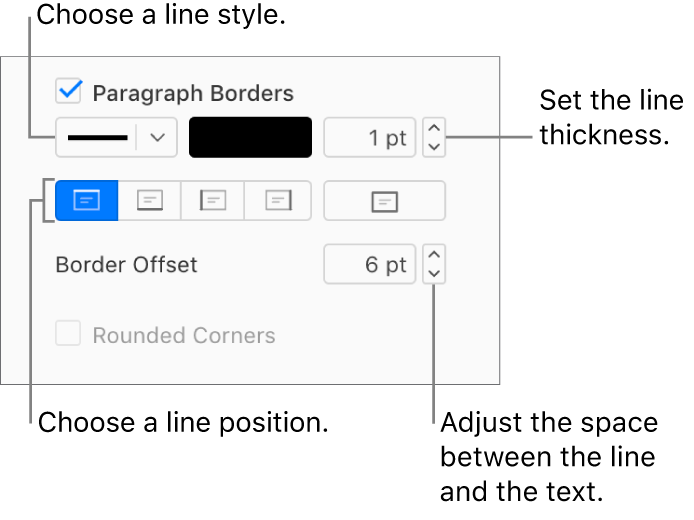
Select the Paragraph Borders checkbox, then click the pop-up menu below the checkbox and choose a line style.

Do any of the following:
Add one or more lines: Click the top or bottom position buttons (below the line style pop-up menu and color well).
Choose a line thickness: Click the arrows for the value field next to the color well (or type a number in the field).
Choose a line color: Click the color well, then choose a color. To choose from a wider variety of colors, click More or Custom, then make your choices.
Choose the amount of white space between the line or border and the text: Click the Offset arrows.
Remove a border or rule
Borders and rules can be created in different ways, so if you’re not sure how one was added, you can try these methods to remove it.
Go to Keynote for iCloud
 , then sign in to your Apple Account (if necessary).
In your presentation, click the Layout button near the top of the Format
 sidebar on the right.
Do one of the following:
If the rule is above or below a line of text (or a blank line): Click in the text above or below the rule, or in the blank line immediately above or below the rule.
If rules appear above or below multiple paragraphs: Drag to select everything (text, blank lines, and so on) that has a rule above or below it.
Deselect the Paragraph Borders checkbox.
If the Paragraph Borders checkbox isn’t selected, make sure you click immediately above or below the rule.
Note: If you’re having trouble removing a border or rule as described above, click it. If selection handles appear, it’s actually a shape object, and you need to press the Delete key on the keyboard to remove it. (If you see a small x at the corners of the shape or ends of the line, it’s locked. You need to unlock it before you can delete it.)