Logic Pro User Guide for iPad
-
- What is Logic Pro?
- Working areas
- Work with function buttons
- Work with numeric values
-
- Intro to tracks
- Create tracks
- Create tracks using drag and drop
- Choose the default region type for a software instrument track
- Select tracks
- Duplicate tracks
- Reorder tracks
- Rename tracks
- Change track icons
- Change track colors
- Use the tuner on an audio track
- Show the output track in the Tracks area
- Delete tracks
- Edit track parameters
- Start a Logic Pro subscription
- How to get help
-
- Intro to recording
-
- Before recording software instruments
- Record software instruments
- Record additional software instrument takes
- Record to multiple software instrument tracks
- Record multiple MIDI devices to multiple tracks
- Record software instruments and audio simultaneously
- Merge software instrument recordings
- Spot erase software instrument recordings
- Replace software instrument recordings
- Capture your most recent MIDI performance
- Route MIDI internally to software instrument tracks
- Record with Low Latency Monitoring mode
- Use the metronome
- Use the count-in
-
- Intro to arranging
-
- Intro to regions
- Select regions
- Cut, copy, and paste regions
- Move regions
- Remove gaps between regions
- Delay region playback
- Trim regions
- Loop regions
- Repeat regions
- Mute regions
- Split and join regions
- Stretch regions
- Separate a MIDI region by note pitch
- Bounce regions in place
- Change the gain of audio regions
- Create regions in the Tracks area
- Convert a MIDI region to a Session Player region or a pattern region
- Rename regions
- Change the color of regions
- Delete regions
-
- Intro to chords
- Add and delete chords
- Select chords
- Cut, copy, and paste chords
- Move and resize chords
- Loop chords on the Chord track
- Edit chords
- Work with chord groups
- Use chord progressions
- Change the chord rhythm
- Choose which chords a Session Player region follows
- Analyze the key signature of a range of chords
- Create fades on audio regions
- Extract vocal and instrumental stems with Stem Splitter
- Access mixing functions using the Fader
-
- Intro to Step Sequencer
- Use Step Sequencer with Drum Machine Designer
- Record Step Sequencer patterns live
- Step record Step Sequencer patterns
- Load and save patterns
- Modify pattern playback
- Edit steps
- Edit rows
- Edit Step Sequencer pattern, row, and step settings in the inspector
- Customize Step Sequencer
-
- Effect plug-ins overview
-
- Instrument plug-ins overview
-
- ES2 overview
- Interface overview
-
- Modulation overview
- Use the Mod Pad
-
- Vector Envelope overview
- Use Vector Envelope points
- Use Vector Envelope solo and sustain points
- Set Vector Envelope segment times
- Vector Envelope XY pad controls
- Vector Envelope Actions menu
- Vector Envelope loop controls
- Vector Envelope point transition shapes
- Vector Envelope release phase behavior
- Use Vector Envelope time scaling
- Modulation source reference
- Via modulation source reference
-
- Sample Alchemy overview
- Interface overview
- Add source material
- Save a preset
- Edit mode
- Play modes
- Source overview
- Synthesis modes
- Granular controls
- Additive effects
- Additive effect controls
- Spectral effect
- Spectral effect controls
- Filter module
- Low, bandpass, and highpass filters
- Comb PM filter
- Downsampler filter
- FM filter
- Envelope generators
- Mod Matrix
- Modulation routing
- Motion mode
- Trim mode
- More menu
- Sampler
- Studio Piano
- Copyright
Subtractive synthesizer components
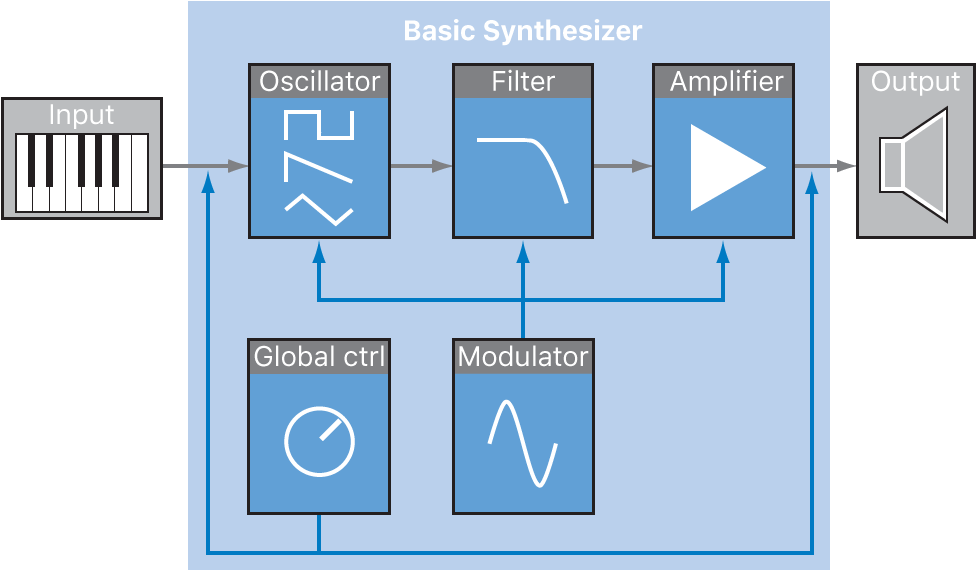
The front panel of most subtractive synthesizers provides similar signal-generating and processing modules—coupled with a number of modulation and control modules. The signal-generating and processing modules typically run from left to right, mirroring the synthesizer signal flow.

Signal-generating and processing components
Oscillators: Generate the basic signal. This is usually a waveform that is rich in harmonics. See Oscillators. Many synthesizers provide more than one oscillator, and almost all synthesizer oscillators can generate several waveform types.
Filter section: Used to alter the basic signal by filtering out (removing) portions of the frequency spectrum. Many synthesizers have a single filter that is applied universally to all oscillator signals. Multioscillator synthesizers can provide multiple filters, allowing each oscillator signal to be filtered in a different way. See Filters overview.
Amplifier section: Used to control the level of the signal over time. The amplifier has a module known as an envelope, which is divided into several elements that provide level control for the beginning, middle, and end portions of your sound. Simple synthesizers generally have a single envelope, which is used to control the oscillator (and filter) over time. More complex synthesizers can provide multiple envelopes. See Amplifier envelope overview.
Modulation and control components
Modulators: Used to modulate the signal-generating and processing components. Modulations can be machine-based—automatically generated by a synthesizer component—or can be manually activated by using the modulation wheel, for example. Most synthesizers have a component called an LFO (low frequency oscillator) to provide a waveform that modulates the signal. See Modulation overview.
Global controls: Set the overall characteristics of your synthesizer sound, such as tuning, glides between notes, pitch bends, and monophonic or polyphonic playback. See Global controls.
Download this guide: PDF