
Create, open, and convert documents in TextEdit on Mac
You can create, open, and save a document in rich text, plain text, Microsoft Word, OpenDocument, Web Archive, and HTML formats. You can also lock a document to prevent editing, or export a document as a PDF.
Create a new document
Open the TextEdit app
on your Mac.Do one of the following:
If you have iCloud Drive turned on for TextEdit: A TextEdit dialog appears. Click New Document in the bottom left. See Store files in iCloud Drive.
If TextEdit is already open: Choose File > New.
When the document opens, begin typing or dictate text.
If Apple Intelligence* is turned on, you can use Writing Tools to help you find the right wording and tone. See Use Writing Tools with Apple Intelligence.
TextEdit automatically saves your documents as you work on them. You can also do any of the following:
Change the file name and where it’s saved: Choose File > Save, name the document, choose a location (such as iCloud Drive or “TextEdit — iCloud”) in the Where pop-up menu, then click Save.
If you save documents in iCloud, they’re available on all your devices where you have iCloud Drive turned on.
If you don’t see the pop-up menu, click TextEdit in the iCloud section of the sidebar.
Add metadata: In rich text documents only, choose File > Show Properties, then enter the information, such as an author, organization, or copyright.
Add tags to make a document easier to find: See Use tags to organize files.
Open a document
You can open documents in Microsoft Word, OpenDocument, Web Archive, HTML, rich text, and plain text formats. You can also change the formatting of HTML and RTF files when you open them.
In the TextEdit app
on your Mac, choose File > Open.Select the document, then click Open.
If your document is stored in iCloud Drive, you can select TextEdit in the iCloud section of the sidebar, then double-click your document.
To see the default formatting of an HTML or RTF file, choose TextEdit > Settings, then click Open and Save.
Convert to plain or rich text
When you create a rich text document, you can apply formatting options, such as justification or stylized text. Plain text documents don’t have formatting options.
In the TextEdit app
on your Mac, open a document.Do one of the following:
Remove all formatting: Choose Format > Make Plain Text.
Note: When you change a rich text document to plain text, the document loses all text styles and formatting, and the document saves as a .txt file.
Allow formatting, tables, and images: Choose Format > Make Rich Text. The document saves as a .rtf file.
If there’s a format you prefer for new documents, you can set the default format. Choose TextEdit > Settings, click New Document, then select “Rich text” or “Plain text” below Format.
Save a document in other formats
New TextEdit documents are in rich text format by default, but you can save a document in Microsoft Word, OpenDocument, Web Archive, HTML, rich text, and plain text formats. You can also export it as a PDF.
In the TextEdit app
on your Mac, open a document.Do any of the following:
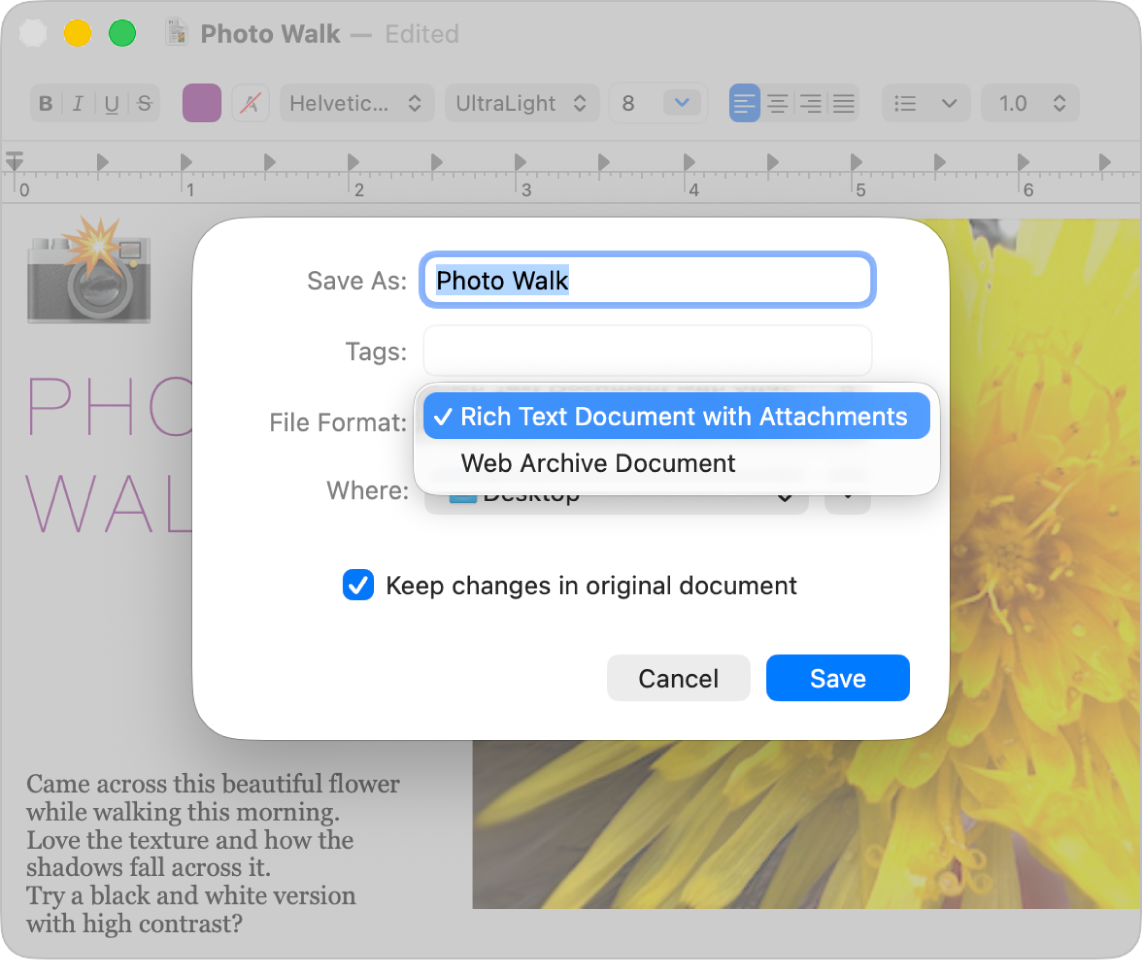
Change the format: Choose File > Save, choose a format in the File Format pop-up menu, then click Save.
Create a PDF: Choose File > Export as PDF.
Save a copy
In the TextEdit app
on your Mac, open a document.Hold down the Option key, then choose File > Save As.
Enter a name for the copy, then click Save.
The copy remains open, and you can edit it.
Prevent edits
In the TextEdit app
on your Mac, open a document.Do any of the following:
Make a document read-only: Choose Format > Prevent Editing.
If you own a read-only document, you can choose Format > Allow Editing to edit the document again. Others can make a copy of the document to edit it.
Lock a document: Place the pointer to the right of the document title at the top of the document window, click the arrow that appears, then click the Lock button
 .
.A locked TextEdit document can’t be edited or deleted. If you own a locked document, you can click the Lock button
to edit it. Others can make a copy of the document to edit it.
If you want to edit documents with additional features beyond what’s possible with TextEdit, see Pages User Guide for Mac.