Final Cut Pro User Guide for Mac
- Welcome
- What’s new
-
- Intro to importing media
- If it’s your first import
- Organize files during import
-
- Import from Image Playground
- Import from iMovie for macOS
- Import from iMovie for iOS or iPadOS
- Import from Final Cut Pro for iPad
- Import from Final Cut Camera
- Import from Photos
- Import from Music
- Import from Apple TV
- Import from Motion
- Import from GarageBand and Logic Pro
- Import using workflow extensions
- Record into Final Cut Pro
- Memory cards and cables
- Supported media formats
-
- Intro to effects
-
- Intro to transitions
- How transitions are created
- Add transitions and fades
- Quickly add a transition with a keyboard shortcut
- Set the default duration for transitions
- Delete transitions
- Adjust transitions in the timeline
- Adjust transitions in the inspector and viewer
- Merge jump cuts with the Flow transition
- Adjust transitions with multiple images
- Modify transitions in Motion
- Add adjustment clips
-
- Add storylines
- Use the precision editor
- Conform frame sizes and rates
- Use XML to transfer projects
-
- Intro to sharing projects
- Share to Apple devices
- Share on the web
- Send a video frame to Pixelmator Pro
- Share in email
- Share stereo or spatial video
- Batch sharing
- Share using Compressor
- Create share destinations
- Change metadata for shared items
- View the status of shared items
- Speed up exports with simultaneous processing
- Glossary
- Copyright and trademarks
Create motion tracks manually in Final Cut Pro for Mac
In Final Cut Pro, you can manually create motion tracks and assign effects or clips to existing motion tracks.
In certain workflows, you may have to create a motion track independently of the asset (the effect or clip) that you want to assign to it. For example, you could create a motion track while waiting for the final asset to be created, or revise a tracking image (such as a logo) and then assign it to the existing motion track.
Create a motion track independent of any effect or clip
You can create motion track without having to drag an effect or a clip (such as a title, logo, generator, or still image) to the viewer.
In Final Cut Pro, select a clip in the timeline.
Position the playhead so that the clip appears in the viewer.
Do one of the following:
Open the Video inspector, scroll to the Trackers section, then click the New Tracker button (+) at the top of the Trackers section.
If the selected clip has an existing motion track, click the down arrow to the right of the Tracker button at the top of the viewer, then click Create New Tracker.
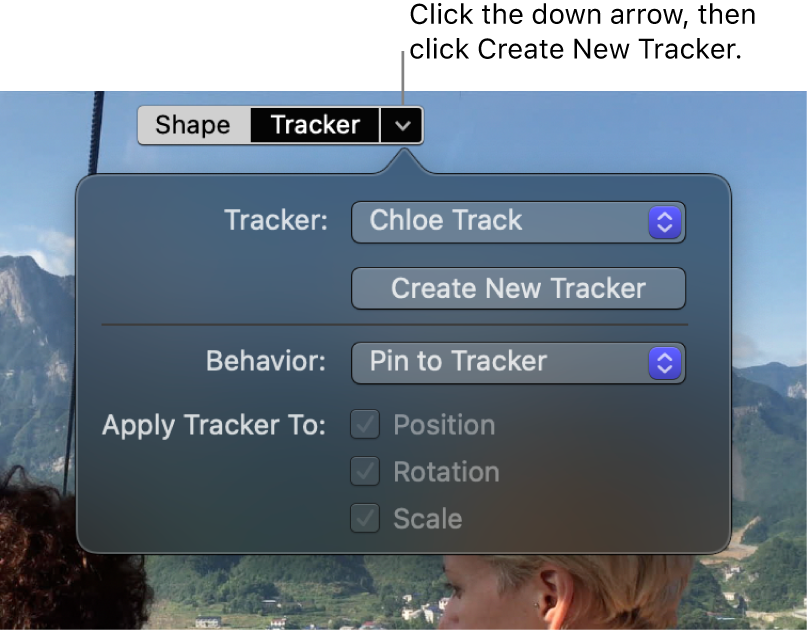
The new tracker appears in the Trackers section of the inspector, and an onscreen tracker appears in the viewer.
Position the tracker over the object that you want to track.
If necessary, you can use the onscreen controls to better fit the tracker to the object.
Tip: To use machine learning to recognize objects or regions of potential interest for tracking, press the Option key while dragging the tracker in the viewer. As you drag, the tracker snaps to suggested images, objects, and faces in the video.
Click Analyze.
Final Cut Pro analyzes motion in the clip and generates keyframes for the new motion track.
You can connect this motion track with any effect shape mask or image (or other clip) on the same clip. See Assign an effect or clip to an existing motion track, below.

Assign an effect or clip to an existing motion track
After Final Cut Pro has analyzed a video clip and generated object tracking data for it, it’s easy to reuse the tracking data with other effects or clips (such as images, titles, generators, or video clips).
You can connect any effect shape mask or clip to an existing motion track on the same clip (or on a connected clip at the same playhead location).
In the Final Cut Pro timeline, select a clip that has been analyzed for object tracking and has existing tracking keyframes.
Position the playhead so that the clip appears in the viewer.
Do one of the following:
Assign an effect shape mask: Open the Video inspector and select the shape mask in the Effects section.
Assign an image (or other clip): Track an image or other clip to a moving object.
Assign a connected clip: Select any connected clip at the same playhead location as the clip you selected in step 1, then click the pop-up menu in the lower-left corner of the viewer and choose Transform (or press Shift-T). For more information, see Resize, move, and rotate clips.
An onscreen tracker appears in the viewer.
At the top of the viewer, click the down arrow to the right of the Tracker button and choose a previously created motion track from the Tracker pop-up menu.
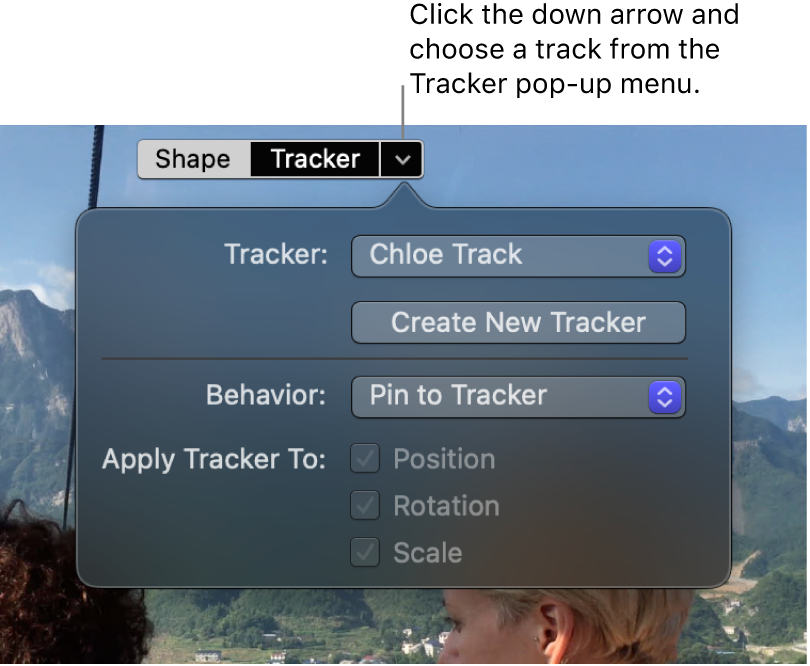
The effect shape mask or clip is assigned to the motion track you chose. You can adjust the shape or position of the item without affecting the tracking data. See Offset the position of a tracking effect.
Note: If there are multiple (connected) clips at the same playhead location, an additional pop-up menu (Tracker Source) appears in the Tracker controls. In the Tracker Source pop-up menu, choose the clip that contains the motion track you want to use.

Download this guide: PDF