Move and align objects in Keynote for iCloud
You can position objects anywhere on a slide, and align objects relative to one another using x and y coordinates, alignment guides, and more.
Note: If an object is placed inline with text, you can reposition it only by dragging (or cutting and pasting) it to a new location in the current text flow or to another text box or shape. To move an inline object outside a text box or shape, see Move an inline object to the slide.
Move an object
Click the object so its selection handles appear, or if it’s a table, so the row numbers and column letters appear.
Do one of the following:
For images, image galleries, shapes, text boxes, or charts: Drag it to a new location.
Note: If the object is positioned inline with the text, you can drag it to a new location within the current text flow, or to a different text box or shape on the slide.
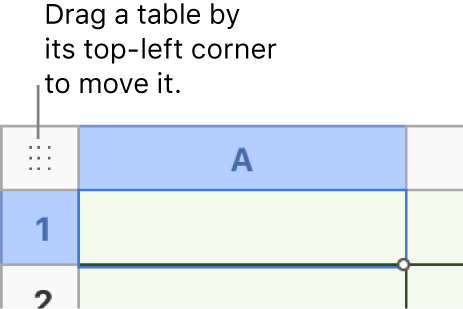
For tables: Drag the square in the top-left corner of the table. (If you don’t see the square, click outside the table, then click any cell in the table.)

Copy, cut, and paste an object
When you cut (rather than delete) an object using the steps below, the object you remove is saved so that you can paste it immediately into a new location in your presentation.
Select one or more objects to copy.
Do one of the following:
On a Mac: Press Command-C to copy the object or Command-X to cut it.
On a Windows computer: Press Control-C to copy the object or Control-X to cut it.
To paste the object, click where you want to paste it, then do one of the following:
On a Mac: Press Command-V.
On a Windows computer: Press Control-V.
Drag the object to reposition it on the page.
Move an object incrementally
You can move an object one point at a time to more precisely position it on the slide.
Select an object, then do any of the following:
Move the object one point: Press an arrow key.
Move the object ten points: Hold down the Shift key while you press an arrow key.
Align objects vertically or horizontally
You can align objects so they line up along a vertical or horizontal axis.
Select one or more objects, then click Arrange at the top of the Format
 sidebar on the right.
Click the Align pop-up menu, then choose an option.
If two or more objects are selected, the objects align to the object most in the direction you selected. For instance, if you align three objects to the left, the object that is farthest to the left doesn’t move, and the other objects align to it.
Equally space objects
You can quickly position objects so there is equal spacing between them (on a horizontal or vertical axis, or evenly along both axes).
Select three or more objects, then click Arrange at the top of the Format
 sidebar on the right.
Click the Distribute pop-up menu, then choose an option:
Evenly: Objects are spaced equally along both the horizontal and vertical axes.
Horizontally: Objects are spaced equally along a horizontal axis.
Vertically: Objects are spaced equally along a vertical axis.
Align an object using x and y coordinates
You can specify the exact location of charts, text boxes, shapes, and images using x and y coordinates.
Select a chart, text box, shape, or image.
Click Arrange at the top of the Format
 sidebar on the right, then enter the x and y values in the Position fields.
X: The value measured from the slide’s left edge to the object’s top-left corner
Y: The value measured from the slide’s top edge to the object’s top-left corner
If an object is rotated, the x and y coordinates refer to the current top-left corner, not to the original corner.
If the object is a line, use the Start and End controls to change the x and y values. The Start coordinates refer to the lower-left endpoint of the line when it’s first added to your presentation. If you later flip or rotate the line, the Start coordinates continue to refer to the original endpoint.
Turn alignment guides on or off
You can turn on alignment guides to help you place objects in relation to the slide edges or other objects on the slide. You can turn these guides off when you don’t need them.
Click the Tools button
 in the toolbar, then choose Preferences.
Click the Guides button, then select or deselect the checkbox next to a guide to turn it on or off.
Center guides: Indicate when the center of the object you’re dragging aligns with the center of the slide or the center of another object.
Edge guides: Indicate when an edge of the object you’re dragging aligns with an edge of the slide or the edge of another object.
Spacing guides: Indicate when three or more objects are spaced equally apart on the slide.