Use templates in Pages on iPad
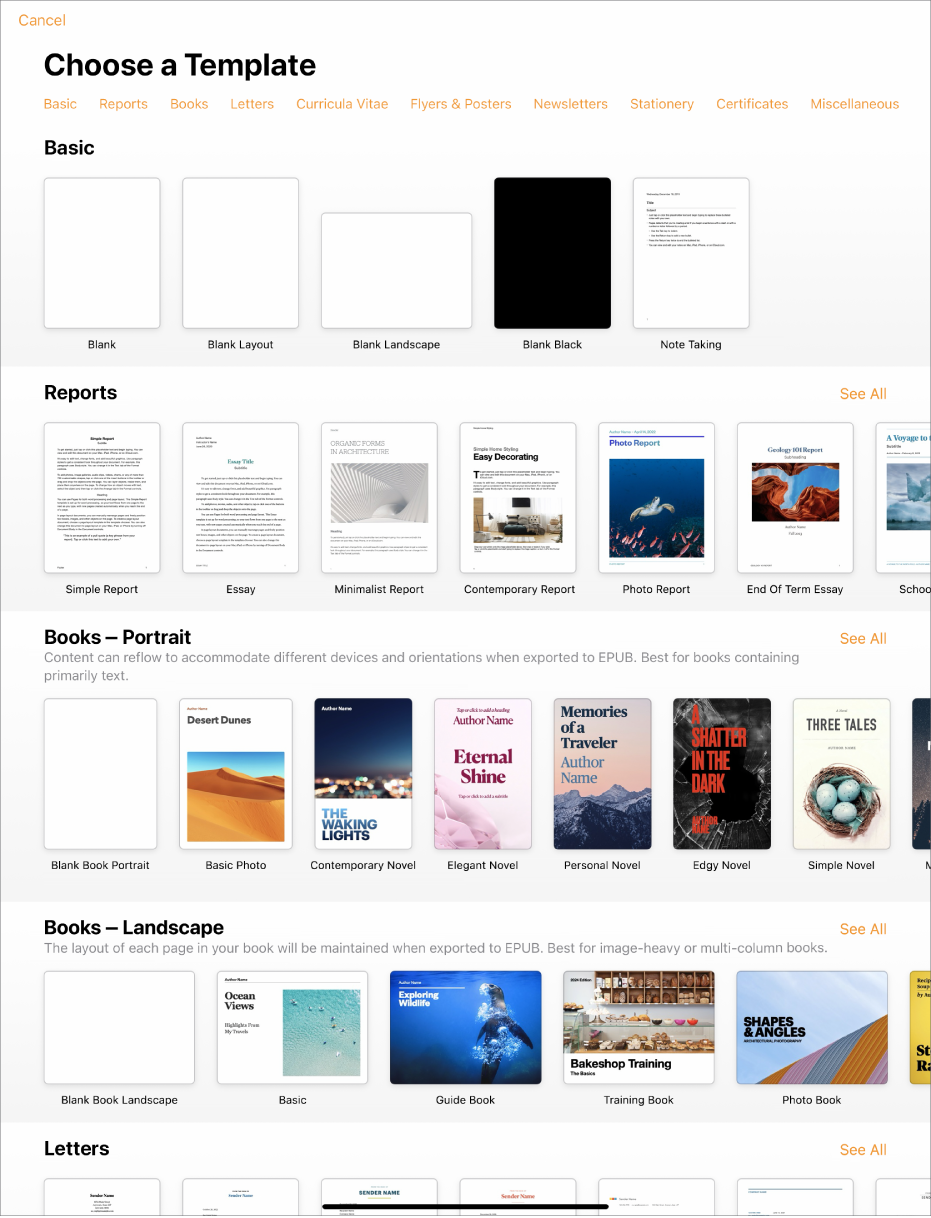
A template is a pre-designed set of elements for creating a document — a layout, placeholder text and images, and so on. Placeholders give you an idea of what a document created with this template might look like when you use its text and object styles. Every time you create a new document, you choose a template from the template chooser (shown below) as a starting point.

After you open a template, you can add your own text, replace placeholder graphics or delete them, and add new objects (tables, charts, text boxes, shapes, lines and media).
Pages templates are designed either for word processing or for page layout. For example, the Essay and School Newsletter templates, and book templates in portrait orientation, are for word processing. The Tab Flyer, Museum Brochure and book templates in landscape orientation are for page layout. After you begin creating your document, you can’t switch to a different template. You can, however, convert the document from word processing to page layout, and vice versa.
Pages templates are designed to use information from your My Card in Contacts. For information on setting up your My Card, see Set up your My Card in Contacts.
You may be prompted to authorise Pages to use information from your contacts when opening a template. To authorise, tap OK in the dialogue. If you don’t want to authorise the use of your contact information, tap Don’t Allow. For more information on allowing apps to use your contact information, see Allow apps to use your contact information.
Choose a template
Go to the Pages app
 on your iPad.
In the document manager, tap Choose a Template.
If a document is open, tap
 in the top-left corner to go to the document manager.
Scroll to find a template for the type of document you want to create, then tap one to open it.
To create a document that’s mainly text: Choose one of the Basic templates (these are all word processing templates).
To create a brochure, poster, or something with a more complex layout: Choose a template that looks closest to what you want to create. The choices include a variety of word processing and page layout templates.
To create an interactive book: Choose a book template. Books in EPUB format can be opened in Apple Books and other ebook readers.
To create a document with the formatting of a different language: Tap
 in the top-right corner of the template chooser, choose the language, then choose a template. See Format a document for another language.
Some templates aren’t downloaded to your computer until you choose them or open a document that uses the template. If your connection is slow or you’re offline when this happens, placeholder images in the document may appear at a lower resolution until you’re online again or the template finishes downloading.
If you need help creating your own document from the template, see Create your first document.
Convert to a word processing document
When you convert a page layout document to a word processing document, any existing objects, including text boxes, remain in the document. If text boxes are layered with objects, you need to adjust the layering and text wrap in the converted document.
Go to the Pages app
 on your iPad.
Open a document.
Tap in the corner of any page in the document (so nothing is selected), then tap
 .
.To make it easier to tap without accidentally selecting text or an object, zoom the page with two fingers. You can also tap the page thumbnail in Page Thumbnails view.
Tap the Document tab, then turn on Document Body.
Tap outside the controls to close them.
Important: If you change your mind, tap ![]() to undo the last action. You can keep tapping to step back through your most recent actions. You can also revert the document to a previous version.
to undo the last action. You can keep tapping to step back through your most recent actions. You can also revert the document to a previous version.
Convert to a page layout document
WARNING: When you convert a word processing document to a page layout document, any existing body text (text that’s not in a text box) is deleted, along with any objects set to move inline with text. If you want to save the body text and any inline objects, copy them before you convert the document, then add a text box to the new document and paste the copied text. Objects set to stay on the page and not move with the text are retained in the conversion.
Go to the Pages app
 on your iPad.
Open a document, tap in the corner of any page in the document (so nothing is selected), then tap
 .
.To make it easier to tap without accidentally selecting text or an object, zoom the page with two fingers. You can also tap the page thumbnail in Page Thumbnails view.
Tap the Document tab, turn off Document Body, then tap Convert in the dialogue.
Tap outside the controls to close them.
Important: If you change your mind, tap ![]() to undo the last action. You can keep tapping to step back through your most recent actions. You can also revert the document to a previous version.
to undo the last action. You can keep tapping to step back through your most recent actions. You can also revert the document to a previous version.
Use a business card template
The business card templates are page layout documents, so all text is contained in text boxes. You can speed up the process by grouping the edited text on the first card, copying it, then pasting it on each card.
Go to the Pages app
 on your iPad.
In the document manager, tap Choose a Template.
Scroll down to the Business Cards section, then tap a template.
The numbers at the bottom of each page indicate the commercial business card paper that the page is designed for. Edit only the page that corresponds to your business card paper.
Tap
 , tap Settings, then turn on Centre Guides, Edge Guides and Spacing Guides.
Select text on the first card, then type your own information.
To group the text boxes on the business card, tap and hold a text box, then tap the remaining text boxes with another finger. Lift your fingers, then tap Group.
Delete the text boxes on the next card.
If you delete text boxes on all the remaining cards, the alignment guides won’t appear. Alignment guides let you know when the object you’re moving is in alignment with other objects on the page.
Tap the grouped business card, then tap Copy.
Tap near the edge of the page, then tap Paste.
Drag the copy to one of the other cards until the alignment guides appear.
The alignment guides appear when the new copy is aligned exactly horizontally and vertically with the text on the adjacent cards.
Delete the text boxes on the next card, then paste again, and repeat steps 9 and 10 until all the cards are completed.
Tap
 , then tap Print.
If no printer is selected, tap Select Printer, then choose one.
Your device automatically searches for any nearby AirPrint printers. For more information, see the Apple Support article About AirPrint.
Tap Print.
If you’re using one of the commercial business card papers, print only the page that you edited.
You can modify any of the pre-designed templates, then save your changes to create your own custom templates. See Create and manage custom templates.